Working with text frames
Other languages: Português
| Installation • Usage • PDF issues • Imposition • Other |
This article is intended to be a compilation of operations pertaining to text frames.
| All Working with pages:
Working with text frames |
Creation
Create a text frame by:
- Clicking the Insert Text Frame icon on the toolbar
- or select Insert > Text Frame from menu
- Keyboard: T, or Alt+N, T.
This will enable your mouse to place and size the text frame: click-and-hold-down mouse button, then drag diagonally on the page. The click determines one corner of the frame, letting up the diagonally opposite corner. It may be more conventional to start with the upper-left hand corner, but you may start with any corner to its opposite.
Deletion
Delete a selected frame by pressing the Delete key, or alternatively Ctrl+X.
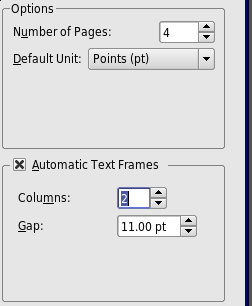
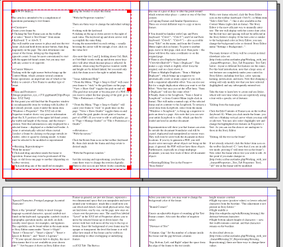
Automatic Text Frame Creation
Context Menu
Clicking with the right mouse button brings up the Context Menu, which contains several common frame operations, an important one of which is the ability to convert a Text Frame to another type of frame.
Size and Position
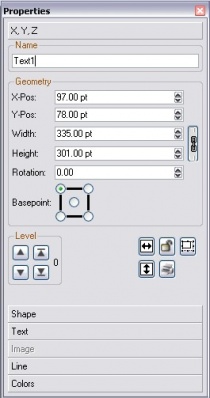
At this point you will find that the Properties window is an indispensible item for working with Scribus. If not already present, open it under the menu item Windows > Properties. In v1.2.4, this is Tools > Properties. The XYZ tab of the Properties window shows very precise information about the X,Y position of the upper left hand corner, the width and height of the frame, and the frame's rotation. Note that information is only displayed for a selected frame -- displayed as a dashed red border. A frame is automatically selected when created. Unselect a frame by clicking on the page outside its borders, select it again by clicking inside. A frame must be selected to be modified or repositioned.
Resizing, Repositioning
With the mouse:
- Click-and-drag anywhere inside the frame to reposition. Frames may even be positioned off the page, or slid from one page to another (depending on Scribus version).
- Click-and-drag any of the small red rectangles along the border to resize the frame.
With the Properties window:
There are three ways to change the individual settings --
- editing with the keyboard
- clicking on the up or down arrows to the right of each value. The keyboard up and down arrows will accomplish the same thing.
- using the mousewheel on each setting -- usually hovering the cursor will be enough, if not, click on the value first
Also note that for 2 and 3, holding down Ctrl, Shift, or Ctrl+Shift (works with up and down arrow keys also) will alter which decimal place is affected. In addition, when using the Properties window width and height are by default linked, but you need only click the chain icon to the right to unlink them.
Note that in versions 1.3.5+ (at this time), holding down Ctrl, Shift, etc., will only modify the digit changed when using the scroll wheel of the mouse.
Some Additional Help
- From the Menu, Page > Snap to Grid (v1.2.4: View > Snap to Grid) will cause your frame to "stick" to the grid lines on the page. View > Show Grid toggles the grid on and off. (The grid does not print or become part of a PDF.) If you want to adjust the line spacing of the grid, go to File > Preferences > Guides.
- From the Menu, Page > Snap to Guides (v1.2.4: View > Snap to Guides) will cause your frame to "stick" to guide lines on the page. View > Show Guides toggles them on and off. (Like the grid, guides do not print or become part of a PDF.) If you want to edit or add guides, go to Page > Manage Guides or File > Preferences > Guides.
Rotation
With the mouse:
Click the Rotate Item icon on the toolbar (keyboard: R), then click inside the frame and drag-rotate to desired angle.
With the Properties window:
Just like resizing and repositioning, you have the same three ways to change the rotation digitally. There is also an icon just below (looks something like one of a pair of dice) to alter the point around which rotation takes place -- center or one of the four corners.
Copying Frames and Similar Operations
There are several different ways to copy or move frames.
- You should be familiar with Copy and Paste (keyboard: Ctrl+C, Ctrl+V) and Cut and Paste (keyboard: Ctrl+X, Ctrl+V) -- also accessible from Edit on the menu, and from the Context Menu (right-click in frame). To paste to another page, move to that page, click on it, then paste -- the frame will have the same coordinates as on the original page.
- There is also Duplicate (keyboard: Ctrl+Alt+Shift+D) Item > Duplicate. This makes a copy which is slightly offset from the original, and on a layer above it.
- There is Multiple Duplicate, Item > Multiple Duplicate, which brings up a requestor to automatically create as many copies as you wish, with a sequential adjustable offset. You can also use this for a single duplication when you want to set the offset. Note that once you set the offset here, Item > Duplicate will use this same offset.
- It's also possible to drag an item with the right mouse button. After releasing the button, a dialog asks to either copy or move the item or to cancel the operation.
- Finally, there is the Scrapbook, Item > Send to Scrapbook (v1.3.x) or from Context Menu (right-click in frame). This will make a named copy of the selected frame and its contents to the Scrapbook. To retrieve a saved item from Scrapbook, select from the menu Windows > Scrapbook (in v1.2.4, Tools > Scrapbook), to bring up a requestor to paste an item to a page. Also note that you can save your entire Scrapbook to a file, which can then be loaded and used in another document.
Experimentation will show you that frames can even be outside the document boundaries and still be copied, duplicated and manipulated in various ways. They will even be saved with the document in these locations. If you try to generate a PDF, you will receive error messages about objects not being on the page; if ignored, the PDF will not have these objects. Furthermore, especially in a large multipage document, you may lose track of these off-document objects.
Entering/Editing Text in the Frame
Story Editor
With a text frame selected, click the Story Editor icon on the toolbar (keyboard: Ctrl+Y), or Menu item Edit > Edit Text...; this is also available in the Context Menu (right-click in frame). The Story Editor is the most efficient way to manually enter text. The text will display with the correct font color, but the font face and spacing will not be reflected in the Story Editor's display. If the font color is similar to the background color in Story Editor, you may change the background color as desired: Story Editor menu Settings > Background....
The many features of Story Editor will be covered in detail elsewhere (also see Properties: Text Tab below - layout is different but features are the same). For this brief introduction, note that a large array of text features are completely under your control in Story Editor, including font face, color, spacing, kerning, justification, and more. Note that changing a setting will only modify text that you have selected (highlighted) and any subsequently entered text.
Take the time to learn how to create and use Styles, which will save time when you are repetitively using a font with a specific set of features.
Editing from the main page
Click the Edit Contents of Frame icon on the toolbar (keyboard: E). When you click inside the frame, you will see a blinking vertical cursor where you may add or edit text. You may also select (highlight) text and change the highlighted text features in Properties > Text. As you can see the choices are analogous to those in the Story Editor.
Editing All the text in the frame
If not already selected, click the Select item icon on the toolbar (keyboard: C | note that if you are in Edit Contents of Frame mode, pressing C will enter text in the frame). Now select the frame whose text you wish to edit. At this point if you make changes in Properties: Text, all text in the frame will be modified.
Special Characters, Foreign Language Accented Characters
There is the potential ability to insert foreign language accented characters, special symbols not found on the keyboard, typographic symbols (such as typographic quotation marks, em dash, en dash, variably sized spaces, for example), and ligatures. This capability can be found either in the main menu or Story Editor menu under Insert > Glyph, Insert > Character, Insert > Quote, Insert > Spaces & Breaks, and Insert > Ligature.
- If your special character fails to display, this most often means that it is not available in your chosen font. Just because it shows in Story Editor does not mean it will show on the page.
- Also see Typography.
Loading Text from a File
Load text from a file from the Context Menu (right click in frame) > Get Text, or from the menu File > Import > Get Text. You may also Append Text (Get Text will replace whatever is already in the frame). You may also load a file into Story Editor.
There are also the special files of "lorem ipsum" text, that can most easily be accessed from the Context Menu (right-click in frame), under Sample Text (from Menu: Insert > Sample Text). Scribus has this in several language versions, in addition to Latin.
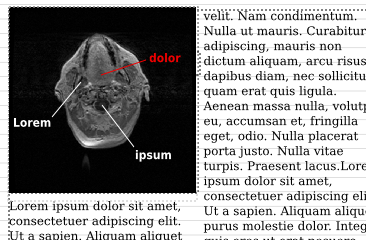
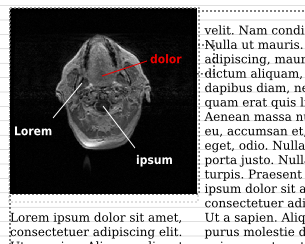
The Problem of Uneven Lines in Columns
If you place text into a frame with two or more columns, you may see that the lines do not line up from one column to the next, and especially likely when combining a text frame and superimposed image frame. You can also see this when you have two separate text frames side-by-side.
Here is a video that shows how to fix this (version 1.3.3.x):
Scribus Video: Drop caps, baseline, text frame columns
| The Problem looks like this: use View > Show Baseline Grid to see these lines |
The Solution looks like this: |
 |
|
To solve this, apply a Paragraph Style. You can create and edit Styles from Edit > Styles, but since you also want to apply the Style, go to Story Editor, click Edit > Edit Styles. This brings up the Style Manager. Either click on Default Paragraph Style or click the New button, then select Paragraph Style. Inside the Distances and Alignment box you will see a button which by default says Fixed Linespacing. Click this button and select Align to Baseline Grid. Now go back to Story Editor and apply this style to the paragraph(s) as needed. Alternatively you can also select the Style in the Text tab of Properties palette.
In v 1.3.3.x, go to Edit > Paragraph Styles in the Main Menu, or Edit > Styles in Story Editor. Click and hold the icon next to the linespacing adjustment (upper left of Distances box), and you will be able to choose Align to Baseline Grid.
Set or adjust the spacing for Baseline Grid in File > Preferences > Guides for future documents, or File > Document Setup > Guides for the current document.
Linking One Frame to Another
Text may be continued from one frame to another, on the same page or different pages.
Here are the steps:
- Select the first frame
- Click the Link Text Frames icon on the toolbar (keyboard: N)
- Click the second frame -- that's it.
- Continue clicking to continue linking further frames. Remember that the links go in the order that you click from one to the next. When you are finished, click the Link icon or click outside of the linked frames to stop linking.
- To add more frames later, select the linked frames, then the Link icon, then the frame(s) you want to add. Newly added frames always are appended at the end.
Note that frames can be linked before or after they have any content.
Unlink Text Frames is operationally similar -- click the first frame, then the Unlink icon, then the frames to unlink.
Levels & Layers
Frames in general, not just text frames, represent a two-dimensional space that you manipulate and move around your workspace, much like a small note you can attach and detach. Like small physical notes, they are laid down, one by one, on the page, new ones on a layer over the previous ones. The small box labeled Level in the XYZ tab of Properties allows you to move the selected frame up or down layers; the arrows with bars will move all the way to the top or bottom. Since the background of your frame may be opaque or transparent, the level the frame is at will affect how much of the frame can be visible in relationship to other overlapping or underlying frames.
XYZ Tab: The Rest
The remaining buttons in the XYZ tab do the following:
- Flip the selected frame horizontally or vertically
- Lock a frame in place. Everything about your frame is locked -- size, position, contents. Copying and pasting a locked frame may produce unexpected results.
- Lock the size of the frame only. Note that the editing tabs disappear from the corners and sides.
- Enable/disable printing of the frame. Why? You may want to have a frame on the page that's a message to yourself or someone else, yet not be part of the printed finished work. Or the frame may just be a space-saver for some other purpose.
Properties: Shape Tab
Click the Shape tab in Properties. Near the top is a button with a square in the center. If you click that button, you may quickly switch to one of a group of set shapes from your original rectangle. In addition, if you click Edit Shape, you now have full vector-editing control of your shape.
Another angle on shapes and text frames:
You may also use the Polygon tool on the toolbar (use will be described in detail in another section) to create a regular polygon, which may then be converted using the Context Menu (right-click in the polygon) to Convert To > Text Frame. Note that before you enter text, you may want to change the background color of the frame.
Round Corners
Causes an adjustable degree of rounding of the Text Frame corners. Also note the effect of negative values.
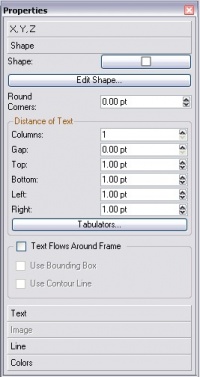
Distance of Text
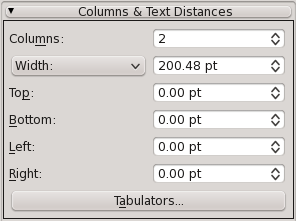
Columns, Gap: Set the number of columns inside the frame and the gap between columns. Unfortunately, you can't set different gaps yet.
Top, Bottom, Left, and Right adjust the space from the edge of the frame to the text inside.
Tabulators: For setting tab stops within your frame.
Versions 1.3.5/1.3.6
| With Scribus versions 1.3.5+, the settings for columns and text distances has moved to a sub-tab of the Text tab of Properties. Also, there is a toggle between setting the Gap between columns and the Width of the columns (all column widths, all gaps must be have the same value). |
Text Flows Around Frame
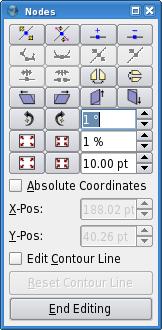
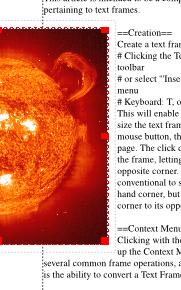
| Use this to determine what happens with text underneath the selected frame. Remember Levels & Layers? When you create an image frame, the Bounding Box (of the image) and the Contour Line are the same size and position. But click on Edit Shape... and you can change this Contour Line's size, position, and shape as desired -- just check the box for Edit Contour Line. |
Here is an example with an image frame, but this could just as well be a text frame or a shape: |
Properties: Text Tab
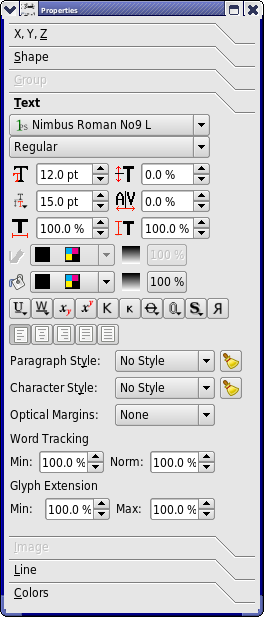
The top two buttons are straightforward: font face and style. Remember that if you are in Select Item mode, as opposed to Edit Contents mode, changes in the font settings will change all the text in the frame. To modify only some of the text, switch to Edit Contents mode (keyboard: E), then highlight the text you wish to modify.
Next is a block of six requestors with number values:
- Left top is font size
- Left middle is linespacing: the space between lines of text.
If you click and hold the button to the left of the spinbox a few seconds, a list shows up that offers three choices:- Fixed Linespacing
- Automatic Linespacing
- Align to Baseline Grid
In the first option, linespacing can be manually adjusted, but in the second it cannot. When you are in Select Item mode, linespacing will automatically change as you adjust font size (but can be adjusted afterward independently in fixed linespacing), in Edit Contents mode it will not automatically change unless you are in automatic linespacing. See Working with Story Editor: Font Size and Line Spacing about the different ways that font size and line spacing adjustments interact. You may change the degree of automatic line spacing in File > Preferences > Typography.
The third choice means that your text will be aligned to the Baseline Grid. The distance between those baselines is set in File > Document Setup > Guides for the current document, and in File > Preferences > Guides for future documents. You can show/hide the Baseline Grid with View > Show Baseline Grid.
- Left bottom is the width of characters -- note that height remains constant, and extreme changes distort the shape of glyphs.
- Right top raises (positive values) or lowers selected characters from the baseline. This adjustment is not present in Story Editor.
- Right middle is kerning: the distance between characters
- Right bottom adjusts height of characters -- note that width remains constant, and that characters remain on the baseline.
As described above in Resizing, Repositioning, there are three ways to change the values in these various spinboxes.
There are two color buttons next, the top referring to the outline and/or shadow if selected (see below, items 8 and 9), and the bottom to the fill color. Aside from the hue, you may also adjust saturation - click on the number for a list of choices.
A row of buttons follows, so from left to right:
- Underline, including spaces between words. Adjustable line width, vertical position. No adjustments in v1.2.4
- Underline, characters only. Adjustable line width, vertical position. Not available in v1.2.4
- Subscript. You may also want or need to adjust size. For v1.2.4, adjustments are in Effects > Preferences > Typography
- Superscript. Size is separately adjusted. For v1.2.4, adjustments are in Effects > Preferences > Typography
- (artificial) superiors. Applies to letters. Not available in v1.2.4
- (artificial) small caps. Letters only; sizes of other characters and capitalized letters not affected.
- Strikethrough. Line width and position adjustable. No adjustments in v1.2.4
- Adds an outline to the font, width adjustable. No adjustments in v1.2.4
- Creates a shadow, in essence a duplication of the character, just "behind" it, position adjustable. You may have both an outline and a shadow, but both will have the same color and shade. Not available in v1.2.4
- Reverse (horizontal mirror image) of selected letters. Can only be applied to the whole text, not to single paragraphs.
The next row of buttons selects justification. The rightmost button forces every line to be fully justified, which can produce unexpected results.
This applies to versions 1.3.3.x, where Styles are simpler than 1.3.4+:
The Style button allows for easy application of a set of font features. There are no default styles, these are user-created. See the Menu item Edit > Paragraph Styles... or Edit > Line Styles... to create a New style, or Save and Import styles.
For more on styles, see Working with Story Editor:Styles.
In versions 1.3.4+, there has been a major enhancement of Styles, so we now see a collection of new buttons, and selectors. See this page for additional information.
Lastly, the Language button chooses a language for automatic hyphenation. As you can see in this picture, the Language button has been removed in 1.3.4 -- you can still find this in File > Document Setup > Hyphenator for the current document, or in File > Preferences > Hyphenator for future documents. Also, there is a Language selector in the Style Manager in 1.3.4.
Properties: Line Tab
The Line of a Text Frame refers to the border of the frame. The first thing to be aware of is that the default setting for Line Color is None, so regardless of the settings in the Line Tab, nothing will show until the Line Color is set. Set the Line Color in Properties > Colors, where you can choose a color for Lines and Fill of frames and polygons.
Otherwise, the various settings for Line are straightforward. If a setting is greyed-out, it does not apply to frames.
Properties: Color Tab
As noted above, the Line Color refers to the border of the frame, with the default being None.
Fill Color means background color of the frame. None for a Fill Color means that the background is transparent. Text Color can be set in the Text Tab in Properties, or in Story Editor.
Shade refers to saturation of the color, so that 0% should represent a neutral grey scale color. Opacity refers to the relative opacity/transparency, with 100% being totally opaque, 0% totally transparent. It is worth noting at this point that some PDF versions and some PDF viewers do not support transparency.
Overprinting versions 1.3.4 and above
Knockout versus Overprinting are described here.
Please note that you are not limited to colors you see displayed in the Color Tab, nor are you compelled to have all these choices. See the Menu item Edit > Colors to add, edit, or remove colors. Removing colors can simplify the use of Scribus, and does reduce saved file size.
