Creating a Graph, Part 2: Difference between revisions
| Line 82: | Line 82: | ||
xmark = int(scribus.valueDialog('Tick Mark Interval', 'Enter X Interval for Tick Marks')) | xmark = int(scribus.valueDialog('Tick Mark Interval', 'Enter X Interval for Tick Marks')) | ||
xtick = xorigin | xtick = xorigin | ||
xscale = xaxis/xrange # this | xscale = xaxis/xrange # this gives you typographic points per data unit | ||
yrange = int(scribus.valueDialog('Maximum Y Scale', 'Enter Top Y Value\n(Scale)')) | yrange = int(scribus.valueDialog('Maximum Y Scale', 'Enter Top Y Value\n(Scale)')) | ||
ymark = int(scribus.valueDialog('Tick Mark Interval', 'Enter Y Interval for Tick Marks')) | ymark = int(scribus.valueDialog('Tick Mark Interval', 'Enter Y Interval for Tick Marks')) | ||
ytick = yorigin | ytick = yorigin | ||
yscale = yaxis/yrange # this | yscale = yaxis/yrange # this gives you typographic points per data unit | ||
scribus.setRedraw(1) | scribus.setRedraw(1) | ||
scribus.setUnit(0) | scribus.setUnit(0) | ||
Revision as of 01:22, 19 May 2006
| You may also be interested in: Automatically Creating a Graph |
This page will start with the script graph.py, and create a new graph2.py to add some additional features.
graph.py makes a simple graph with X and Y axes, labels for the axes, and a title. With graph2.py we will add the ability to assign a scale to the axes, make user-defined tick marks, and then give some feed back about the typographic features of this graph.
New requestors
    xrange = int(scribus.valueDialog('Maximum X Scale', 'Enter Top X Value\n(Scale)'))
    xmark = int(scribus.valueDialog('Tick Mark Interval', 'Enter X Interval for Tick Marks'))
The first asks for the value for the total X axis in the units of the graph (no need to name the units here), which we need to convert to an integer. The second asks for the number of units between tick marks on the X axis scale.
From this we can calculate a typographic scale for our graph, using the fact that we have set the width of the graph with the variable xaxis:
xscale = xaxis/xrange # this give you typographic points per data unit
Now we can generate the tick marks, using a while loop:
    while (xtick < (xorigin + xaxis)):
        xt = scribus.createLine(xtick, yorigin, xtick, yorigin - 10)
        scribus.setLineWidth(t, xt)
        scribus.setLineColor(color, xt)
        scribus.setFillColor(color, xt)
        xtick = xtick + xmark * xscale
These tick marks will appear above the axis line, but could as easily appear below -- change -10 to +10.
Now, as an aid to the Scribus user, let's add a text box that will help with the page measurements for adding other features with Scribus. Also, we will have a reminder about the settings we supplied:
    caption = "Scale for this graph\n\n" "X: " + str(xmark) + "units/mark\n" + "Y: "
    caption = caption + str(ymark) + "units/mark\n" + str(xmark) + " units = "
    caption = caption + str(xscale * xmark) + " pts (X)\n" + str(ymark) + " units = "
    caption = caption + str(yscale * ymark) + " pts (Y)"
# These caption statements can be combined to one line
    S = scribus.createText(200, 120, 150, 80)
    scribus.setTextColor("Blue", S)
    scribus.setText(caption, S)
    scribus.setTextAlignment(1, S)
    scribus.setFont("Nimbus Roman No9 L Bold", S)
    scribus.setFontSize(8, S)
Now, the Results
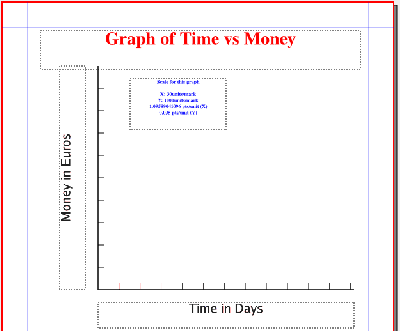
So, here is an example of the final result:
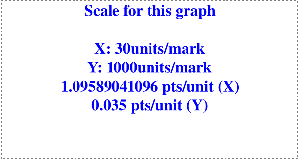
| And here is the information we can use in Scribus (detail of the small text frame above): |
You would consider this a working frame to use while adding other features. The graph could be edited, and the frame then deleted or disable printing.
Script: graph2.py
| For users of Windows and 1.3.3.x in general, see the notes and kludge in Automatically Creating a Graph in order to adjust for Windows fonts, and for the inability to create vertical lines in 1.3.3.x -- even the vertical tick marks in graph2.py would have to be handled this way. |
#!/usr/bin/env python

# File: graph2.py
# originally 2006.05.17
# this version 2006.05.18
# creates basic graph with axis labels

import scribus

xorigin = 150      # x-origin of graph
yorigin = 450     # y-origin of graph
xaxis=400      #x axis length
yaxis=350      #y axis length
color="Black"
a = 1.5 # width of lines
t = 0.8 # width of scale markers
if scribus.haveDoc():
    title = scribus.valueDialog('Title','Enter Title')
    xlabel = scribus.valueDialog('X-axis Label','Enter X-Label')
    ylabel = scribus.valueDialog('Y-axis Label','Enter Y-Label')
    xrange = int(scribus.valueDialog('Maximum X Scale', 'Enter Top X Value\n(Scale)'))
    xmark = int(scribus.valueDialog('Tick Mark Interval', 'Enter X Interval for Tick Marks'))
    xtick = xorigin
    xscale = xaxis/xrange # this gives you typographic points per data unit
    yrange = int(scribus.valueDialog('Maximum Y Scale', 'Enter Top Y Value\n(Scale)'))
    ymark = int(scribus.valueDialog('Tick Mark Interval', 'Enter Y Interval for Tick Marks'))
    ytick = yorigin
    yscale = yaxis/yrange # this gives you typographic points per data unit
    scribus.setRedraw(1)
    scribus.setUnit(0)
    d = scribus.createLine(xorigin,yorigin,xorigin+xaxis,yorigin)
    scribus.setLineWidth(a, d)
    scribus.setLineColor(color, d)
    scribus.setFillColor(color, d)
    e = scribus.createLine(xorigin,yorigin,xorigin,yorigin-yaxis)
    scribus.setLineWidth(a, e)
    scribus.setLineColor(color, e)
    scribus.setFillColor(color, e)
    xtick = xtick + xmark * xscale
    ytick = ytick - ymark * yscale
    while (xtick < (xorigin + xaxis)):
        xt = scribus.createLine(xtick, yorigin, xtick, yorigin - 10)
        scribus.setLineWidth(t, xt)
        scribus.setLineColor(color, xt)
        scribus.setFillColor(color, xt)
        xtick = xtick + xmark * xscale
    while (ytick > (yorigin - yaxis)):
        yt = scribus.createLine(xorigin, ytick, xorigin + 10, ytick)
        scribus.setLineWidth(t, yt)
        scribus.setLineColor(color, yt)
        scribus.setFillColor(color, yt)
        ytick = ytick - ymark * yscale
    T = scribus.createText(60, 45, 500, 60)
    scribus.setTextColor("Red", T)
    scribus.setText(title, T)
    scribus.setTextAlignment(1, T)
    scribus.setFont("Nimbus Roman No9 L Bold", T)
    scribus.setFontSize(28, T)
    XL = scribus.createText(xorigin, yorigin + 20, 400, 40)
    scribus.setText(xlabel, XL)
    scribus.setTextAlignment(1, XL)
    scribus.setFont("Luxi Sans Regular", XL)
    scribus.setFontSize(20, XL)
    YL = scribus.createText(90, 450, 350, 40)
    scribus.setText(ylabel, YL)
    scribus.setTextAlignment(1, YL)
    scribus.setFont("Luxi Sans Regular", YL)
    scribus.setFontSize(20, YL)
    scribus.rotateObject(90,YL)
    caption = "Scale for this graph\n\n" "X: " + str(xmark) + "units/mark\n" + "Y: "
    caption = caption + str(ymark) + "units/mark\n" + str(xmark) + " units = "
    caption = caption + str(xscale * xmark) + " pts (X)\n" + str(ymark) + " units = "
    caption = caption + str(yscale * ymark) + " pts (Y)"
# These caption statements can be combined to one line
    S = scribus.createText(200, 120, 150, 80)
    scribus.setTextColor("Blue", S)
    scribus.setText(caption, S)
    scribus.setTextAlignment(1, S)
    scribus.setFont("Nimbus Roman No9 L Bold", S)
    scribus.setFontSize(8, S)

    scribus.redrawAll()

