Get Started With Scribus:8
Get Started With Scribus 2006
| ||||||||
Chapter 8
|
- What Can You Do With Scribus
- Scribus And Its Sisters
- Empty, White Spaces
- Cover Page
- Working With Layers On A Page
- Design Multiple Pages
- Create Final Page Layouts
- Design With Graphics And
Freedom - Set Fire With SVG Graphics
- Publishing Demands Freedom.PDF.
- Travel At The Speed Of Scribus
- Contributors
- GNU Free Documentation Licence
Design With Graphics And Freedom
Many Unique Page Designs
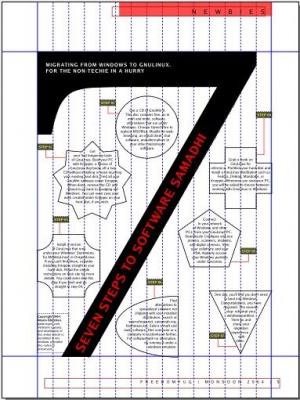
Page five jumps into graphics-oriented, creative freedom where page geometry is conformed to with defiance. Take a look at the screenshot here. It looks dramatic, but thanks to the power of Scribus, is quite easy to produce.
|
Here are the steps we'll follow to create this page:
|
Copy Elements to Template
First, start by creating a new template in Edit > Templates... (Edit > Master Pages... in v1.3.x). Choose a right page from the drop-down, call it '7steps'. A blank page graces your display. Then, click on your earlier FeatureR template, and drag the mouse from the top-left to the bottom-left of the page to select the red band on top with the text, and the page folio and page number text frame at the bottom. Click on your new '7steps' template. Right-click anywhere and select 'Paste.' Alternatively, go to Edit > Paste from the menus. The elements are pasted into the exact position they belong to, thanks to the intelligence coded into Scribus. Change text to 'Newbies'.
Visual Guidance
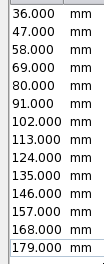
Amazingly, the layout has 15 columns that align elements. Check the next screenshot. So, go to Page > Manage Guides... . Add a Vertical guide at 36mm.
Then add 11mm to this to create another guide. Continue adding 11 mm to the result of the previous guide, until you read 179mm. Check 'Lock Guides' and click OK. Close the templates palette and add page five to your document, in the Pages palette, by dragging the '7steps' template to after page 4 in the page palette.
Seventh Wonder
In a new text frame that you draw on the page, enter the letter '7' in Georgia Roman, at say, 200 points. Right-click the text frame, and from the popup menu, choose, Convert To > Outlines. The letter '7' is converted into a graphics outline. Align it to the top-left of your margin, and drag the lower-right to the second-last column, bottom-right. The graphic '7' automatically scales to fit the whole page.
Do you want to tweak the shape of '7'? Go to the Properties palette, to the 'Shape' tab, and click on 'Edit Shape.' Enjoy. Finally, padlock the '7'.
Important: For each text frame or other element that is placed on this page, please uncheck Text flows around frame so you don't have text jumping to another position suddenly.
Shapes for Text
Drawing the shapes is easy. Click and hold on the square icon in Tools, and discover more than 16 shapes you can freely drag and draw in Scribus. Click on the 'Polygon' tool and you can even draw stars with as many corners as you wish and other options. For each shape, choose Fill 'None' and Stroke 'Black'. The thickness and style of the line is in the 'Line' tab of Properties, where I chose a 1 point thick solid line. Discover more styles and options for yourself here. The design looks good because all shapes are aligned to any two random vertical guides. In effect, that makes the width of each shape a multiple of 11mm, since the guides are all 11mm apart.
Right-click each shape, and choose Convert To > Text Frame. Then, enter the text using the story editor, or type it in directly, and apply a special '7steps body text' paragraph style, defined earlier.
Use Scrapbook for Steps
For the label 'Step 01' draw a box, fill it with a color, draw a text frame on top with the text 'Step 01', draw a red line to connect it to its relevant shape, and then group the whole label with its line, using Item > Group in the menus.
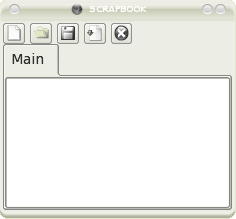
Go to Tools > Scrapbook menu. A dialog box displays, called the 'Scrapbook' meant for oft-used elements. Drag and drop the label into it. Also drag and drop the red-colored story-ender box. You can then drag and drop the label to any other shape, edit the text, re-draw or edit the red line to connect to it, and have lots of fun.
Rotated Text
In another fresh text frame, typeset 'Seven Steps To Software Samadhi' in all-caps, red letters. In the Properties palette, rotate it to 60 degrees in the 'X,Y,Z' tab. You could fine-tune the angle until it fits perfectly. Add all the other text on the page in their text frames, and you're done.


