Working with Scribus: How to begin: Difference between revisions
C schaefer (talk | contribs) mNo edit summary |
C schaefer (talk | contribs) mNo edit summary |
||
| Line 13: | Line 13: | ||
* The starting place of Scribus is the Document. Although it may seem counterintuitive, the Document (A4, USLetter, or whatever) is only a space within which to work. It is shown in white, but in reality has no color, and cannot be assigned a color. | * The starting place of Scribus is the Document. Although it may seem counterintuitive, the Document (A4, USLetter, or whatever) is only a space within which to work. It is shown in white, but in reality has no color, and cannot be assigned a color. | ||
* On this Document working space are placed objects, most of which are called frames. If they are text frames, they may contain text and only text, image frames contain only images. There are also shape, polygon, and line frames. One kind of frame can be converted to another, but once converted loses its previous features. For example, an image frame converted to a text frame loses the image it may have contained. | * On this Document working space are placed objects, most of which are called frames. If they are text frames, they may contain text and only text, image frames contain only images. There are also shape, polygon, and line frames. One kind of frame can be converted to another, but once converted loses its previous features. For example, an image frame converted to a text frame loses the image it may have contained. | ||
* These frames can be freely moved around the page (and for advanced versions of Scribus, off the page, and slid from one page to another), resized, and the contents manipulated. Thus, the idea of Scribus is to manipulate the layout of your Document with a high level of precision | * These frames can be freely moved around the page (and for advanced versions of Scribus, off the page, and slid from one page to another), resized, and the contents manipulated. Thus, the idea of Scribus is to manipulate the layout of your Document with a high level of precision – placement, resolution, color management – so that work can be done at a professional level. | ||
* Some things on the screen never appear in the final work. These are margin indicators, guides, and grid lines, which are simply used to help align objects on the page and with respect to each other. | * Some things on the screen never appear in the final work. These are margin indicators, guides, and grid lines, which are simply used to help align objects on the page and with respect to each other. | ||
* Some other things which one might expect would always print are not required to do so. Objects may be hidden from view or visible yet not print or end up in the final product (PDF). This feature is, in fact, quite useful. | * Some other things which one might expect would always print are not required to do so. Objects may be hidden from view or visible yet not print or end up in the final product (PDF). This feature is, in fact, quite useful. | ||
| Line 21: | Line 21: | ||
If you are using 1.2.4 or 1.2.5 versions of Scribus (if you don't see it in the title bar, check '''Help > About Scribus'''), you see a grey, featureless screen for the most part. Your first step is to create a Document to work with. | If you are using 1.2.4 or 1.2.5 versions of Scribus (if you don't see it in the title bar, check '''Help > About Scribus'''), you see a grey, featureless screen for the most part. Your first step is to create a Document to work with. | ||
On the menu, click '''File > New'''. On the toolbar, the leftmost icon accomplishes the same thing. This brings up a requestor, for which you can select paper size, margins (margins can be used, for example, to remind you of the limits of where your printer can print on the page) and the units | On the menu, click '''File > New'''. On the toolbar, the leftmost icon accomplishes the same thing. This brings up a requestor, for which you can select paper size, margins (margins can be used, for example, to remind you of the limits of where your printer can print on the page) and the units – default is in points. You can select whether you want to see one page at a time or two pages side by side – keep in mind you are only creating the first page, other pages can be added later. | ||
You can also select to set up column guides | You can also select to set up column guides – these are only guides and do not set up text to be printed or displayed in columns. What they will do is help you align text frames on the page as columns. | ||
[[image:scribus_new_doc_12_en.png]] | [[image:scribus_new_doc_12_en.png]] | ||
Revision as of 23:12, 29 July 2006
This article presumes that you have in some way successfully downloaded Scribus, installed it, and have started it up, and now stare at the screen saying, "Now what do I do?".
If you find your way to the Scribus mailing list, you will read over and again that Scribus is a "layout program." It is not designed primarily with the features of a wordprocessor, such as OpenOffice.org's Writer, or Word, or WordPerfect. Rather, imagine someone working in design, wanting to do the layout for an advertisement, someone wanting to do an attractive, informative newsletter, a newspaper, a brochure, or even a book where the design and layout are in need of precise control.
In professional printing, the decisions about what is being printed and what this content is being printed on are quite separate decisions. The layout person is first of all concerned about the layout of that content, and then about the type of paper or other stock it is printed on, how many colors are desired, the type of printing equipment being utilised, and so on. Scribus is mainly about that layout part, but in the process will be able to produce something which can be taken to a professional printing business and meet their needs.
For the more casual user, Scribus is perfectly happy to work with a PC of whatever type, and print the results on a home printer, either color or black and white.
Lest we not forget, the output of Scribus need never reach the printed page. Scribus will make PDFs, which can be used for a presentation projected on a screen, or create PDF forms, and increasingly, PDFs are a desirable medium for the internet.
Philosophically Speaking...
Here are some elementary features of Scribus:
- The starting place of Scribus is the Document. Although it may seem counterintuitive, the Document (A4, USLetter, or whatever) is only a space within which to work. It is shown in white, but in reality has no color, and cannot be assigned a color.
- On this Document working space are placed objects, most of which are called frames. If they are text frames, they may contain text and only text, image frames contain only images. There are also shape, polygon, and line frames. One kind of frame can be converted to another, but once converted loses its previous features. For example, an image frame converted to a text frame loses the image it may have contained.
- These frames can be freely moved around the page (and for advanced versions of Scribus, off the page, and slid from one page to another), resized, and the contents manipulated. Thus, the idea of Scribus is to manipulate the layout of your Document with a high level of precision – placement, resolution, color management – so that work can be done at a professional level.
- Some things on the screen never appear in the final work. These are margin indicators, guides, and grid lines, which are simply used to help align objects on the page and with respect to each other.
- Some other things which one might expect would always print are not required to do so. Objects may be hidden from view or visible yet not print or end up in the final product (PDF). This feature is, in fact, quite useful.
OK, So Begin
Scribus 1.2.x
If you are using 1.2.4 or 1.2.5 versions of Scribus (if you don't see it in the title bar, check Help > About Scribus), you see a grey, featureless screen for the most part. Your first step is to create a Document to work with.
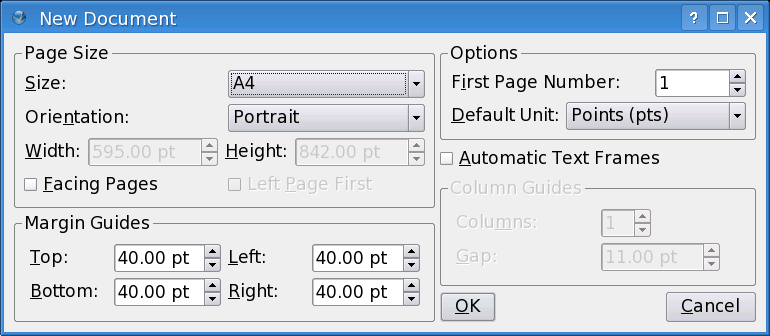
On the menu, click File > New. On the toolbar, the leftmost icon accomplishes the same thing. This brings up a requestor, for which you can select paper size, margins (margins can be used, for example, to remind you of the limits of where your printer can print on the page) and the units – default is in points. You can select whether you want to see one page at a time or two pages side by side – keep in mind you are only creating the first page, other pages can be added later.
You can also select to set up column guides – these are only guides and do not set up text to be printed or displayed in columns. What they will do is help you align text frames on the page as columns.
Scribus 1.3.x
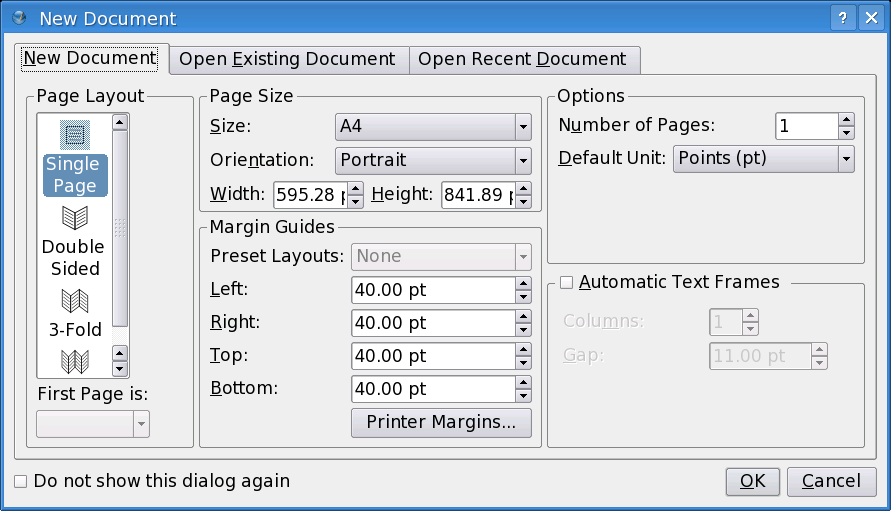
You can immediately know you are working with these versions by the fact that, when you startup Scribus, you automatically get the New File requestor, which also will allow you to alternatively open a pre-existing file. You also get several additional options, including starting with more than one page.
1.2.x and 1.3.x File Formats
Scribus 1.3.x files have a number of parameters for your work that were not a part of earlier versions, and therefore files saved with 1.3.x are more complex. The biggest effect on the user is that Scribus 1.3.x can load an earlier 1.2.x file, but will only save it in the newer format. Unfortunately, 1.2.x versions cannot load 1.3.x files, and an error will result.
So, if you need to share Scribus files with someone else, use the same version they do. If you have some older files, you do not need to convert them for 1.3.x, since they will still be able to be loaded.
You've Got Your Workspace, Your Scribus, What Are You Waiting For?
It's time to make some frames:
and
Have fun!

