Help:Manual Shapes: Difference between revisions
Jump to navigation
Jump to search
No edit summary |
No edit summary |
||
| Line 5: | Line 5: | ||
<h2>Working with Shapes & Polygons</h2>In [[Help:Manual_Frames|Working with Frames]] there is information on manipulation of frames which is applicable to all frame types. There we only explained how to start creation of shapes and polygons by using the appropriate toolbar icon, or using keyboard <b>S</b> or <b>P</b>. <p>With shapes and polygons, you have a number of choices to make with each about what kind of shape or polygon to create. All of these are vector drawings, so you can freely resize or edit them after creation. Let's start with shapes. | <h2>Working with Shapes & Polygons</h2>In [[Help:Manual_Frames|Working with Frames]] there is information on manipulation of frames which is applicable to all frame types. There we only explained how to start creation of shapes and polygons by using the appropriate toolbar icon, or using keyboard <b>S</b> or <b>P</b>. <p>With shapes and polygons, you have a number of choices to make with each about what kind of shape or polygon to create. All of these are vector drawings, so you can freely resize or edit them after creation. Let's start with shapes. | ||
<h3>Shapes</h3> <table> | <h3>Shapes</h3> <table width="80%"> | ||
<tr> | <tr> | ||
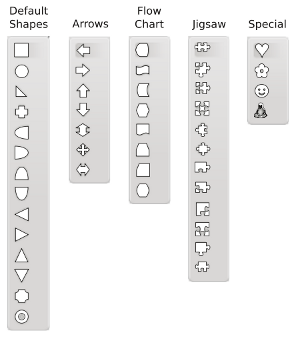
<td>Shapes are a collection of predetermined shapes, and with version 1.3.5+ have been greatly increased in number. The default shape when you start Scribus is the simple rectangular shape which the icon shows. Just to the right side of the shape figure on the toolbar is an arrow for a drop down list of subselections. Once you select from a drop down category and specific type (click with the mouse), you see the toolbar icon change to your selected shape. <i>Note: the appearance of the Shapes icons has been enhanced in the image to the right - they will not appear as distinct as this.</i> | <td>Shapes are a collection of predetermined shapes, and with version 1.3.5+ have been greatly increased in number. The default shape when you start Scribus is the simple rectangular shape which the icon shows. Just to the right side of the shape figure on the toolbar is an arrow for a drop down list of subselections. Once you select from a drop down category and specific type (click with the mouse), you see the toolbar icon change to your selected shape. <i>Note: the appearance of the Shapes icons has been enhanced in the image to the right - they will not appear as distinct as this.</i> | ||
Revision as of 21:49, 27 April 2011
Working with Shapes & Polygons
In Working with Frames there is information on manipulation of frames which is applicable to all frame types. There we only explained how to start creation of shapes and polygons by using the appropriate toolbar icon, or using keyboard S or P.
With shapes and polygons, you have a number of choices to make with each about what kind of shape or polygon to create. All of these are vector drawings, so you can freely resize or edit them after creation. Let's start with shapes.
Shapes
Polygons
Context Menu
Editing Shapes
This will be handled in EditingShapes.htmlits own section</a>, since it has much greater applicability than just to geometric figures.
