How to create your own colours: Difference between revisions
| Line 186: | Line 186: | ||
Sometimes you have a colour defined in another document that you would like to use in your current one. While you could re-create the colour manually it's usually much quicker to import the colour from the other document. | Sometimes you have a colour defined in another document that you would like to use in your current one. While you could re-create the colour manually it's usually much quicker to import the colour from the other document. | ||
With the {{Window|Colours|icons}} dialog open | With the {{Window|Colours|icons}} dialog open press the {{Button|Import}} button. | ||
You will now be presented with an {{Window|Open File|icons}} dialog where you can choose which document - Scribus SLA file - you want to import the colour from. Select a document and press {{Button|OK}} to import <u>all</u> of the colours from the selected document. (Press {{Button|Cancel}} to cancel the import.) | You will now be presented with an {{Window|Open File|icons}} dialog where you can choose which document - Scribus SLA file - you want to import the colour from. Select a document and press {{Button|OK}} to import <u>all</u> of the colours from the selected document. (Press {{Button|Cancel}} to cancel the import.) | ||
Revision as of 13:03, 13 April 2015
| Installation • Usage • PDF issues • Imposition • Other |
Button … Menu → Choice … Keyboard
Introduction
This article introduces you to the basics of colours in Scribus and shows you how to:
- Know the difference between the two main colour models.
- Navigate the Colours dialog.
- Create your own colours.
- Retrieve a colour from an existing colour palette.
- Copy/import colours from an existing document.
- Create your own "custom palettes".
Colour Basics
Scribus give you the choice creating colours using two different colour models: RGB and CMYK. A colour model is just a way of selecting a colour.
RGB
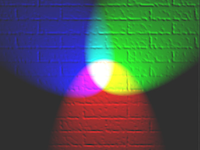
RGB is an acronym for "Red, Green and Blue" and is the standard used for visual displays. If you are not expecting your document to be printed then using RBG colours will be fine. You can find out much more about the RGB colour model here.
CMYK
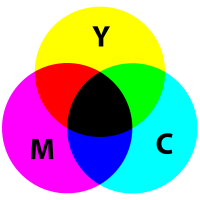
CMYK is an acronym for "Cyan, Magenta, Yellow and Key" and is the standard used in the printing industry. If you expect to get your document printed professionally you should try and use CMYK colours. Even if you are printing using a home/office printer you should think about using CYMK. (Look at the colour cartridge(s) in your printer. If one is light blue, one is purple or dark blue, and one is yellow then you're using something like CMYK.)
If you think you might need to use Colour Management - as briefly mentioned above - then you should use CMYK from the start. This will make it easier when you come to printing. You might be able to use RGB colours but your print shop will probably work with CMYK by default and might complain if you use RGB. You can find out much more about the CMYK colour model here.
- "If you will be printing your document, then use CMYK."
- "If your document is for on-screen use only, then you're okay to use RGB."
Spot Colours
Scribus also allows you to make a colour into a "Spot Colour". Spot Colours are more complicated than they seem and you can find out more information on them here and here, but you can think of them as an instruction to your print shop to use a special ink.
For instance, if you want a certain colour to be printed using a metallic ink - a shiny gold perhaps - then you should make this colour a Spot Colour. You should also be ready to explain to the print shop exactly what you want.
In general, don't create your own Spot Colours unless you know what you're doing.
The Colours Dialog
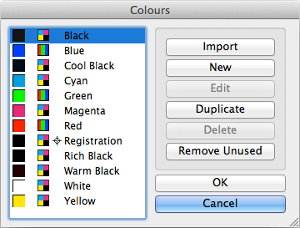
The ![]() Colours dialog is where you will manage all of the colours used in your document.
Colours dialog is where you will manage all of the colours used in your document.
To open the ![]() Colours dialog:
Colours dialog:
- Open Scribus and create a new document (unless you've already got a document open).
- Choose menu Edit → Colours…
You will be presented with a dialog that looks like that above.
The list on the left-hand side shows the colours already defined in your document. To do something with a colour it should be selected in this list before performing the action.
The buttons on the right have the following functions:
- Import lets you copy all of the colours from another document.
- New lets you create a new colour from scratch.
- Edit lets you change an already existing colour.
- Duplicate lets you copy an existing colour and alter the copy.
- Delete lets you remove a colour from your document (or replace it with another existing colour).
- Remove Unused deletes all the colours from your document that aren't being used by anything.
OK accepts any changes you've made, and Cancel undos any changes you've made.
The Colour Editor
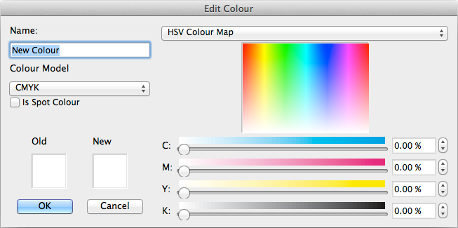
If you press the any of the New Edit or Duplicate buttons you will be presented with the ![]() Edit Colour dialog as above.
Edit Colour dialog as above.
At the top-left of the editor you will see the name of the colour you are working on. You can use any name you want - including spaces - as long as it's not already being used by another colour.
Below the name is a drop-down selector for the "Colour Model" - CMYK/RGB, as mentioned earlier.
Below that are two panels. The panel on the left shows the Old (original) colour, and the one on the right is the New (changed) colour. The Old colour is always "White" when you create a new colour. If you are editing a colour, the Old colour is what the colour was before you made any changes. If you are duplicating a colour, the Old colour is the original colour you are making a duplicate of. The New colour is always what will be created when you press OK.
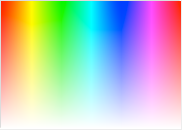
At the top-right of the dialog is the "Palette Selector" drop-down menu. By default this is set to "HSV Colour Map". Selecting from the HSV Colour Map gives you the multi-coloured rectangle like that above where you can click to select the colour under the mouse pointer.
Below the Colour Map are some sliders that you can use to alter the colour you are currently working on. Next to each slider is a text field where you can enter a value directly and to the right of each field is a set of spinner arrows that allow you to quickly increment/decrement that value.
Creating a new colour from scratch
With the ![]() Colours dialog open - choose menu Edit → Colours… if it's not already open - press the New button.
Colours dialog open - choose menu Edit → Colours… if it's not already open - press the New button.
You will be presented with the ![]() Edit Colour dialog.
Edit Colour dialog.
To create a new CMYK colour make sure the Colour Model is set to CMYK. To create a new RGB colour make sure the Colour Model is set to RGB.
It is recommended that you give the colour a name that relates to what you're using the colour for. For example, if you want a dark blue colour for the background to a banner then you should name the colour something like "Banner Background". Naming colours this way avoids confusion if you decide to change the colour later. For the same example, if you originally named the colour "Dark Blue" but wanted to change the banner background to red - instead of dark blue - you would have to rename the colour along with changing it. (And what if you changed your mind again?)
Click anywhere on the Colour Map to select the colour that is under the pointer. (Drag the pointer across the map to see the colour change.)
As you select a colour from the Colour Map the "New" colour panel - over on the left - will change to show you what the new colour will look like.
Use the sliders below the Colour Map to adjust the colour as you want it. Drag a slider to alter that component of the colour. For instance, if you are working on a CMYK colour, dragging the "C" slider will change the amount of Cyan in the colour. You can also set specific values for each colour component using the text input fields to the right of each slider.
Once you're happy with your new colour you can press OK to create it or, if you no longer want the new colour, press Cancel.
Creating a new colour from an existing palette
With the ![]() Colours dialog open press the New button.
Colours dialog open press the New button.
You will be presented with the ![]() Edit Colour dialog as before.
Edit Colour dialog as before.
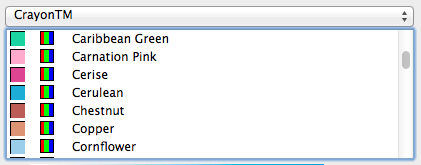
If you click on the Palette Selector drop-down menu - top-right - you will be presented with a named list of standard colour palettes to choose from. Selecting one of these palettes will change the Colour Map to a list of named colours, as shown above. You can select any of these colours by clicking on it.
For instance, click on the Palette Selector, scroll down until you get to the "CrayonTM" palette and click on it. You will see that the Colour Map has been replaced with a list of named colours. Clicking on a colour - for example "Aquamarine" - will change the colour you are editing to reflect the values that are stored for that named colour. (In Aquamarine's case it is a light blue.) You may also notice that the colour model may have changed. This is because some palettes are RGB palettes and some are CMYK palettes (there's no way to know before you start looking at one).
If you now change the colour values you do not change the colour in the standard palette. You are only changing your own copy of that colour.
When you pick a colour from one of the standard palettes, Scribus will automatically rename the colour as the name of the colour in the palette. You may want to rename it yourself to something more useful.
Picking colours from a standard palette can sometimes make it easier to get colours that work well together. There are dozens of palettes supplied with Scribus so why not have a look at some and see what you can find?
Editing an existing colour
With the ![]() Colours dialog open select a colour from the list on the left and press the Edit button.
Colours dialog open select a colour from the list on the left and press the Edit button.
You will be presented with the ![]() Edit Colour dialog as before but you will be editing the colour you selected.
Edit Colour dialog as before but you will be editing the colour you selected.
You can change the Colour Model and values - as you would do when creating a new colour - to anything you want.
Pressing OK makes the changes to the colour, while Cancel cancels any changes you made.
Duplicating a colour
With the ![]() Colours dialog open select a colour from the list on the left and press the Duplicate button.
Colours dialog open select a colour from the list on the left and press the Duplicate button.
You will be presented with the ![]() Edit Colour dialog as before but you are now editing a copy of the colour you selected.
Edit Colour dialog as before but you are now editing a copy of the colour you selected.
You will notice that the name of the colour has been temporarily changed to "Copy of <colour>" where <colour> is the name of the colour you originally selected. You should change this name to something better.
The original colour you selected will not change. Any change you make here will be to the new duplicate. Alter the Colour Model and/or values as you want.
Once you press OK your new colour will be created. Press Cancel if you no longer want the new colour.
Deleting a colour
With the ![]() Colours dialog open select a colour from the list on the left and press the Delete button.
Colours dialog open select a colour from the list on the left and press the Delete button.
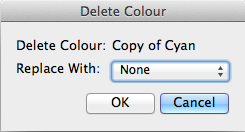
You will now be presented with a new ![]() Delete Colour dialog as above.
Delete Colour dialog as above.
Here you should select which other existing colour the deleted colour will be replaced with by using the drop-down menu. Any object that has been given the colour you are deleting - text, outline, fill, etc. - will have that colour replaced by the one you choose. For example, if you are deleting "Red" and replacing it with "Blue" then anything with "Red" as its colour will now be coloured "Blue".
Selecting "None" as the replacement colour will cause everything that has the colour you're deleting to not have any colour at all.
OK the dialog to really delete the colour, or press Cancel to cancel the deletion.
Removing unused colours
Sometimes your list of colours can become messy with lots of colours which you created for whatever reason but no longer want. You could go through the list, selecting each one that you know you're not using in turn, and deleting them but that can be quite a long process and you might accidentally delete one that you didn't mean to.
For this reason Scribus has the "Remove Unused Colours" function.
With the ![]() Colours dialog open press the Remove Unused button.
Colours dialog open press the Remove Unused button.
Once this button is pressed, Scribus will look at each colour in the list and check to see if anything is using that colour. If anything is using the colour then Scribus will ignore it and move on the the next. If nothing is using that colour then Scribus will immediately delete it without checking with you first. Once Scribus has been through all of the colours it will update the list to show only those colours that are being used by objects in your document.
Importing colours from another document
Sometimes you have a colour defined in another document that you would like to use in your current one. While you could re-create the colour manually it's usually much quicker to import the colour from the other document.
With the ![]() Colours dialog open press the Import button.
Colours dialog open press the Import button.
You will now be presented with an ![]() Open File dialog where you can choose which document - Scribus SLA file - you want to import the colour from. Select a document and press OK to import all of the colours from the selected document. (Press Cancel to cancel the import.)
Open File dialog where you can choose which document - Scribus SLA file - you want to import the colour from. Select a document and press OK to import all of the colours from the selected document. (Press Cancel to cancel the import.)
Importing gets all of the colours from the selected document and adds them to your open document. Once you've used the colour you want on an object you can use the "Remove Unused Colours" function to remove the others that were imported, if you want to.
Custom Palettes
Using the functions above you can create your own "custom palettes" which you can use in any other document.
- Create a new document.
- Set-up the colours as required. Make sure you get them right as they'll be used multiple times.
- Save the document with a good name. E.g. "Gardening Newsletters Palette".
- Close the document and create a new one.
- Use the Import button in the
 Colours dialog to copy the colours from your saved "palette" document into your new document.
Just remember that any changes you make to the colours you imported will not be reflected back to the "palette" document. And if you change the "palette" document colours you'll need to re-import them to see the changes.
Tutorial Instructions
In some of the tutorials on this wiki you will be instructed to create certain colours so that you can follow along with what's happening.
In such cases you will be given instructions such as:
- Create a new RGB colour "Violet" with values 146, 110 and 174.
In this case you would:
- Choose menu Edit → Colours…
- Press the New button.
- Change the name of the colour to "Violet" (without the quotes).
- Make sure the Colour Model is set to RGB.
- Use the sliders or entry fields to set "R" to 146, then set "G" to 110, then "B" to 174.
- Press the OK button to create the new colour.
- Press OK on the
 Colours to go back to your document unless you have to create more colours.
Similarly, if you were instructed to:
- Create a new CMYK colour "Goldenrod" with values 4%, 14%, 62%, 1%.
You would:
- Choose menu Edit → Colours…
- Press the New button.
- Change the name of the colour to "Goldenrod" (without the quotes).
- Make sure the Colour Model is set to CMYK.
- Use the sliders or entry fields to set "C" to 4%, then set "M" to 14%, then "Y" to 62%, then "K" to 1%.
- Press the OK button to create the new colour.
- Press OK on the
 Colours to go back to your document unless you have to create more colours.
The colour values given will always be given in the order R, then G, then B for RGB colours, or C, then M, then Y, then K for CMYK colours.
Conclusion
You've now seen how you can add colours to your document and remove colours which you don't want.
