Scripter/Images: Difference between revisions
No edit summary |
|||
| (52 intermediate revisions by 5 users not shown) | |||
| Line 1: | Line 1: | ||
{{Scripting Index}} | {{Scripting Index}} | ||
I decided to beef up this page a bit, since we get a number of questions about whether a script can be written for some task or other, and one quickly realizes that it takes some time to find all the scripts that deal with such a task. What people really need is a quick survey of what's out there, so that they can either modify some existing script themselves, or be able to ask for help with the modification for their particular needs. | |||
I'll try to start with simple scripts first, then go to more complicated or perhaps esoteric ones down the page. | |||
== [[Import an image in the way office-programs do]]== | |||
{| width=80% cellpadding=20px | | |||
|[[File:Directimageimportresults.png]] | |||
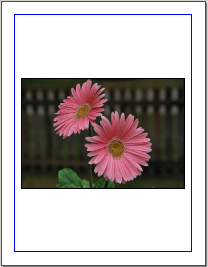
|This script does the simple task of taking an image file and making a standard image frame and loading it onto a page. In a modified state, it is one of the scripts included with Scribus, '''DirectImageImport.py'''. | |||
The presumption is that you will then resize and reposition this image in most cases. One downside in the modified script is its need for PIL, the Python Imaging Library. The advantage of PIL is that you end up with a frame exactly dimensioned for the image, and importantly the frame ends in a state of scaled to frame proportionally, so resizing keeps the proportions. | |||
|} | |||
== [[Image Wizard: Scale and Align an Image]]== | |||
{| width=80% cellpadding=20px | | |||
|[[File:ImageWizard3.png]] | |||
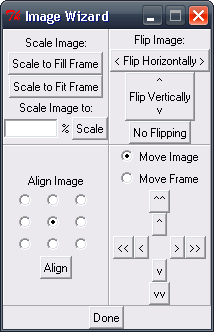
|With this idea that you have imported an image, but want to adjust various details about it, we come to '''Image Wizard'''. I confess I haven't tried this one to make sure it still works, but what it does is use tkinter to create a remote control-like structure for a number of manipulations as shown. While I can understand that for a Scribus novice this might seem a great tool, realistically most of these manipulations are easily done without a script. For example, right-clicking on an image frame brings up a context menu to adjust frame to image or image to frame. Flipping horizontally and vertically are one-click operations in the X,Y,Z tab. | |||
You might also have a look at [[Align an Image in its Frame]] . This does the simple task of aligning an image in the frame, such as upper left corner or centering, again using tkinter, though here you can select multiple image frames at once before running the script. | |||
Likewise, there is [[Scale an Image to Fill a Frame Proportionally]]. Just as with Image Wizard, this scaling of images is now done so easily on the main screen there is probably little need for this. | |||
Although what this script does is pretty straightforward, as you can see from looking at it, writing the tkinter commands for a dialog like this is rather involved. | |||
|} | |||
==[[Automatic import of images: Versions not requiring Tkinter]]== | |||
{| width = 80% cellpadding=20px| | |||
|[[File:Scribalbumexample.png]] | |||
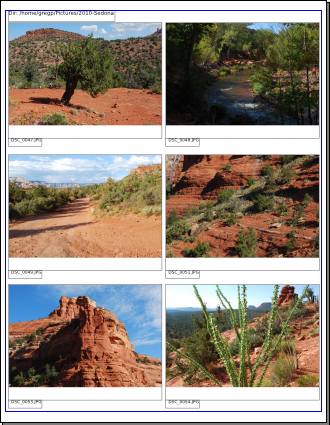
|In addition to this particular wiki page, you might also look at [[Automatic import of images from a directory using a script]] and [[Making a photobook from a directory of images using a script]]. All of these in their own way is operating from the point of view that you have a directory of images that you wish to incorporate into a Scribus document. It's one thing if you have half a dozen images, but what about a directory of 60 or 100? That's a lot of image frame creation! Even if you make some sort of template, you then have to keep track of where you are as you manually import the images. | |||
I started out thinking that tkinter was a desirable way to go, but I find tkinter rather ugly and hard to read, so I decided on finding a way to get around it. This results in a series of value dialogs to accomplish the same thing, though certainly more easy to understand and modify. For my personal use, I felt that either 4 or 6 images on a page served my purpose. Fewer images on a page allows for more annotations and commentary. There is almost always some need for post-script editing, but these scripts get the heavy-lifting out of the way. | |||
Here is another approach to automatic image loading: [[Gallery.py]]. The idea behind this script is that you have a document with image frames, empty or not, and you have selected a number of them. You run the scipt, and select a directory from which to obtain images. The script then goes down the selected frames, which may be on any page in your document, and loads from your chosen directory, and meanwhile, if you have Python Imaging Library, will adjust frame size so that it is proportional to the image. | |||
|} | |||
==[[Swap Images]]== | |||
This is just a simple utility to switch the images in 2 selected frames. If you work a lot with images, utilities like this can be timesavers. Note that the images don't have to be on the same page, just click the first, Shift-click the second, then run the script. | |||
This is undo-able, but you will need to click '''Undo''' twice, since there are two separate operations in the script. | |||
==[[Split Image Across Gutter]]== | |||
{| width = 80% cellpadding=20px | | |||
|[[File:SplitImageAcrossGutter2.png|450px]] | |||
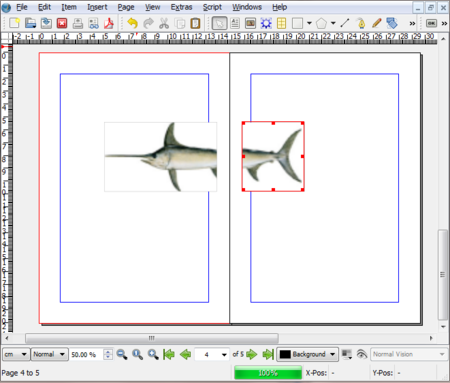
|This is trickier than you might think, mostly related to the "lost" space in the binding of a book. Obviously, you will need to know this lost space, since it is an entry you must make as the script runs. | |||
|} | |||
==[[Image crop, resize and CMYK conversion. Save and reload in TIFF format]]== | |||
I've not used this script, though it does generally seem to be a useful thing. The one thing I would question is whether the colorspace conversion is necessary, since we mostly recommend that users let Scribus do the colorspace conversion to CMYK. | |||
==[[Gallery.py]]== | |||
This is a little different approach to importing images. This script expects you to have created and selected one or more image frames. You are first shows a message that tells you have many frames you have selected. You are then presented with a file dialog to begin choosing images. | |||
In the 1.4.x series of Scribus versions, you go back to your starting directory rather than where you last were. There should be a drop-down list of directories you have recently accessed to help with navigation. On some systems, Preview may only work effectively if you right-click the file first, since left-clicking rapidly selects the file before you have a chance to see it in the preview window. When you have selected as many images as you want, click Cancel. You then can choose the width of the frame for resizing, if you have the Python Imaging Library. The script continues until it runs out of images or runs out of selected frames to fill. | |||
Latest revision as of 15:05, 10 December 2016
I decided to beef up this page a bit, since we get a number of questions about whether a script can be written for some task or other, and one quickly realizes that it takes some time to find all the scripts that deal with such a task. What people really need is a quick survey of what's out there, so that they can either modify some existing script themselves, or be able to ask for help with the modification for their particular needs.
I'll try to start with simple scripts first, then go to more complicated or perhaps esoteric ones down the page.
Import an image in the way office-programs do
Image Wizard: Scale and Align an Image

|
With this idea that you have imported an image, but want to adjust various details about it, we come to Image Wizard. I confess I haven't tried this one to make sure it still works, but what it does is use tkinter to create a remote control-like structure for a number of manipulations as shown. While I can understand that for a Scribus novice this might seem a great tool, realistically most of these manipulations are easily done without a script. For example, right-clicking on an image frame brings up a context menu to adjust frame to image or image to frame. Flipping horizontally and vertically are one-click operations in the X,Y,Z tab.
You might also have a look at Align an Image in its Frame . This does the simple task of aligning an image in the frame, such as upper left corner or centering, again using tkinter, though here you can select multiple image frames at once before running the script. Likewise, there is Scale an Image to Fill a Frame Proportionally. Just as with Image Wizard, this scaling of images is now done so easily on the main screen there is probably little need for this. Although what this script does is pretty straightforward, as you can see from looking at it, writing the tkinter commands for a dialog like this is rather involved. |
Automatic import of images: Versions not requiring Tkinter

|
In addition to this particular wiki page, you might also look at Automatic import of images from a directory using a script and Making a photobook from a directory of images using a script. All of these in their own way is operating from the point of view that you have a directory of images that you wish to incorporate into a Scribus document. It's one thing if you have half a dozen images, but what about a directory of 60 or 100? That's a lot of image frame creation! Even if you make some sort of template, you then have to keep track of where you are as you manually import the images.
I started out thinking that tkinter was a desirable way to go, but I find tkinter rather ugly and hard to read, so I decided on finding a way to get around it. This results in a series of value dialogs to accomplish the same thing, though certainly more easy to understand and modify. For my personal use, I felt that either 4 or 6 images on a page served my purpose. Fewer images on a page allows for more annotations and commentary. There is almost always some need for post-script editing, but these scripts get the heavy-lifting out of the way. Here is another approach to automatic image loading: Gallery.py. The idea behind this script is that you have a document with image frames, empty or not, and you have selected a number of them. You run the scipt, and select a directory from which to obtain images. The script then goes down the selected frames, which may be on any page in your document, and loads from your chosen directory, and meanwhile, if you have Python Imaging Library, will adjust frame size so that it is proportional to the image. |
Swap Images
This is just a simple utility to switch the images in 2 selected frames. If you work a lot with images, utilities like this can be timesavers. Note that the images don't have to be on the same page, just click the first, Shift-click the second, then run the script.
This is undo-able, but you will need to click Undo twice, since there are two separate operations in the script.
Split Image Across Gutter
Image crop, resize and CMYK conversion. Save and reload in TIFF format
I've not used this script, though it does generally seem to be a useful thing. The one thing I would question is whether the colorspace conversion is necessary, since we mostly recommend that users let Scribus do the colorspace conversion to CMYK.
Gallery.py
This is a little different approach to importing images. This script expects you to have created and selected one or more image frames. You are first shows a message that tells you have many frames you have selected. You are then presented with a file dialog to begin choosing images.
In the 1.4.x series of Scribus versions, you go back to your starting directory rather than where you last were. There should be a drop-down list of directories you have recently accessed to help with navigation. On some systems, Preview may only work effectively if you right-click the file first, since left-clicking rapidly selects the file before you have a chance to see it in the preview window. When you have selected as many images as you want, click Cancel. You then can choose the width of the frame for resizing, if you have the Python Imaging Library. The script continues until it runs out of images or runs out of selected frames to fill.

