Creating a tiled image: Difference between revisions
Jump to navigation
Jump to search
C schaefer (talk | contribs) No edit summary |
m (link Multiple duplicate) |
||
| (15 intermediate revisions by 4 users not shown) | |||
| Line 1: | Line 1: | ||
{{TIP Index}} | {{TIP Index}} | ||
[[Category:Images]] [[Category:EN]] | |||
This tip shows how a bunch of shapes can be used to create an | This tip shows how a bunch of shapes can be used to create an image frame. Used techniques are [[Multiple Duplicate]] of shapes, combining them as polygons and then converting to an image frame. | ||
* Create a rectangular shape. In the example, it has a width and a height of 16 mm. Of course, any other type of shape can be used. | * Create a rectangular shape. In the example, it has a width and a height of 16 mm. Of course, any other type of shape can be used. | ||
[[Image:Tiledimg3a.png]] | |||
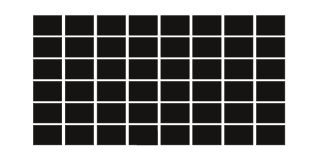
* With the menu command Item > Multiple Duplicate, create | * With the menu command '''''Item > Multiple Duplicate''''' (Rows & Columns Tab), create 6 rows by 8 columns with a horozontial and vertical gap of 2mm. | ||
[[Image: | [[Image:Tiledimg4.png]] | ||
* | * Now, select all the rectangles and then '''''Item->Combine Polygons''''' | ||
* | * Right click in the Combined Polygon frame and select '''''Convert to Image Frame'''''. | ||
* Last, but not least, load an image into your new image frame. | |||
* | |||
[[Image:Tiled_img_2a.jpg|400px]] | |||
[ | (c) Thomas Zastrow, 2007 | ||
'''The content of this page is licenced under the [http://www.fsf.org/licensing/licenses/fdl.html Free Documentation Licence].''' | |||
Latest revision as of 00:06, 16 February 2016
| Installation • Usage • PDF issues • Other |
This tip shows how a bunch of shapes can be used to create an image frame. Used techniques are Multiple Duplicate of shapes, combining them as polygons and then converting to an image frame.
- Create a rectangular shape. In the example, it has a width and a height of 16 mm. Of course, any other type of shape can be used.
- With the menu command Item > Multiple Duplicate (Rows & Columns Tab), create 6 rows by 8 columns with a horozontial and vertical gap of 2mm.
- Now, select all the rectangles and then Item->Combine Polygons
- Right click in the Combined Polygon frame and select Convert to Image Frame.
- Last, but not least, load an image into your new image frame.
(c) Thomas Zastrow, 2007
The content of this page is licenced under the Free Documentation Licence.


