Creating a threefold brochure: Difference between revisions
(→Todo) |
|||
| (17 intermediate revisions by 4 users not shown) | |||
| Line 4: | Line 4: | ||
This tutorial will show you how to create a threefold brochure step by step. | This tutorial will show you how to create a threefold brochure step by step. | ||
Tow remarks: | |||
* | * The tutorial has been updated to match the features in 1.4.1, please report to the mailing list or the bug tracker any bugs) | ||
* The | * The measurements are for an A4 page. | ||
=Create the document= | =Create the document= | ||
| Line 19: | Line 19: | ||
[3] Set a margin of 1 cm for the page | [3] Set a margin of 1 cm for the page | ||
* You can use any value you | * You can use any value you wish for the border around the text: 1 cm is a good value. | ||
* You can replace the measure in points with ''1 cm'': Scribus will convert the value for you! | * You can replace the measure in points with ''1 cm'': Scribus will convert the value for you! | ||
[4] Create two pages: one per side of the A4 sheet. | [4] Create two pages: one per side of the A4 sheet. | ||
[5] I would leave the default unit as Points, but you may set it to Millimeters if you | [5] I would leave the default unit as Points, but you may set it to Millimeters if you prefer. | ||
=Create the Guides= | =Create the Guides= | ||
| Line 48: | Line 48: | ||
You can leave the dialog using the close button of its window. | You can leave the dialog using the close button of its window. | ||
Please, don't forget to activate ''Snap to Guide | Please, don't forget to activate ''Snap to Guide'' in the ''Page'' menu (if you don't see the guides, you may have to check ''Show guides'' in the ''View'' menu). | ||
=What page on which column?= | =What page on which column?= | ||
If you are folding your brochure in accordion, (3-panel accordion fold) you should now have a document which looks like this: | |||
[[Image:3fold_-_empty_document.png]] | [[Image:3fold_-_empty_document.png]] | ||
The different ways, you can fold a brochure are explained in detail at [[Creating_a_brochure]] page also in this HOWTO | The different ways, you can fold a brochure are explained in detail at [[Creating_a_brochure]] page also in this HOWTO series. | ||
On the picture above you see my | On the picture above, you see my example of how you can place your text in the brochure: | ||
* A cover page with a big title and some drawings or | * A cover page with a big title and some drawings or pictures. | ||
* A longer text which flows on two "pages" and which is visible when you open the brochure. | * A longer text which flows on two "pages" and which is visible when you open the brochure. | ||
* Two shorter texts on the inner part (the "extra text 1" could also be a form). | * Two shorter texts on the inner part (the "extra text 1" could also be a form). | ||
* A back of the brochure with contact address or a form. | * A back of the brochure with contact address or a form. | ||
Here you have a sample result: | |||
[[Image:3fold_-_document.png]] | |||
You can also download the result as [[Media:3fold_-_document.pdf|pdf]] or as a [[Media:3fold_-_document.gz|Scribus 1.3.5svn collected archive]]. | |||
. | Notes: | ||
*You might slightly correct the guides to correct the space needed for folding. | |||
=What to do now?= | |||
There are other (better) panels sequences like: | |||
* The page sequence if you want a "3-Panel Roll Fold" will be: | |||
<pre>Text1 - Back Cover - Front Cover | |||
Text2 - Text3 - Text4</pre> | |||
* Read about creating [[Working_with_image_frames|picture]] and [[Working_with_text_frames|text]] frames | |||
=Todo= | |||
* | |||
Latest revision as of 08:18, 21 June 2012
| Installation • Usage • PDF issues • Imposition • Other |
This tutorial will show you how to create a threefold brochure step by step.
Tow remarks:
- The tutorial has been updated to match the features in 1.4.1, please report to the mailing list or the bug tracker any bugs)
- The measurements are for an A4 page.
Create the document
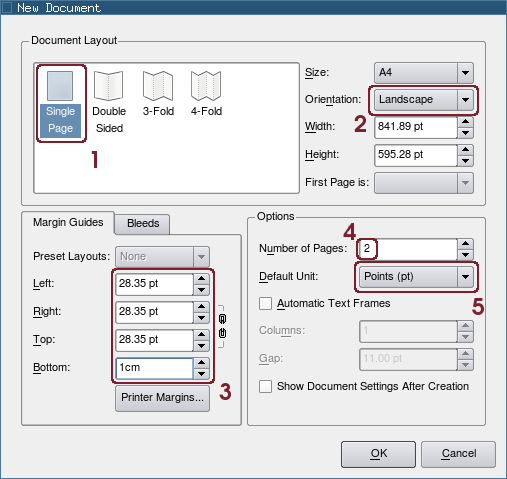
Create a new file:
[1] Choose the Single Page document layout
[2] Set the orientation as Landscape
[3] Set a margin of 1 cm for the page
- You can use any value you wish for the border around the text: 1 cm is a good value.
- You can replace the measure in points with 1 cm: Scribus will convert the value for you!
[4] Create two pages: one per side of the A4 sheet.
[5] I would leave the default unit as Points, but you may set it to Millimeters if you prefer.
Create the Guides
Under the Page menu launch the Guide Manager:
[1] Choose the Column/Row tab.
[2] Set 2 vertical guides.
[3] Let there be a gap
[4] Set the gap to the double as the margin for the page
- 56.69 pt correspond to 2 cm
- You need the double because you will see the half of the gap as the inner margin of the leaf
[5] Refer the guides to margins instead of the page.
[6] Apply the guides to all the pages
You can leave the dialog using the close button of its window.
Please, don't forget to activate Snap to Guide in the Page menu (if you don't see the guides, you may have to check Show guides in the View menu).
What page on which column?
If you are folding your brochure in accordion, (3-panel accordion fold) you should now have a document which looks like this:
The different ways, you can fold a brochure are explained in detail at Creating_a_brochure page also in this HOWTO series.
On the picture above, you see my example of how you can place your text in the brochure:
- A cover page with a big title and some drawings or pictures.
- A longer text which flows on two "pages" and which is visible when you open the brochure.
- Two shorter texts on the inner part (the "extra text 1" could also be a form).
- A back of the brochure with contact address or a form.
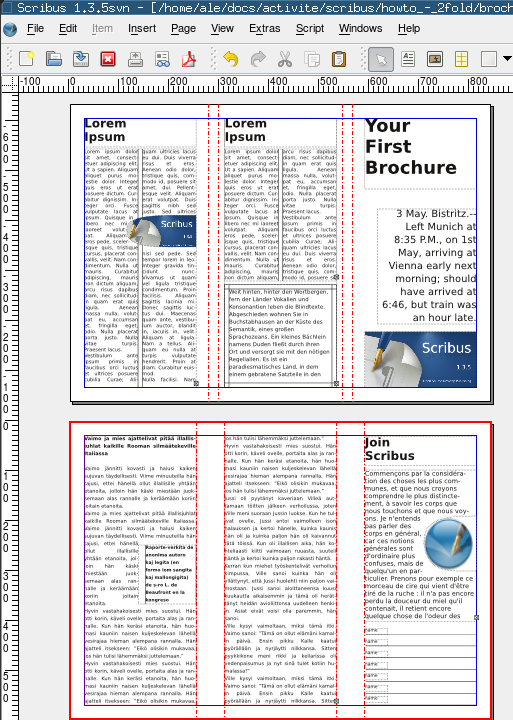
Here you have a sample result:
You can also download the result as pdf or as a Scribus 1.3.5svn collected archive.
Notes:
- You might slightly correct the guides to correct the space needed for folding.
What to do now?
There are other (better) panels sequences like:
- The page sequence if you want a "3-Panel Roll Fold" will be:
Text1 - Back Cover - Front Cover
Text2 - Text3 - Text4


