GSoC 2011 Tables Design: Difference between revisions
m (moved GSoC 2011 Tables to GSoC 2011 Tables Design: It better suits it.) |
|||
| (37 intermediate revisions by the same user not shown) | |||
| Line 1: | Line 1: | ||
= GSoC 2011 Tables = | = GSoC 2011 Tables Design = | ||
This page outlines the design and implementation details of tables in Scribus as part of Google Summer of Code 2011. | This page outlines the design and implementation details of tables in Scribus as part of Google Summer of Code 2011. | ||
== General Design == | == General Design == | ||
As was outlined briefly in my [[GSoC_2011_Tables_Proposal|project proposal]], the tables in Scribus will be implemented as a new page item. Handling of cell content will be delegated to text frames. More [[ | As was outlined briefly in my [[GSoC_2011_Tables_Proposal|project proposal]], the tables in Scribus will be implemented as a new page item. Handling of cell content will be delegated to text frames. More [[Tables|radical approaches]] to tables in Scribus have been suggested before, but the tables I'll be implementing as part of Summer of Code will be more traditional in the sense that tables will consist of a rectangular array of cells. | ||
== Use Cases == | == Use Cases == | ||
TODO. | |||
== User Interface Design / Interaction == | == User Interface Design / Interaction == | ||
These are some notes about the interaction design of the tables UI. A lot of the ideas come from [http://lists.scribus.net/pipermail/scribus-dev/2011-May/000917.html this] thread on the mailing list. | |||
=== Modes of Operation === | |||
[[File:Table_modes.png|right|frame|Mockup of the ''normal'' and ''editing'' modes.]] | |||
Following the tradition of the modal way of working with items in Scribus, there will be two operational modes when working with tables; ''normal'' mode and ''editing'' mode. The possible operations for each mode are listed below. The operations are explained in more detail further down. | |||
==== Normal Mode ==== | |||
This is the ''normal'' mode of operation when working with items in Scribus, and the one the user will be in directly after creating a table. In this mode, the user is able to | |||
* Select tables. | |||
* Resize tables. | |||
* Move tables. | |||
* Select rows and columns. | |||
* Resize rows and columns. | |||
* Select cells and regions of cells. | |||
* Add and remove rows and columns. | |||
* Format tables, rows, columns and cells. | |||
==== Editing Mode ==== | |||
By double-clicking in a table cell with the mouse, the user is able to enter ''editing'' mode. In this mode, the user is able to | |||
* Edit cell content. | |||
* Navigate between cells using the keyboard. | |||
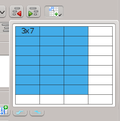
[[File:Quick_table_widget.png|right|thumb|120px|The "quick" table creation widget in Calligra Words]] | |||
=== Creating Tables === | === Creating Tables === | ||
The current way of creating tables is quite sufficient; the user is able to create tables by pressing a button in the toolbar or by picking a menu item, entering the desired number of rows and columns and then mouse dragging the desired dimensions of the table on the page. Possibly, I could steal a widget that Casper Boemann of Calligra Words wrote which looks like the automatically expanding grid for selecting number of rows and columns in e.g. LibreOffice. He said it was OK, as long as I fix a couple of bugs he had found in it :) But in general, the current way of inserting tables works fine. | |||
It should also be possible to create tables by importing them from a file, and the general consensus seems to be that CSV has higher priority than ODF, at least for the GSoC project. Hopefully the table implementation will be scriptable enough that this import could be done as a script. | |||
=== Moving and Resizing Tables === | === Moving and Resizing Tables === | ||
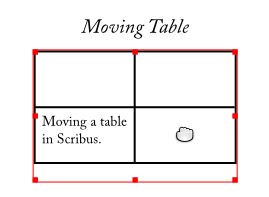
Moving a table is a simple matter of dragging it around with the mouse, just like with other items in Scribus. | |||
[[File:Moving_table.png|center|frame|Mockup of moving a table.]] | |||
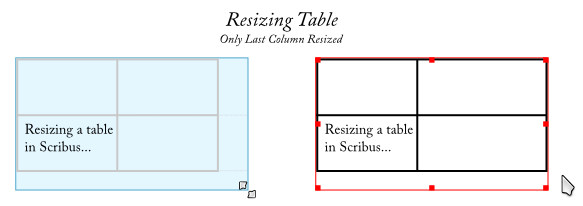
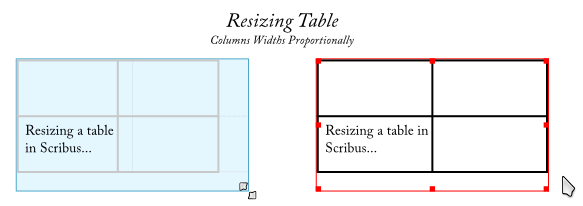
Resizing a table is also done just like with regular Scribus items. We will probably want two ways of resizing the table, one where only the width of the last column is affected, and one where all column widths follow proportionally. | |||
[[File:Resizing_table.png|center|frame|Mockup of resizing a table where only the last columns is affected.]] | |||
[[File:Resizing_table_proportionally.png|center|frame|Mockup of resizing a table where all column widths follow proportionally.]] | |||
For an alternative workflow when resizing tables, inspired by some ideas by a.l.e. on the mailing list, take a look at this more detailed workflow mockup: | |||
[[File:Resizing_table_workflow_mockup.png|thumb|center|Detailed Table Resizing Workflow Mockup.]] | |||
=== Selecting Cells === | |||
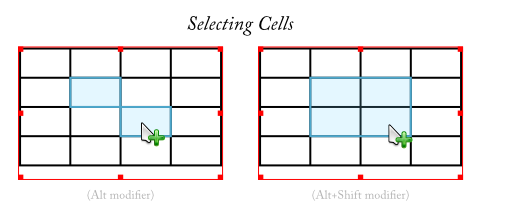
Selecting cells can be done directly from ''normal'' mode. Using the '''Alt''' modifier, the user can select individual cells by clicking on them, and by using the '''Alt+Shift''' modifier a rectangular region of cells can be selected by dragging across them. | |||
[[File:Selecting_cells.png|center|frame|Mockup of selecting table cells.]] | |||
=== Selecting Rows and Columns === | |||
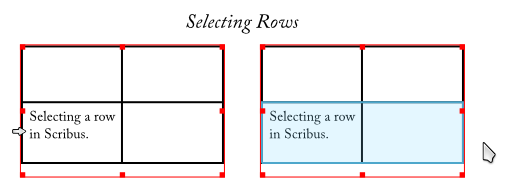
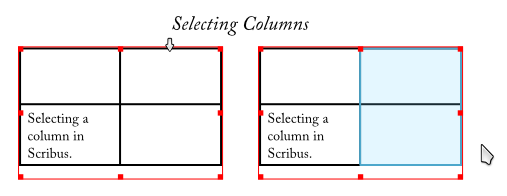
Selecting rows and columns will work like in common word processors. When hovering the left edge of the first cell in row the cursor will be turned into a right-pointing arrow and by clicking the entire row is selected. Likewise for columns but when hovering to top edge of the first cell and with a down-pointing arrow. | |||
[[File:Selecting_row.png|center|frame|Mockup of selecting a table row.]] | |||
[[File:Selecting_column.png|center|frame|Mockup of selecting a table column.]] | |||
=== Resizing Rows and Columns === | |||
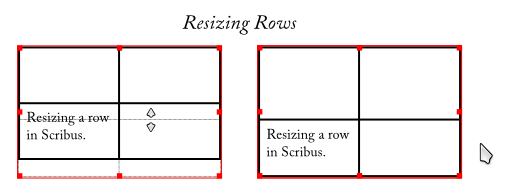
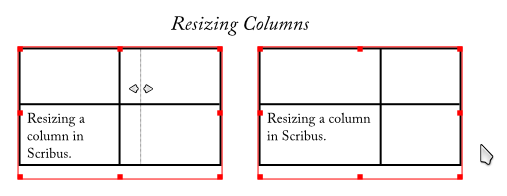
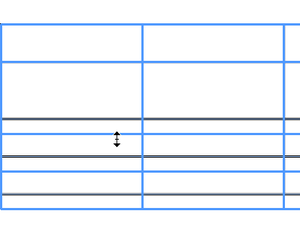
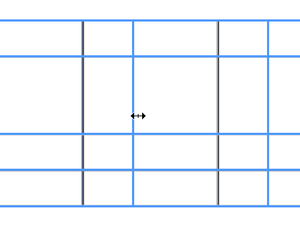
Resizing rows and columns will also work like in common word processors. While in ''normal'' mode the user will be able to drag with the mouse on row/column boundaries to resize the rows and columns, respectively. | |||
[[File:Resizing_row.png|center|frame|Mockup of resizing a table row.]] | |||
[[File:Resizing_column.png|center|frame|Mockup of resizing a table column.]] | |||
=== Inserting and Deleting Rows and Columns === | === Inserting and Deleting Rows and Columns === | ||
=== | TODO. | ||
=== Editing Table Content === | |||
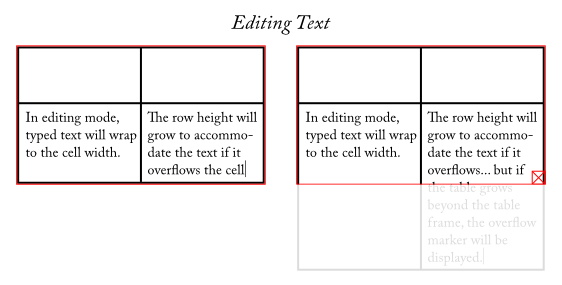
By double-clicking a cell the user is put in table ''editing'' mode. As text is typed, it will be constrained to the cell width, but the height of the row will grow automatically. If the rows of the table will not fit the frame, the overflow marker will be displayed. | |||
[[File:Table_editing.png|center|frame|Mockup of editing the contents of a table cell.]] | |||
=== Formatting Tables and Cells === | === Formatting Tables and Cells === | ||
Formatting of tables and cells, such as background color, border color, border style, default paragraph style et.c. can be done either directly by using the Property Palette, or by using table styles or cell styles. These will be available in the Styles Manager just like normal paragraph or character styles, but will contain properties specific to tables and cells. | |||
There is currently some work planned to rework the Properties Palette to be less cluttered and more context sensitive, and if this work will take place during the course of my GSoC project, this is something that might need to be taken into account. But no matter which version of the Properties Palette will be in use, I imagine that the user should be able to | |||
# '''(in normal mode with a table selected)''' | |||
#* change formatting properties of the table. | |||
# '''(in normal mode with a row selected)''' | |||
#* change formatting properties of the row '''and''' | |||
#* change formatting properties of the table | |||
# '''(in normal mode with a column selected)''' | |||
#* change formatting properties of the column '''and''' | |||
#* change formatting properties of the table | |||
# '''(in normal mode with a cell or rectangular region of cells selected)''' | |||
#* change formatting properties of the cell(s) '''and''' | |||
#* change formatting properties of the row(s) the cell(s) is/are in '''and''' | |||
#* change formatting properties of the column(s) the cell(s) is/are in '''and''' | |||
#* change formatting properties of the table the cell(s) is/are in | |||
# '''(in editing mode with the cursor positioned in a cell)''' | |||
#* change formatting properties of the cell the cursor is in '''and''' | |||
#* change formatting properties of the row the cursor is in '''and''' | |||
#* change formatting properties of the column the cursor is in '''and''' | |||
#* change formatting properties of the table the cursor is in. | |||
as well as apply a style for any of the above. | |||
The theme here is that with more specific parts of the table selected, such as a cell, the user should still be able to format higher level parts of the table which the cell is in, such as the row or the entire table. | |||
== Technical Implementation == | == Technical Implementation == | ||
This will all come as the project progresses. | |||
=== Basic Data Structures === | === Basic Data Structures === | ||
This will all come as the project progresses. | |||
=== Table Layout Process === | === Table Layout Process === | ||
This will all come as the project progresses. | |||
=== Border Model === | === Border Model === | ||
The border model initially used for the borders of the table cells will be a collapsing border model similar to the [http://www.w3.org/TR/CSS2/tables.html#collapsing-borders CSS2 collapsing border model]. Border conflicts will also be handled in a similar way, described below. | |||
== | ==== Border Conflict Resolution Method ==== | ||
= | TODO. | ||
= | === Border Painting === | ||
== | With borders joined, the following cases are possible: | ||
[[File:Table_border_join_cases.png|400px|thumb|center|Possible cases when painting joined table borders]] | |||
=== | === Saving / Loading === | ||
This will all come as the project progresses. | |||
=== CSV Import Script === | |||
This will all come as the project progresses. | |||
=== Outstanding Questions === | |||
Here I'll gather some technical questions I need to find answers to. | |||
I | ==== Disabling Decorations / Resize Handles of Text Frames ==== | ||
I will have to figure out how drawing of decorations, and possibly also the resize handles of text frames can be disabled. The table will only be interested in the text displaying / editing capabilities of the text frames, and will not want them to draw anything else such as borders, decorations or resize handles. Perhaps this is an easy thing, but still something I'll have to investigate. | |||
=== | ==== Saving to .sla ==== | ||
How will we represent the tables in Scribus' .sla format? | |||
== Future Considerations == | |||
=== Linked Table Frames === | |||
In the future, we'll probably want to be able to link table frames, e.g. to be able to let one table flow from a page to the next, or from one column to the next. It might be a good idea to keep this in mind when writing the table layout process. | |||
=== ODF Import === | |||
This is for the future. | |||
== Some InDesign CS5.5 Screenshots == | |||
{| | {| | ||
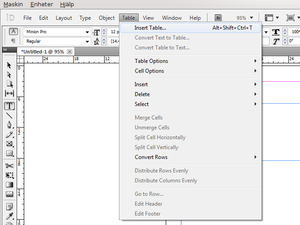
| style="vertical-align: bottom;" | [[File:Indesign_table_menu.png|thumb|right|The "Table" menu of Adobe Indesign CS5.5]] | |||
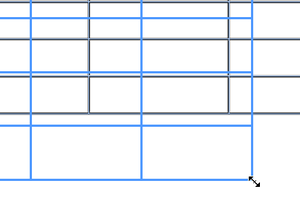
| style="vertical-align: bottom;" | [[File:Indesign_table_resizing.png|thumb|center|Resizing a table in Adobe Indesign CS5.5]] | | style="vertical-align: bottom;" | [[File:Indesign_table_resizing.png|thumb|center|Resizing a table in Adobe Indesign CS5.5]] | ||
| style="vertical-align: bottom;" | [[File:Indesign_row_resizing.png|thumb|center|Resizing a table row in Adobe Indesign CS5.5]] | | style="vertical-align: bottom;" | [[File:Indesign_row_resizing.png|thumb|center|Resizing a table row in Adobe Indesign CS5.5]] | ||
| Line 55: | Line 153: | ||
|} | |} | ||
[[Category:GSOC]][[Category:GSOC 2011]][[Category:EN]][[Category:Development]][[Category:Tables]] | |||
[[Category:Development]] | |||
[[Category:Tables]] | |||
Latest revision as of 16:47, 3 July 2011
GSoC 2011 Tables Design
This page outlines the design and implementation details of tables in Scribus as part of Google Summer of Code 2011.
General Design
As was outlined briefly in my project proposal, the tables in Scribus will be implemented as a new page item. Handling of cell content will be delegated to text frames. More radical approaches to tables in Scribus have been suggested before, but the tables I'll be implementing as part of Summer of Code will be more traditional in the sense that tables will consist of a rectangular array of cells.
Use Cases
TODO.
User Interface Design / Interaction
These are some notes about the interaction design of the tables UI. A lot of the ideas come from this thread on the mailing list.
Modes of Operation
Following the tradition of the modal way of working with items in Scribus, there will be two operational modes when working with tables; normal mode and editing mode. The possible operations for each mode are listed below. The operations are explained in more detail further down.
Normal Mode
This is the normal mode of operation when working with items in Scribus, and the one the user will be in directly after creating a table. In this mode, the user is able to
- Select tables.
- Resize tables.
- Move tables.
- Select rows and columns.
- Resize rows and columns.
- Select cells and regions of cells.
- Add and remove rows and columns.
- Format tables, rows, columns and cells.
Editing Mode
By double-clicking in a table cell with the mouse, the user is able to enter editing mode. In this mode, the user is able to
- Edit cell content.
- Navigate between cells using the keyboard.
Creating Tables
The current way of creating tables is quite sufficient; the user is able to create tables by pressing a button in the toolbar or by picking a menu item, entering the desired number of rows and columns and then mouse dragging the desired dimensions of the table on the page. Possibly, I could steal a widget that Casper Boemann of Calligra Words wrote which looks like the automatically expanding grid for selecting number of rows and columns in e.g. LibreOffice. He said it was OK, as long as I fix a couple of bugs he had found in it :) But in general, the current way of inserting tables works fine.
It should also be possible to create tables by importing them from a file, and the general consensus seems to be that CSV has higher priority than ODF, at least for the GSoC project. Hopefully the table implementation will be scriptable enough that this import could be done as a script.
Moving and Resizing Tables
Moving a table is a simple matter of dragging it around with the mouse, just like with other items in Scribus.
Resizing a table is also done just like with regular Scribus items. We will probably want two ways of resizing the table, one where only the width of the last column is affected, and one where all column widths follow proportionally.
For an alternative workflow when resizing tables, inspired by some ideas by a.l.e. on the mailing list, take a look at this more detailed workflow mockup:
Selecting Cells
Selecting cells can be done directly from normal mode. Using the Alt modifier, the user can select individual cells by clicking on them, and by using the Alt+Shift modifier a rectangular region of cells can be selected by dragging across them.
Selecting Rows and Columns
Selecting rows and columns will work like in common word processors. When hovering the left edge of the first cell in row the cursor will be turned into a right-pointing arrow and by clicking the entire row is selected. Likewise for columns but when hovering to top edge of the first cell and with a down-pointing arrow.
Resizing Rows and Columns
Resizing rows and columns will also work like in common word processors. While in normal mode the user will be able to drag with the mouse on row/column boundaries to resize the rows and columns, respectively.
Inserting and Deleting Rows and Columns
TODO.
Editing Table Content
By double-clicking a cell the user is put in table editing mode. As text is typed, it will be constrained to the cell width, but the height of the row will grow automatically. If the rows of the table will not fit the frame, the overflow marker will be displayed.
Formatting Tables and Cells
Formatting of tables and cells, such as background color, border color, border style, default paragraph style et.c. can be done either directly by using the Property Palette, or by using table styles or cell styles. These will be available in the Styles Manager just like normal paragraph or character styles, but will contain properties specific to tables and cells.
There is currently some work planned to rework the Properties Palette to be less cluttered and more context sensitive, and if this work will take place during the course of my GSoC project, this is something that might need to be taken into account. But no matter which version of the Properties Palette will be in use, I imagine that the user should be able to
- (in normal mode with a table selected)
- change formatting properties of the table.
- (in normal mode with a row selected)
- change formatting properties of the row and
- change formatting properties of the table
- (in normal mode with a column selected)
- change formatting properties of the column and
- change formatting properties of the table
- (in normal mode with a cell or rectangular region of cells selected)
- change formatting properties of the cell(s) and
- change formatting properties of the row(s) the cell(s) is/are in and
- change formatting properties of the column(s) the cell(s) is/are in and
- change formatting properties of the table the cell(s) is/are in
- (in editing mode with the cursor positioned in a cell)
- change formatting properties of the cell the cursor is in and
- change formatting properties of the row the cursor is in and
- change formatting properties of the column the cursor is in and
- change formatting properties of the table the cursor is in.
as well as apply a style for any of the above.
The theme here is that with more specific parts of the table selected, such as a cell, the user should still be able to format higher level parts of the table which the cell is in, such as the row or the entire table.
Technical Implementation
This will all come as the project progresses.
Basic Data Structures
This will all come as the project progresses.
Table Layout Process
This will all come as the project progresses.
Border Model
The border model initially used for the borders of the table cells will be a collapsing border model similar to the CSS2 collapsing border model. Border conflicts will also be handled in a similar way, described below.
Border Conflict Resolution Method
TODO.
Border Painting
With borders joined, the following cases are possible:
Saving / Loading
This will all come as the project progresses.
CSV Import Script
This will all come as the project progresses.
Outstanding Questions
Here I'll gather some technical questions I need to find answers to.
Disabling Decorations / Resize Handles of Text Frames
I will have to figure out how drawing of decorations, and possibly also the resize handles of text frames can be disabled. The table will only be interested in the text displaying / editing capabilities of the text frames, and will not want them to draw anything else such as borders, decorations or resize handles. Perhaps this is an easy thing, but still something I'll have to investigate.
Saving to .sla
How will we represent the tables in Scribus' .sla format?
Future Considerations
Linked Table Frames
In the future, we'll probably want to be able to link table frames, e.g. to be able to let one table flow from a page to the next, or from one column to the next. It might be a good idea to keep this in mind when writing the table layout process.
ODF Import
This is for the future.

