Text Gradients: Difference between revisions
No edit summary |
No edit summary |
||
| Line 9: | Line 9: | ||
In the bottom example, after ''Convert To > Outlines'', we have then clicked ''Item > Combine Polygons'', so that then you can make one large gradient over the entire collection of combined letters. | In the bottom example, after ''Convert To > Outlines'', we have then clicked ''Item > Combine Polygons'', so that then you can make one large gradient over the entire collection of combined letters. | ||
For some tips on putting images in text, check [[Text over images]]. | For some tips on putting images in text, check [[How to fill a Scribus text with an image]], and for hints on text over images see [[Text over images]]. | ||
Revision as of 01:51, 18 April 2008
This is a brief article explaining how to take text and fill it with gradient colors.
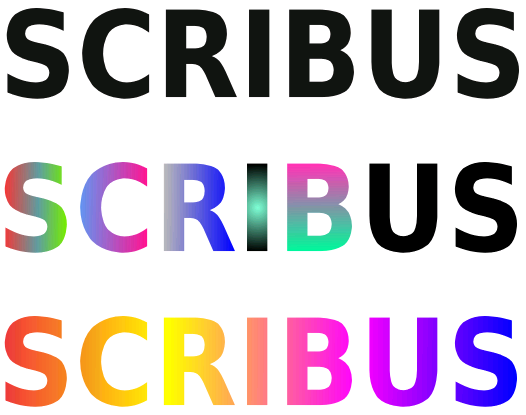
Here are three sets of text. The top shows the text in a text frame, then two copies were made and positioned below.
The first thing to do is to select the frame, then click Item > Convert To > Outlines, or use the Context menu. In the middle example, we then click Item > Ungroup to separate the individual letters, then click each one and use the gradients in Properties > Colors as desired. If you do not ungroup, you can choose different colors for each letter, but there will be one kind of gradient possible for all letters.
In the bottom example, after Convert To > Outlines, we have then clicked Item > Combine Polygons, so that then you can make one large gradient over the entire collection of combined letters.
For some tips on putting images in text, check How to fill a Scribus text with an image, and for hints on text over images see Text over images.
