|
|
| Line 14: |
Line 14: |
| Enter Edit Contents mode by clicking the icon on the toolbar, or pressing <b>E</b> from the keyboard. Go back to Select Item mode by pressing <b>Esc</b>, or clicking outside, then inside the frame. You will need to have checked <b>Free Scaling</b> in order for this to be operational. | | Enter Edit Contents mode by clicking the icon on the toolbar, or pressing <b>E</b> from the keyboard. Go back to Select Item mode by pressing <b>Esc</b>, or clicking outside, then inside the frame. You will need to have checked <b>Free Scaling</b> in order for this to be operational. |
| <br/>With image frames, Edit Contents mode allows you to click-drag with the mouse to shift the image relative to the frame, i.e., the same as adjusting the X-Pos and Y-Pos in the Image tab. | | <br/>With image frames, Edit Contents mode allows you to click-drag with the mouse to shift the image relative to the frame, i.e., the same as adjusting the X-Pos and Y-Pos in the Image tab. |
| | |
| | {{OPL}} |
Latest revision as of 18:33, 29 March 2012
Table of Contents
Working with Images
See Working with Frames to learn about Image Frame frame creation and manipulation. Note that the image frame shows as a red border with small square handles at the corners and at the midpoints of each side. Diagonals in black are drawn to indicate that it is an image frame. Note that these small square handles disappear when the frame is locked.
The quickest way to load an image into the frame is to right-click on the frame, and select Get Image from the Context menu. Pressing Ctrl+D or menu File > Import > Get Image will also work. A file dialog will appear, showing the image types that Scribus can import, which include bitmap formats TIFF, PNG, JPG and GIF as well as vector format PS (PostScript) and PDF files, which will be converted to bitmaps. Note that after import the image may only partly show. We'll see below in Properties: Image how to adjust scaling and positioning of the image in the frame.
Descriptions, advantages and disadvantages of various file formats will be discussed elsewhere.
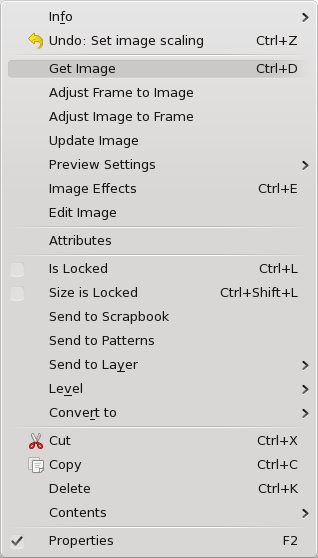
Right-click on the empty frame to show its context menu as seen to the right. An empty frame will not show all these choices. - Info gives a short list of information about the image, its name, the PPI (pixels per inch) of the original and as shown in Scribus, its colorspace, and whether it is set to print (and export to PDF).
- Undo will undo the last operation, which should be indicated. If applicable, there will also be a Redo item.
- Get Image allows for importing an image, as indicated above.
- Adjust Frame to Image enlarges or shrinks the width and height of your frame to fit the image at its current resolution.
- Adjust Image to Frame adjusts the image to the frame. Image will remain proportional if this is checked in Image tab of Properties.
- Update Image reloads the image. Would be used if you have edited the source file. See Edit Image below.
- Preview Settings This allows to image to be visible or not, and if visible, the resolution can be selected. Lower resolution or not showing images will speed up screen refreshes if this is sluggish. Full Resolution can only be as high as your monitor supports. These settings do not affect printing your image or exporting to PDF.
- Image Effects (also Ctrl + E) provide for a number of editing types, like blurring or changing contrast and brightness. These edits happen in a nondestructive way, i.e., the source file is not altered.
- Edit Image starts your image editor as set in the File->Preferences->External Tools and loads the image.
- Attributes will not be discussed here.
- Is Locked locks the frame's position, size, and content.
- Size is Locked locks only the size. Frame and image can otherwise be moved and edited.
- Send to Scrapbook and Send to Patterns will not be covered here, except to say that these allow for saving content to be shared among documents.
- Level allows you to move the frame up or down levels on the current layer. If your document has more than one layer, there will also be an item Send to Layer to allow moving the frame to a different layer.
- Convert to gives you the following sub-choices:
- Polygon, converts to a polygon, with apparent loss of your image, recoverable with Convert to Image Frame.
- Text Frame converts to that kind of frame, in which case your image becomes invisible, but will be restored if you convert back to an image frame. You cannot show text and an image together, except where text is incorporated in an image. Use a superimposed text frame to apply text over an image.
- Cut, Copy, and Delete are covered in Working with Frames.
- Contents > Clear is only present when your frame has content, and you will get a dialog to Ok the operation. There is also a choice Contents > Copy to copy only the content of the frame, as opposed to copying the frame and its contents.
- Properties brings up or hides the Properties palette
|  |
Properties: Image
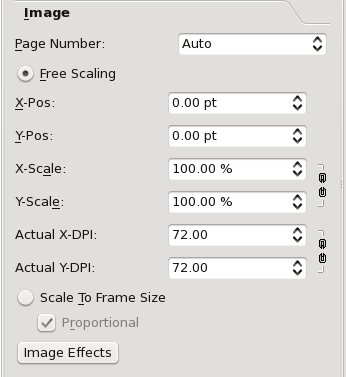
| When an Image is first loaded, the default is for it to have Free Scaling, and will be imported at its "native" size, at 72 DPI (your monitor's resolution). Under Free Scaling the spinboxes are: - X-Pos and Y-Pos - Relative position of the left upper corner of the image to the left upper corner of the frame.
- X-Scale and Y-Scale - Magnification of the image, compared to when it is at 72 DPI.
- Actual X-DPI and Actual Y-DPI - These of course are inversely related to magnification. Your monitor will still likely be showing the image at no better than 72 PPI, but this refers to the final resolution to be exported to the PDF.
In many cases, we may have a more or less set frame size we wish to squeeze an entire image into, in which case choosing Scale to Frame Size (or Adjust Image to Frame from the Context menu) makes sense. Without checking Proportional, the image is simply stretched to fit the frame and may be quite distorted. You should find the combination of scaling to frame size (proportional) and then Adjust Frame to Image from the Context menu very useful for making a frame exactly the right size for your image. Image Effects will be discussed elsewhere. |  |
Edit Contents Mode
Enter Edit Contents mode by clicking the icon on the toolbar, or pressing E from the keyboard. Go back to Select Item mode by pressing Esc, or clicking outside, then inside the frame. You will need to have checked Free Scaling in order for this to be operational.
With image frames, Edit Contents mode allows you to click-drag with the mouse to shift the image relative to the frame, i.e., the same as adjusting the X-Pos and Y-Pos in the Image tab.
| This material may be distributed only subject to the terms and conditions set forth in the Open Publication License, v1.0 or later. Distribution of the work or derivative of the work in any standard (paper) book form is prohibited unless prior permission is obtained from the copyright holder. A copy of the license is included in the section entitled "Text of the Open Publication License."
|

