Help:Manual Linesstyles: Difference between revisions
No edit summary |
No edit summary |
||
| Line 5: | Line 5: | ||
<h2>Working with Lines & Line Styles</h2> | <h2>Working with Lines & Line Styles</h2> | ||
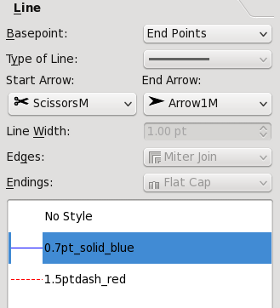
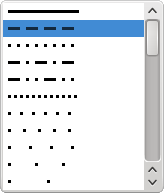
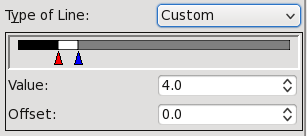
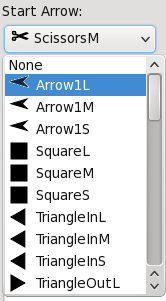
<h3>Properties: Lines</h3> <table width="75%" cellpadding="5"> <tr> <td>[[File:Help_line_tab7.png]]</td> <td valign="top">Here in the Line tab of the Properties palette is where we set the line attributes of the various kinds of lines used in Scribus, which includes: <ul> <li>Straight lines (single line segments)</li> <li>Bezier curves</li> <li>Freehand lines</li> <li>Borders of Shapes and Polygons</li> <li>Borders of frames of all kinds - <i>these must have a color assigned for these settings to show.</i></li> </ul> We are going to describe these Line tab items a bit out of order, since it seems to make more sense this way for demonstration purposes. <p>The bottom of our graphic here looks different from the default appearance, since in addition to the default <b>No Style</b>, we have created some <b>Line Styles</b> that we can use repeatedly in our document. This will be covered at the end of this section.</p> </td> </tr> </table> <h3>Edges and Endings</h3> <table> <tr> <td>[[File:Help_line_tab.png]]</td> <td>This screenshot shows the choices for corners (<b>Edges</b>) and <b>Endings</b> of lines. <p>From left to right:</p> <ul> <li><b>Miter Join</b> and <b>Flat Cap</b></li> <li><b>Bevel Join</b> and <b>Square Cap</b></li> <li><b>Round Join</b> and <b>Round Cap</b></li> </ul> <p>Since each of these is an independent choice, you will have 9 possible combinations.</p> </td> </tr> </table> <h3>Type of Line and Line Width</h3> <table width="75%"> <tr> <td valign="top">Here we see only a part of the extensive drop-down list for <b>Type of Line</b> choices. <p>In addition to a wide array of predetermined choices, at the bottom of the list is a choice, <b>Custom</b>, which brings up the dialog you see below.</p> </td> <td>[[File:Help_line_tab2.png]]</td> </tr> <tr> <td>You can either manually move the sliders or use the spinboxes to make adjustments. If you have used <i>Gradients</i> in the Color tab, this slider should be familiar. Like gradients, not only can you adjust the transition points use see here, you can also add more by clicking the space underneath the slider - you will see a <b>+</b> appear next to the mouse cursor. The red triangle indicates the point for which the spinboxes apply. Remove points by click-dragging them off the slider (but you cannot have less than two). <p>As you can see, these spinboxes have no units, since they are relative to the width of the line. The <b>Offset</b> shifts your pattern along the line and thus helps to prevent a space from occurring at the beginning or at some transition point such as a corner.</p> </td> <td>[[File:Help_line_tab3.png]]</td> </tr> <tr> <td>[[File:Help_line_tab1.png]]</td> <td>The <b>Line Width</b> setting should need no explanation, but here to the left we see the effects of changing linewidth on the length and spacing of the same dash pattern, using linewidth settings of Hairline, 1.0 pts, and 2.0 pts respectively. <p>The Edge and Endings settings here are the same for each line as was used above, so as you can see especially with round joins and caps, these also apply to our dashes.</p> </td> </tr> </table> <h3>Start Arrow & End Arrow</h3> <table width="65%" cellpadding="5"> <tr> <td>[[File:Help_line_tab5.png]]</td> <td valign="bottom">Just as with <i>Type of Line</i>, we see in <b>Start Arrow</b> and <b>End Arrow</b> a quite extensive list of choices which you can discover on your own. Since these terms apply to opposite ends of a line, they can only be used with a line or an open figure, and therefore these buttons will be inactive with shapes, polygons, and frame borders. <p>Below we see what began as a shape but then was edited to break up the triangle, so that the arrows could be applied - obviously, some "arrows" aren't arrows at all.</p> </td> </tr> <tr> <td></td> <td>[[File:Help_line_tab4.png]]</td> </tr> </table> <h3>Basepoint</h3> We've left this setting for last since it's a bit tricky. For any sort of line or figure, the initial settings in the X,Y,Z tab of Properties show the <b>X-Pos</b> and <b>Y-Pos</b> of the basepoint, which at first is the upper left corner of the frame or bounding box. In the case of a straight line, <b>X-Pos</b> and <b>Y-Pos</b> refer to the initial point from which the line was drawn. The other spinboxes in X,Y,Z show <b>Width</b> and <b>Height</b> of the bounding box - except for a straight line, which is defined by <b>Width</b> (i.e., length) only, plus the direction (<b>Rotation</b>) of the line, and its thickness. <p>This condition is true for the Line tab <b>Basepoint</b> setting of <b>Left Point</b>. If you change the Basepoint to <b>End Points</b>, the X,Y,Z tab now shows spinboxes for <b>X1</b>, <b>Y1</b>, and <b>X2</b>, <b>Y2</b>.</p> <p>For a straight line, this means that <b>X1</b> and <b>Y1</b> refer to the <i>starting point of the line</i>, i.e., where the beginning of the line was when it was drawn. <b>X2</b> and <b>Y2</b> refer to the coordinates of the other end of the line.</p> <p>The example below is for a straight line - where you can see that <b>X-Pos</b> = <b>X1</b>, and <b>Y-Pos</b> = <b>Y1</b>.</p> <p>For anything more complex than a straight line, the values refer to the bounding box, in which case <b>X1</b> and <b>Y1</b> refer to the basepoint as set in the X,Y,Z tab, and the <b>X2</b> and <b>Y2</b> values refer to the width and height of the bounding box, and therefore will always be positive numbers.</p> <table cellpadding="15"> <tr> <td>Basepoint: <b>Left Point</b> <p>[[File:Help_geometry.png]]</p> </td> <td>Basepoint: <b>End Points</b> <p>[[File:Help_geometry1.png]]</p> </td> </tr> </table> <h3>Line Styles</h3> <table width="75%" cellpadding="5"> <tr> <td align="right">[[File:Help_style_manager1.png]]</td> <td valign="top">Now that we've explained various line attributes, it makes sense to talk about line styles. <p>In [[Help:Manual_Styles|Working with Styles]] we discuss how to make text layout styles in Scribus. Here is our <b>Style Manager</b> dialog we saw there. If we click <b>New</b>, then choose <b>Line Style</b> from the drop-down list, we then expand the dialog to show the section for creating/editing line styles.</p> </td> </tr> <tr> <td>[[File:Help_line_tab6.png]]</td> <td>Just underneath the <i>Properties</i> label, there are two buttons, one for adding a style (so you don't have to keep going back to push the <b>New</b> button again), and the other to delete the highlighted style. <p>If you compare your choices here with those in the Line tab of the Properties palette, you see a more limited selection. In Line Type, there is no Custom setting. There are no arrow settings, so these will be applied later if desired.</p> <p>What you do have here in addition are the choices for line color and line shading (saturation) that you would have had to make in the Color tab of the Properties palette.</p> </td> </tr> </table> | <h3>Properties: Lines</h3> <table width="75%" cellpadding="5"> <tr> <td>[[File:Help_line_tab7.png]]</td> <td valign="top">Here in the Line tab of the Properties palette is where we set the line attributes of the various kinds of lines used in Scribus, which includes: <ul> <li>Straight lines (single line segments)</li> <li>Bezier curves</li> <li>Freehand lines</li> <li>Borders of Shapes and Polygons</li> <li>Borders of frames of all kinds - <i>these must have a color assigned for these settings to show.</i></li> </ul> We are going to describe these Line tab items a bit out of order, since it seems to make more sense this way for demonstration purposes. <p>The bottom of our graphic here looks different from the default appearance, since in addition to the default <b>No Style</b>, we have created some <b>Line Styles</b> that we can use repeatedly in our document. This will be covered at the end of this section.</p> </td> </tr> </table> <h3>Edges and Endings</h3> <table> <tr> <td>[[File:Help_line_tab.png]]</td> <td>This screenshot shows the choices for corners (<b>Edges</b>) and <b>Endings</b> of lines. <p>From left to right:</p> <ul> <li><b>Miter Join</b> and <b>Flat Cap</b></li> <li><b>Bevel Join</b> and <b>Square Cap</b></li> <li><b>Round Join</b> and <b>Round Cap</b></li> </ul> <p>Since each of these is an independent choice, you will have 9 possible combinations.</p> </td> </tr> </table> <h3>Type of Line and Line Width</h3> <table width="75%"> <tr> <td valign="top">Here we see only a part of the extensive drop-down list for <b>Type of Line</b> choices. <p>In addition to a wide array of predetermined choices, at the bottom of the list is a choice, <b>Custom</b>, which brings up the dialog you see below.</p> </td> <td>[[File:Help_line_tab2.png]]</td> </tr> <tr> <td>You can either manually move the sliders or use the spinboxes to make adjustments. If you have used <i>Gradients</i> in the Color tab, this slider should be familiar. Like gradients, not only can you adjust the transition points use see here, you can also add more by clicking the space underneath the slider - you will see a <b>+</b> appear next to the mouse cursor. The red triangle indicates the point for which the spinboxes apply. Remove points by click-dragging them off the slider (but you cannot have less than two). <p>As you can see, these spinboxes have no units, since they are relative to the width of the line. The <b>Offset</b> shifts your pattern along the line and thus helps to prevent a space from occurring at the beginning or at some transition point such as a corner.</p> </td> <td>[[File:Help_line_tab3.png]]</td> </tr> <tr> <td>[[File:Help_line_tab1.png]]</td> <td>The <b>Line Width</b> setting should need no explanation, but here to the left we see the effects of changing linewidth on the length and spacing of the same dash pattern, using linewidth settings of Hairline, 1.0 pts, and 2.0 pts respectively. <p>The Edge and Endings settings here are the same for each line as was used above, so as you can see especially with round joins and caps, these also apply to our dashes.</p> </td> </tr> </table> <h3>Start Arrow & End Arrow</h3> <table width="65%" cellpadding="5"> <tr> <td>[[File:Help_line_tab5.png]]</td> <td valign="bottom">Just as with <i>Type of Line</i>, we see in <b>Start Arrow</b> and <b>End Arrow</b> a quite extensive list of choices which you can discover on your own. Since these terms apply to opposite ends of a line, they can only be used with a line or an open figure, and therefore these buttons will be inactive with shapes, polygons, and frame borders. <p>Below we see what began as a shape but then was edited to break up the triangle, so that the arrows could be applied - obviously, some "arrows" aren't arrows at all.</p> </td> </tr> <tr> <td></td> <td>[[File:Help_line_tab4.png]]</td> </tr> </table> <h3>Basepoint</h3> We've left this setting for last since it's a bit tricky. For any sort of line or figure, the initial settings in the X,Y,Z tab of Properties show the <b>X-Pos</b> and <b>Y-Pos</b> of the basepoint, which at first is the upper left corner of the frame or bounding box. In the case of a straight line, <b>X-Pos</b> and <b>Y-Pos</b> refer to the initial point from which the line was drawn. The other spinboxes in X,Y,Z show <b>Width</b> and <b>Height</b> of the bounding box - except for a straight line, which is defined by <b>Width</b> (i.e., length) only, plus the direction (<b>Rotation</b>) of the line, and its thickness. <p>This condition is true for the Line tab <b>Basepoint</b> setting of <b>Left Point</b>. If you change the Basepoint to <b>End Points</b>, the X,Y,Z tab now shows spinboxes for <b>X1</b>, <b>Y1</b>, and <b>X2</b>, <b>Y2</b>.</p> <p>For a straight line, this means that <b>X1</b> and <b>Y1</b> refer to the <i>starting point of the line</i>, i.e., where the beginning of the line was when it was drawn. <b>X2</b> and <b>Y2</b> refer to the coordinates of the other end of the line.</p> <p>The example below is for a straight line - where you can see that <b>X-Pos</b> = <b>X1</b>, and <b>Y-Pos</b> = <b>Y1</b>.</p> <p>For anything more complex than a straight line, the values refer to the bounding box, in which case <b>X1</b> and <b>Y1</b> refer to the basepoint as set in the X,Y,Z tab, and the <b>X2</b> and <b>Y2</b> values refer to the width and height of the bounding box, and therefore will always be positive numbers.</p> <table cellpadding="15"> <tr> <td>Basepoint: <b>Left Point</b> <p>[[File:Help_geometry.png]]</p> </td> <td>Basepoint: <b>End Points</b> <p>[[File:Help_geometry1.png]]</p> </td> </tr> </table> <h3>Line Styles</h3> <table width="75%" cellpadding="5"> <tr> <td align="right">[[File:Help_style_manager1.png]]</td> <td valign="top">Now that we've explained various line attributes, it makes sense to talk about line styles. <p>In [[Help:Manual_Styles|Working with Styles]] we discuss how to make text layout styles in Scribus. Here is our <b>Style Manager</b> dialog we saw there. If we click <b>New</b>, then choose <b>Line Style</b> from the drop-down list, we then expand the dialog to show the section for creating/editing line styles.</p> </td> </tr> <tr> <td>[[File:Help_line_tab6.png]]</td> <td>Just underneath the <i>Properties</i> label, there are two buttons, one for adding a style (so you don't have to keep going back to push the <b>New</b> button again), and the other to delete the highlighted style. <p>If you compare your choices here with those in the Line tab of the Properties palette, you see a more limited selection. In Line Type, there is no Custom setting. There are no arrow settings, so these will be applied later if desired.</p> <p>What you do have here in addition are the choices for line color and line shading (saturation) that you would have had to make in the Color tab of the Properties palette.</p> </td> </tr> </table> | ||
{{OPL}} | |||
Latest revision as of 18:37, 29 March 2012
Working with Lines & Line Styles
Properties: Lines
Edges and Endings
Type of Line and Line Width
Start Arrow & End Arrow
Basepoint
We've left this setting for last since it's a bit tricky. For any sort of line or figure, the initial settings in the X,Y,Z tab of Properties show the X-Pos and Y-Pos of the basepoint, which at first is the upper left corner of the frame or bounding box. In the case of a straight line, X-Pos and Y-Pos refer to the initial point from which the line was drawn. The other spinboxes in X,Y,Z show Width and Height of the bounding box - except for a straight line, which is defined by Width (i.e., length) only, plus the direction (Rotation) of the line, and its thickness.
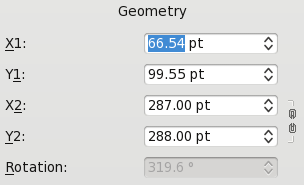
This condition is true for the Line tab Basepoint setting of Left Point. If you change the Basepoint to End Points, the X,Y,Z tab now shows spinboxes for X1, Y1, and X2, Y2.
For a straight line, this means that X1 and Y1 refer to the starting point of the line, i.e., where the beginning of the line was when it was drawn. X2 and Y2 refer to the coordinates of the other end of the line.
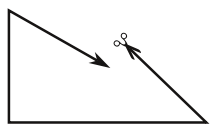
The example below is for a straight line - where you can see that X-Pos = X1, and Y-Pos = Y1.
For anything more complex than a straight line, the values refer to the bounding box, in which case X1 and Y1 refer to the basepoint as set in the X,Y,Z tab, and the X2 and Y2 values refer to the width and height of the bounding box, and therefore will always be positive numbers.
| Basepoint: Left Point | Basepoint: End Points |
Line Styles
 | Now that we've explained various line attributes, it makes sense to talk about line styles. In Working with Styles we discuss how to make text layout styles in Scribus. Here is our Style Manager dialog we saw there. If we click New, then choose Line Style from the drop-down list, we then expand the dialog to show the section for creating/editing line styles. |
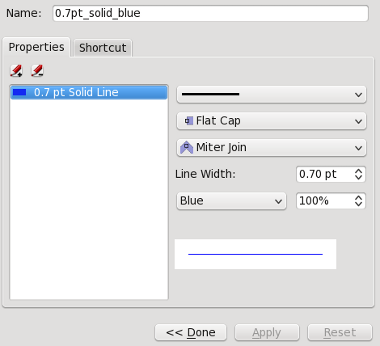 | Just underneath the Properties label, there are two buttons, one for adding a style (so you don't have to keep going back to push the New button again), and the other to delete the highlighted style. If you compare your choices here with those in the Line tab of the Properties palette, you see a more limited selection. In Line Type, there is no Custom setting. There are no arrow settings, so these will be applied later if desired. What you do have here in addition are the choices for line color and line shading (saturation) that you would have had to make in the Color tab of the Properties palette. |
| This material may be distributed only subject to the terms and conditions set forth in the Open Publication License, v1.0 or later. Distribution of the work or derivative of the work in any standard (paper) book form is prohibited unless prior permission is obtained from the copyright holder. A copy of the license is included in the section entitled "Text of the Open Publication License." |
