Help:Manual Masterpages: Difference between revisions
(Created page with "Category:Help_Manual Table of Contents <h2>Working with Master Pages</h2> <p>Master Pages are the means to add content to pages which have repeating content li...") |
No edit summary |
||
| Line 4: | Line 4: | ||
<h2>Working with Master Pages</h2> <p>Master Pages are the means to add content to pages which have repeating content like page numbers, chapter names, section heads and the like. Users of other page layout applications might be familiar with this concept of static page backgrounds. Fundamental to understanding how they work is that these pages are not editable from the normal page canvas. All items except page numbers are static background items.</p> <p>Thoughtful creation of master pages can vastly simplify and speed up the creation of complex documents - the more complex, the more essential they are. There are several reasons to use Master Pages, among them the ability to automatically add [[Help:Manual_Pagenumbering|page numbers]] or avoiding the hassle of inserting objects that are repeatedly used in the same place over and over again.</p> <h4>Creating Master Pages</h4> <p>There are basically two ways to create a Master Page. The most obvious is to create a new one from scratch, which is actually is quite simple: Go to <i>Edit > Master Pages</i>. This will bring up the Master Page dialog:</p> <table width="100%"> <tr> <td align="center">[[File:Help_mpage1.png|alt="Page Palette"|Page Palette]]</td> </tr> </table> <p>As you can see, Master Pages have already been automatically created when you created the new document. How many and what kind of Master Page depends on the document layout you chose: Single-page layouts have one Master Page, double-sided layouts two etc. It is generally a good idea not to touch the "Normal" Master Pages and create new ones instead.</p> <p>The Master Page dialog shown above offers four options, from left to right:</p> <ul> <li><b>Add new Master Page</b>: If you click on this icon, a new dialog pops up. Here you have to enter a name for the new Master Page. Depending on your document layout, you also have to determine the Master Page category (e.g. left page, right page). Clicking OK will create your new Master Page, and you can edit this page immediately.</li> <li style="list-style: none"><b>Duplicate Master Page</b>: This will create a copy of the Master Page you have selected in the dialog. Since a new Master Page is created that way, you will also see the prompt to insert a name. Copying a Master Page is helpful if you are working with documents that use a mostly identical design and only vary in details. Thus, you can create a basic design and create duplicates, in which only the changing details are modified.</li> <li><b>Import Master Pages</b>: Clicking this button brings up a file dialog, in which you need to select a Scribus file. After selecting a file and clicking "OK", Scribus will open a new dialog that allows you to select a Master Page from the document for import into Scribus. This feature is most useful when you have split a large project into several smaller files (which is always recommended), as you don't have to create a new Master Page for each project file.<br> <table width="100%"> <tr> <td align="center">[[File:Help_mpage2.png|alt="Page Palette"]]</td> </tr> </table> </li> <li><b>Delete Master Page</b>: This will delete the Master Page you have selected in the file dialog. If the Master Page is already in use, you will be asked for a replacement.</li> </ul> Another way to create a new Master Page is to convert an existing page into a Master Page via <i>Page > Convert to Master Page</i>. As with any new Master Page you will be asked to insert a name for the new page, as well as determining the category. If you check the option "Copy Applied Master Page Items", the Master Page that is applied to the current page will be merged with the latter into one new Master Page. Otherwise, only the items on the "real" page become part of the new Master Page. <table width="100%"> <tr> <td align="center">[[File:Help_mpage3.png|alt="Page Palette"]]</td> </tr> </table> <h4>Applying Master Pages</h4> <p>As with creating Master Pages, there are also several ways to apply them.</p> <h5>The Page Menu</h5> <p>The most obvious way to apply a Master Page is via <i>Page > Apply Master Page</i>, which will bring up the following dialog:</p> <table width="100%"> <tr> <td align="center">[[File:Help_mpage4.png|alt="Page Palette"]]</td> </tr> </table> <p>In the dropdown list at the top of the dialog you can choose the Master Page you want to apply.</p> <p>The options below let you choose the range of pages to which the selected Master Page will be applied:</p> <ul> <li>Current page</li> <li>Even pages (i.e. in most cases left pages)</li> <li>Odd pages (i.e. in most cases right pages)</li> <li>All pages</li> <li>A range of pages.</li> </ul> <h5>The Page Palette</h5> <p>The Page Palette (<i>Windows > Arrange Pages</i>) gives you a fast, drag-and-drop way of applying Master Pages, navigating pages, moving and inserting pages. The top half of the palette shows the available Master Pages in your document. By right-clicking on a listed Master Page item you can activate a thumbnail preview of the available Master Pages. The lower half has the actual pages within your document. Applying a Master Page is done by dragging a Master Page list item onto a page in the lower half.</p> <table width="100%"> <tr> <td align="center">[[File:Help_mpage5.png|alt="Page Palette"|Page Palette]]</td> </tr> </table> <br> <p><b><i>Important: Please note that Master Page items are always below any item on a regular page. It's impossible to move a Master Page item above a real page item in the stacking order.</i></b></p> | <h2>Working with Master Pages</h2> <p>Master Pages are the means to add content to pages which have repeating content like page numbers, chapter names, section heads and the like. Users of other page layout applications might be familiar with this concept of static page backgrounds. Fundamental to understanding how they work is that these pages are not editable from the normal page canvas. All items except page numbers are static background items.</p> <p>Thoughtful creation of master pages can vastly simplify and speed up the creation of complex documents - the more complex, the more essential they are. There are several reasons to use Master Pages, among them the ability to automatically add [[Help:Manual_Pagenumbering|page numbers]] or avoiding the hassle of inserting objects that are repeatedly used in the same place over and over again.</p> <h4>Creating Master Pages</h4> <p>There are basically two ways to create a Master Page. The most obvious is to create a new one from scratch, which is actually is quite simple: Go to <i>Edit > Master Pages</i>. This will bring up the Master Page dialog:</p> <table width="100%"> <tr> <td align="center">[[File:Help_mpage1.png|alt="Page Palette"|Page Palette]]</td> </tr> </table> <p>As you can see, Master Pages have already been automatically created when you created the new document. How many and what kind of Master Page depends on the document layout you chose: Single-page layouts have one Master Page, double-sided layouts two etc. It is generally a good idea not to touch the "Normal" Master Pages and create new ones instead.</p> <p>The Master Page dialog shown above offers four options, from left to right:</p> <ul> <li><b>Add new Master Page</b>: If you click on this icon, a new dialog pops up. Here you have to enter a name for the new Master Page. Depending on your document layout, you also have to determine the Master Page category (e.g. left page, right page). Clicking OK will create your new Master Page, and you can edit this page immediately.</li> <li style="list-style: none"><b>Duplicate Master Page</b>: This will create a copy of the Master Page you have selected in the dialog. Since a new Master Page is created that way, you will also see the prompt to insert a name. Copying a Master Page is helpful if you are working with documents that use a mostly identical design and only vary in details. Thus, you can create a basic design and create duplicates, in which only the changing details are modified.</li> <li><b>Import Master Pages</b>: Clicking this button brings up a file dialog, in which you need to select a Scribus file. After selecting a file and clicking "OK", Scribus will open a new dialog that allows you to select a Master Page from the document for import into Scribus. This feature is most useful when you have split a large project into several smaller files (which is always recommended), as you don't have to create a new Master Page for each project file.<br> <table width="100%"> <tr> <td align="center">[[File:Help_mpage2.png|alt="Page Palette"]]</td> </tr> </table> </li> <li><b>Delete Master Page</b>: This will delete the Master Page you have selected in the file dialog. If the Master Page is already in use, you will be asked for a replacement.</li> </ul> Another way to create a new Master Page is to convert an existing page into a Master Page via <i>Page > Convert to Master Page</i>. As with any new Master Page you will be asked to insert a name for the new page, as well as determining the category. If you check the option "Copy Applied Master Page Items", the Master Page that is applied to the current page will be merged with the latter into one new Master Page. Otherwise, only the items on the "real" page become part of the new Master Page. <table width="100%"> <tr> <td align="center">[[File:Help_mpage3.png|alt="Page Palette"]]</td> </tr> </table> <h4>Applying Master Pages</h4> <p>As with creating Master Pages, there are also several ways to apply them.</p> <h5>The Page Menu</h5> <p>The most obvious way to apply a Master Page is via <i>Page > Apply Master Page</i>, which will bring up the following dialog:</p> <table width="100%"> <tr> <td align="center">[[File:Help_mpage4.png|alt="Page Palette"]]</td> </tr> </table> <p>In the dropdown list at the top of the dialog you can choose the Master Page you want to apply.</p> <p>The options below let you choose the range of pages to which the selected Master Page will be applied:</p> <ul> <li>Current page</li> <li>Even pages (i.e. in most cases left pages)</li> <li>Odd pages (i.e. in most cases right pages)</li> <li>All pages</li> <li>A range of pages.</li> </ul> <h5>The Page Palette</h5> <p>The Page Palette (<i>Windows > Arrange Pages</i>) gives you a fast, drag-and-drop way of applying Master Pages, navigating pages, moving and inserting pages. The top half of the palette shows the available Master Pages in your document. By right-clicking on a listed Master Page item you can activate a thumbnail preview of the available Master Pages. The lower half has the actual pages within your document. Applying a Master Page is done by dragging a Master Page list item onto a page in the lower half.</p> <table width="100%"> <tr> <td align="center">[[File:Help_mpage5.png|alt="Page Palette"|Page Palette]]</td> </tr> </table> <br> <p><b><i>Important: Please note that Master Page items are always below any item on a regular page. It's impossible to move a Master Page item above a real page item in the stacking order.</i></b></p> | ||
{{OPL}} | |||
Latest revision as of 18:37, 29 March 2012
Working with Master Pages
Master Pages are the means to add content to pages which have repeating content like page numbers, chapter names, section heads and the like. Users of other page layout applications might be familiar with this concept of static page backgrounds. Fundamental to understanding how they work is that these pages are not editable from the normal page canvas. All items except page numbers are static background items.
Thoughtful creation of master pages can vastly simplify and speed up the creation of complex documents - the more complex, the more essential they are. There are several reasons to use Master Pages, among them the ability to automatically add page numbers or avoiding the hassle of inserting objects that are repeatedly used in the same place over and over again.
Creating Master Pages
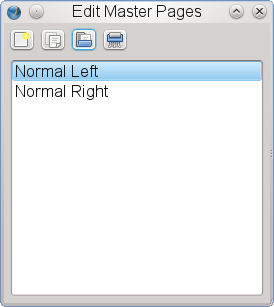
There are basically two ways to create a Master Page. The most obvious is to create a new one from scratch, which is actually is quite simple: Go to Edit > Master Pages. This will bring up the Master Page dialog:
 |
As you can see, Master Pages have already been automatically created when you created the new document. How many and what kind of Master Page depends on the document layout you chose: Single-page layouts have one Master Page, double-sided layouts two etc. It is generally a good idea not to touch the "Normal" Master Pages and create new ones instead.
The Master Page dialog shown above offers four options, from left to right:
- Add new Master Page: If you click on this icon, a new dialog pops up. Here you have to enter a name for the new Master Page. Depending on your document layout, you also have to determine the Master Page category (e.g. left page, right page). Clicking OK will create your new Master Page, and you can edit this page immediately.
- Duplicate Master Page: This will create a copy of the Master Page you have selected in the dialog. Since a new Master Page is created that way, you will also see the prompt to insert a name. Copying a Master Page is helpful if you are working with documents that use a mostly identical design and only vary in details. Thus, you can create a basic design and create duplicates, in which only the changing details are modified.
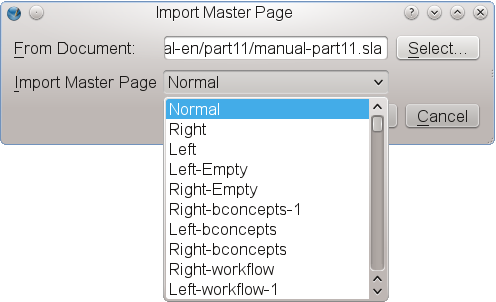
- Import Master Pages: Clicking this button brings up a file dialog, in which you need to select a Scribus file. After selecting a file and clicking "OK", Scribus will open a new dialog that allows you to select a Master Page from the document for import into Scribus. This feature is most useful when you have split a large project into several smaller files (which is always recommended), as you don't have to create a new Master Page for each project file.

- Delete Master Page: This will delete the Master Page you have selected in the file dialog. If the Master Page is already in use, you will be asked for a replacement.
Another way to create a new Master Page is to convert an existing page into a Master Page via Page > Convert to Master Page. As with any new Master Page you will be asked to insert a name for the new page, as well as determining the category. If you check the option "Copy Applied Master Page Items", the Master Page that is applied to the current page will be merged with the latter into one new Master Page. Otherwise, only the items on the "real" page become part of the new Master Page.
 |
Applying Master Pages
As with creating Master Pages, there are also several ways to apply them.
The Page Menu
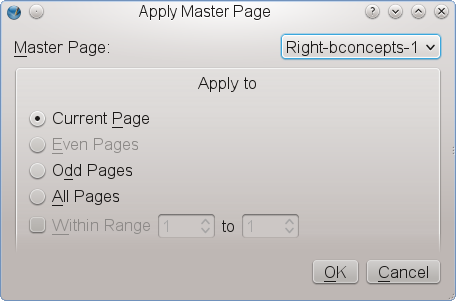
The most obvious way to apply a Master Page is via Page > Apply Master Page, which will bring up the following dialog:
 |
In the dropdown list at the top of the dialog you can choose the Master Page you want to apply.
The options below let you choose the range of pages to which the selected Master Page will be applied:
- Current page
- Even pages (i.e. in most cases left pages)
- Odd pages (i.e. in most cases right pages)
- All pages
- A range of pages.
The Page Palette
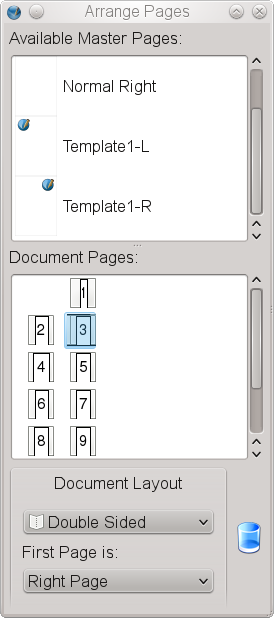
The Page Palette (Windows > Arrange Pages) gives you a fast, drag-and-drop way of applying Master Pages, navigating pages, moving and inserting pages. The top half of the palette shows the available Master Pages in your document. By right-clicking on a listed Master Page item you can activate a thumbnail preview of the available Master Pages. The lower half has the actual pages within your document. Applying a Master Page is done by dragging a Master Page list item onto a page in the lower half.
 |
Important: Please note that Master Page items are always below any item on a regular page. It's impossible to move a Master Page item above a real page item in the stacking order.
| This material may be distributed only subject to the terms and conditions set forth in the Open Publication License, v1.0 or later. Distribution of the work or derivative of the work in any standard (paper) book form is prohibited unless prior permission is obtained from the copyright holder. A copy of the license is included in the section entitled "Text of the Open Publication License." |