Text Gradients: Difference between revisions
Jump to navigation
Jump to search
No edit summary |
No edit summary |
||
| Line 4: | Line 4: | ||
[[Image:Textgradients.png]] | [[Image:Textgradients.png]] | ||
# Select the frame then click ''Item > Convert To > Outlines'', or use the Context menu ''Convert To > Outlines''. This converts each letter to an outline (in other words, a shape), and also groups the letters. | |||
# You will need to select this group (click on it). In the middle example, we are trying to make individual gradients in each letter, so we then click ''Item > Ungroup'' to separate the individual letters. | |||
# Now click each one and use the gradients in ''Properties > Colors'' as desired. If you do not ungroup, you can choose different colors for each letter, but there will be one kind of gradient possible for all letters – you may need to click outside the group, then back to the next letter to switch from one letter to the next. | |||
* In the bottom example, we have made one continuous gradient across all the letters – this is a four-color gradient, going from red to yellow to magenta to blue. After step 1 above, ''Convert To > Outlines'', we have then clicked ''Item > Combine Polygons'', so that then you can make one large gradient over the entire collection of combined letters. | |||
For some tips on putting images in text, check [[How to fill a Scribus text with an image]], and for hints on text over images see [[Text over images]]. | For some tips on putting images in text, check [[How to fill a Scribus text with an image]], and for hints on text over images see [[Text over images]]. | ||
Revision as of 13:40, 3 May 2008
This is a brief article explaining how to take text and fill it with gradient colors.
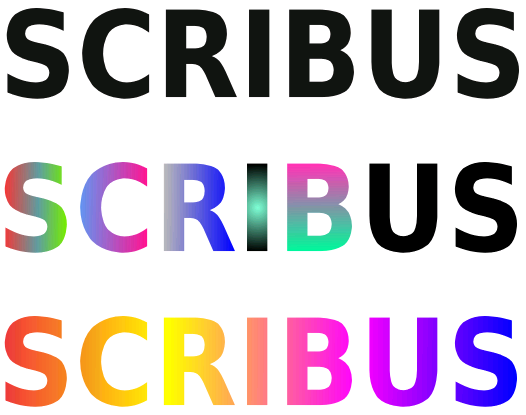
Here are three sets of text. The top shows the text in a text frame, then two copies were made and positioned below.
- Select the frame then click Item > Convert To > Outlines, or use the Context menu Convert To > Outlines. This converts each letter to an outline (in other words, a shape), and also groups the letters.
- You will need to select this group (click on it). In the middle example, we are trying to make individual gradients in each letter, so we then click Item > Ungroup to separate the individual letters.
- Now click each one and use the gradients in Properties > Colors as desired. If you do not ungroup, you can choose different colors for each letter, but there will be one kind of gradient possible for all letters – you may need to click outside the group, then back to the next letter to switch from one letter to the next.
- In the bottom example, we have made one continuous gradient across all the letters – this is a four-color gradient, going from red to yellow to magenta to blue. After step 1 above, Convert To > Outlines, we have then clicked Item > Combine Polygons, so that then you can make one large gradient over the entire collection of combined letters.
For some tips on putting images in text, check How to fill a Scribus text with an image, and for hints on text over images see Text over images.
