Debian
Introduction
This document is about using Scribus Team package archive to obtain up-to-date Scribus packages for Debian GNU/Linux and on Ubuntu GNU/Linux distributions. The archive and packages described here are produced and supported by the Scribus Team member "malex".
Available packages
| Name | Description | Supported Distributions and branches |
|---|---|---|
| scribus | stable (1.4.0) | Debian stable/testing/unstable and Ubuntu Oneiric/Natty/Maverick/Lucid |
| scribus-ng | currently stable Release Candidate (1.4.0-rc6); will be switching to 1.5.0svn soon. | Debian unstable/testing/stable and Ubuntu Oneiric/Natty/Maverick/Lucid |
| fontmatrix | Font manager | Supported Ubuntu releases |
The Scribus Archive
We have two package archives (also known as 'repositories') - debian.scribus.net (located in Europe) and debian.tagancha.org (located in the USA), so you can use one that is closer to you or even both at the same time for redundancy. Instructions are the same whether you run a 32-bit (i386) or a 64-bit (amd64) distribution. Both scribus and scribus-ng packages can be installed on your system at the same time.
Ubuntu PPA
There is another archive hosted by Ubuntu. Daily builds of scribus-trunk packages are made from the latest Scribus subversion trunk code. See the installation instructions at https://launchpad.net/~scribus/+archive/ppa. scribus-trunk can be installed and used in parallel with both scribus and scribus-ng packages.
I. Short instructions for the impatient and experienced
1. Add the repositories to package manager software
Scribus Archive source lines can be simply added to /etc/apt/sources.list:
Debian unstable (Sid):
deb http://debian.scribus.net/debian/ unstable main
deb http://debian.tagancha.org/debian/ unstable main
Debian testing (Wheezy):
deb http://debian.scribus.net/debian/ testing main
deb http://debian.tagancha.org/debian/ testing main
Debian stable (Squeeze):
deb http://debian.scribus.net/debian/ stable main
deb http://debian.tagancha.org/debian/ stable main
Ubuntu Oneiric Ocelot (oneiric or 11.10):
deb http://debian.scribus.net/debian/ oneiric main
deb http://debian.tagancha.org/debian/ oneiric main
Ubuntu Natty Narwhal (natty or 11.04):
deb http://debian.scribus.net/debian/ natty main
deb http://debian.tagancha.org/debian/ natty main
Ubuntu Maverick Meerkat (maverick or 10.10):
deb http://debian.scribus.net/debian/ maverick main
deb http://debian.tagancha.org/debian/ maverick main
Ubuntu Lucid Lynx (lucid or 10.04):
deb http://debian.scribus.net/debian/ lucid main
deb http://debian.tagancha.org/debian/ lucid main
2. Add the Scribus Archive signature key
Our repositories are cryptographically signed for added security with EEF818CF key, so your package manager software could verify that our packages have not been tampered with by a third party will not produce warnings about untrusted packages being installed.
Automated way
Install the scribus-archive-keyring package from our archive using apt, aptitude, or synaptic. Answer yes when your package manager asks if you would really like to install a package from an untrusted source.
Manual way
Get the key from any major keyserver such as:
$ gpg --keyserver wwwkeys.pgp.net --recv-keys EEF818CF
Export the key and add it to the apt keyring.
$ gpg --armor --export EEF818CF | sudo apt-key add -
3. Install the package
Use aptitude, apt, or synaptic to install your the package you'd like to use.
Examples:
$aptitude install scribus
$apt-get install scribus-ng
Note: Report bugs to the Scribus Bug Tracker not Debian or Ubuntu BTS
Do not file bug reports about the packages from the Scribus archive in the Debian or Ubuntu Bug Tracking Systems (BTS). You are encouraged to contact the maintainer directly at ![]() if you have package installation questions or for comments and suggestions about this document. If you have a Scribus issue unrelated to packaging you should use the Scribus BTS.
if you have package installation questions or for comments and suggestions about this document. If you have a Scribus issue unrelated to packaging you should use the Scribus BTS.
II. Step-by-step instructions.
These instructions are focused on Ubuntu.
1. Add the Scribus Archive gpg key to your package manager using gui-apt-key
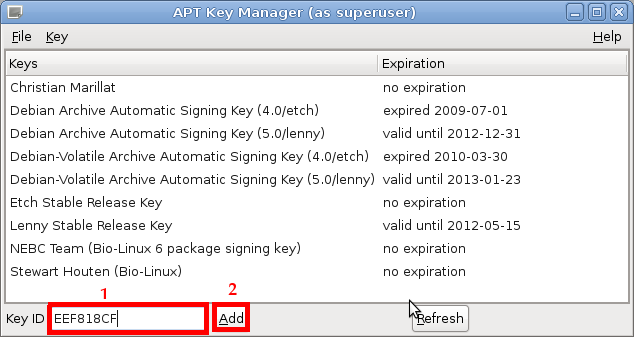
- Start gui-apt-key from the command line by running "sudo gui-apt-key" or from the "Run Application" dialog window that appears when you press Alt+F2. When gui-apt-key starts you will see its main window. Enter the Scribus Archive key's ID into the "Key ID" box (1) and click on the "Add" button (2).
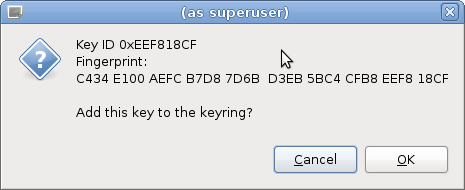
- When the confirmation dialog appears click on the "OK" button.
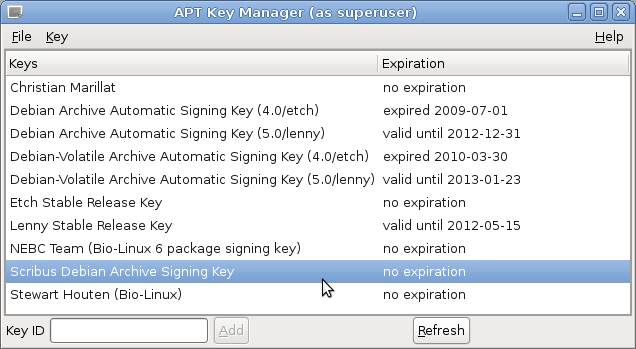
- As a result of you should see the Scribus Archive key in the list in the main window as the result (highlighted entry in the screenshot).
2a. Method 1- Add the Scribus Archive as a new Repository using Software Sources
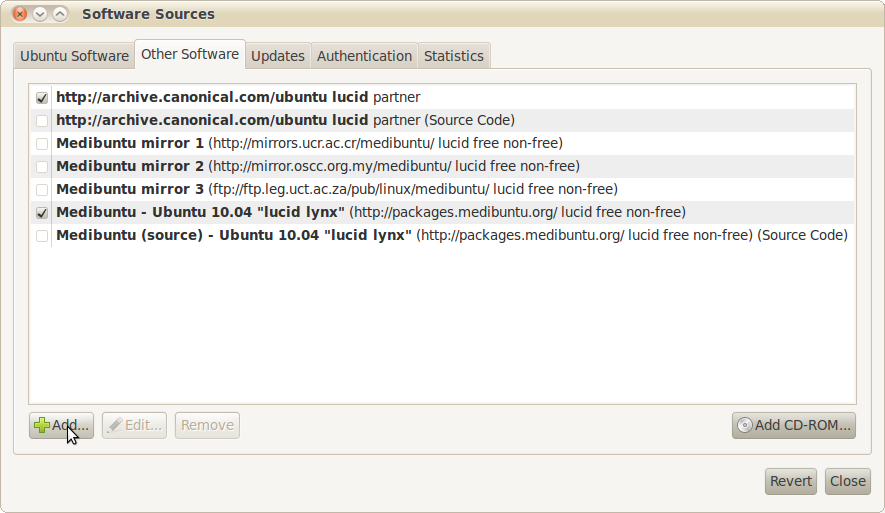
- Go to System > Administration > Software Sources. The Software Sources window will open. Choose the 'Other Software' tab.
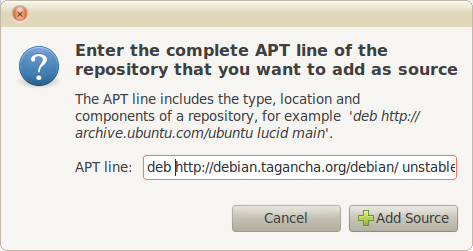
- Click on the Add button. When the dialogue opens type (or copy and paste) the appropriate source line from the list at the top of this document into the text field. For example, if you are running Debian Unstable release you would type or paste "deb http://debian.scribus.net/debian/ unstable main non-free contrib" as shown in the screenshot below. For Ubuntu Lucid Lynx it would be "deb http://debian.scribus.net/debian/ lucid main non-free" and so on.
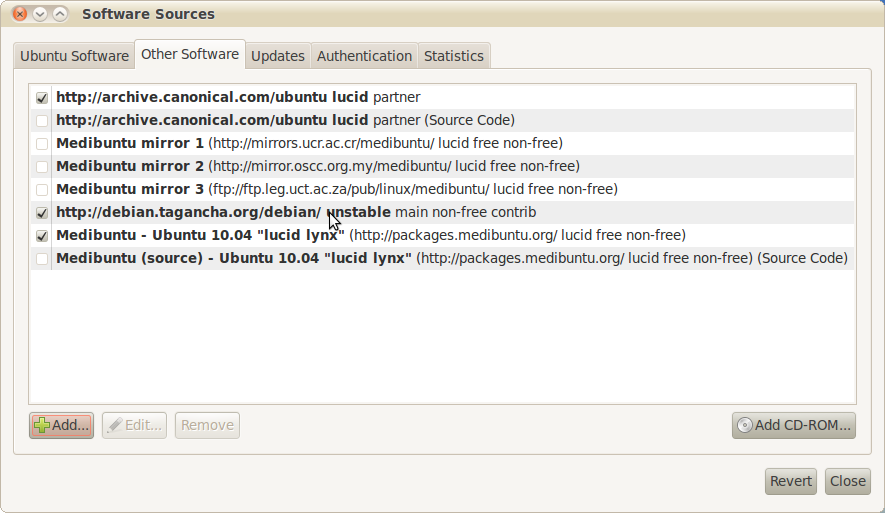
- Left click on the 'Add Source' button and follow the prompts to update the repository index. To check if all went well you should now see your Software Sources updated to look like this:
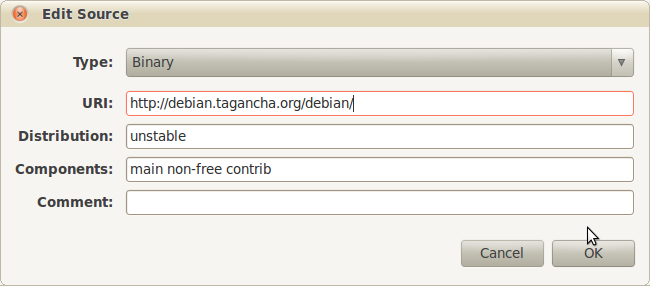
- If it does not look right then highlight the line and left click on the Edit button. Make any changes necessary to ensure it looks like this:
- Close down Software Sources.
2b. Method 2 - Add the Scribus Archive to your package manager using Synaptic
- Start Synaptic package manager (later "Synaptic").
- Click on "Settings" > "Repositories" (Figure 1).
- Click on "New" and type or paste in the "URI", "Distribution", and "Section(s)" and click on "OK" (Figure 2).
- click on the "Reload" button in the toolbar and wait for the package database update to complete.
- Click on the "Search" toolbar button. A "Find" dialog window will open. Type "scribus" in the "Search" field and click on the "Search" button (Figure 3).
- The search should produce results similar to the following (Figure 4).
- Right-click on the package you'd like to install in the search results or click on the small square in the leftmost "S" column and select "Mark for Installation" (Figure 5).
- You should see your chosen package marked for installation in the main synaptic window as indicated by a yellow arrow in the "S" column (Figure 6).
- Click on the "Apply" button in the toolbar. You should see the following dialog window.
- Click on the "Apply" button in the above dialog window. You should see a succession of messages indicating that the package is being downloaded and installed as shown in the next two figures.
- Depending on your synaptic preferences you might have to click on the "Close" button or the installation progress window might close by itself. At the end you should see a green square in the column "S" in front of your chosen package in the main synaptic window.
- scribus (Scribus 1.4.x) - Stable branch. This is the recommended version to use at this time.
- scribus-doc Scribus 1.4.x documentation.
- scribus-ng (Scribus 1.5.x) - Developmental branch with new features and capabilities. Use if you really need the new features in development, but save your work often and report bugs when you encounter them.
- scribus-ng-doc Scribus 1.5.x documentation.
- scribus-template - Additional document templates.
- icc-profiles - A collection of common ICC profiles to use with Scribus and other color profile-aware software. You must Install this package if you want to enable color management.
- lprof Hardware color profiler tool for creating ICC profiles to be used with Scribus.
- qt4-qtconfig allows users to configure the look and behavior of any Qt4 application - necessary to overcome some Ubuntu problems.
- podofo is a library to work with the PDF file format. The scribus-ng packages in the Scribus Archive are podofo-enabled.
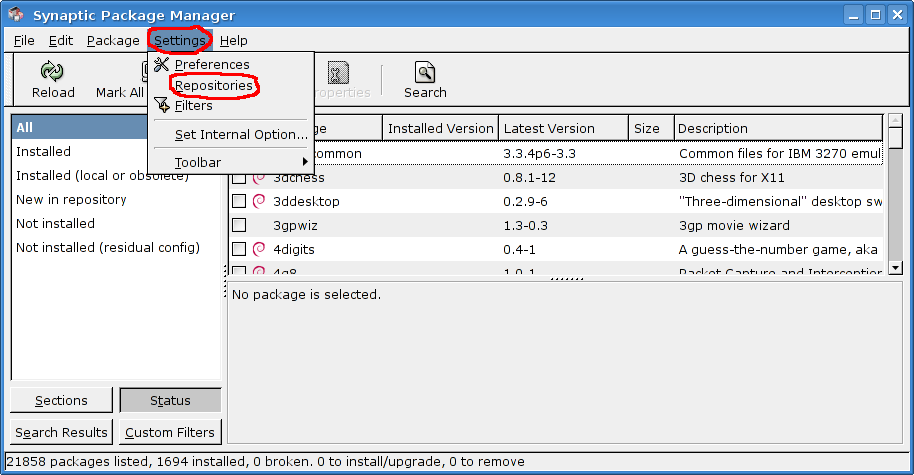 Figure 1. Settings > Repositories menu.
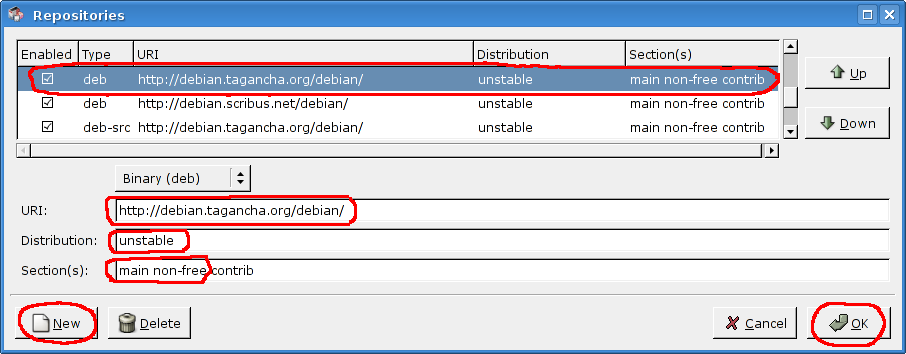 Figure 2. Adding a repository.
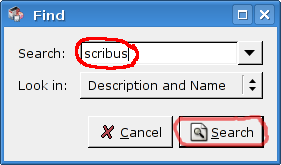
Figure 3. Searching.
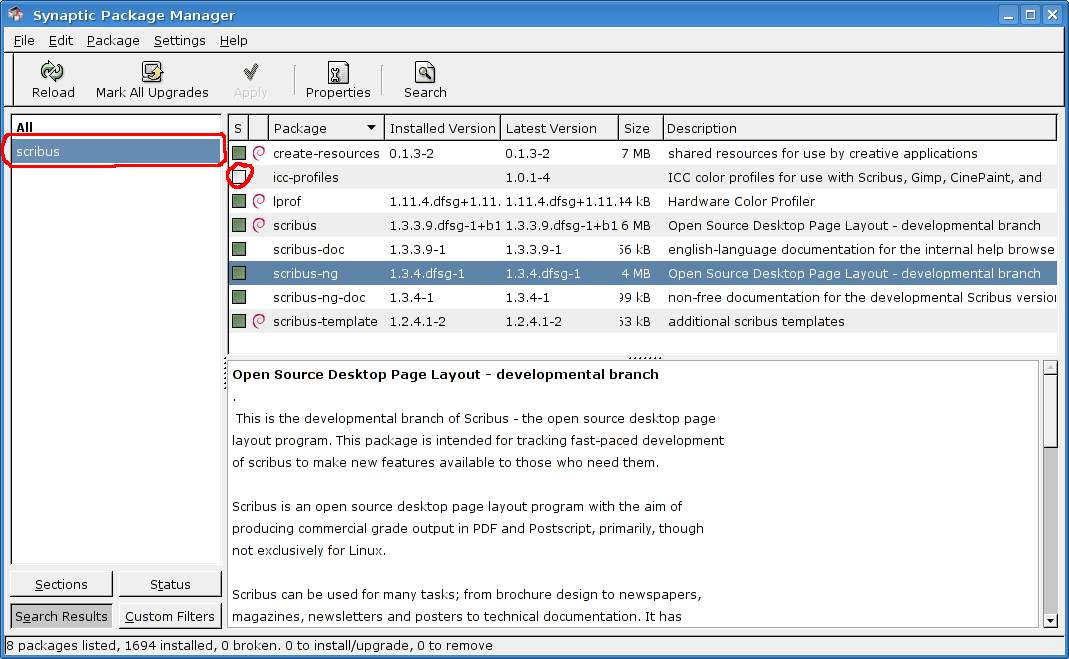
Figure 4. Search results.
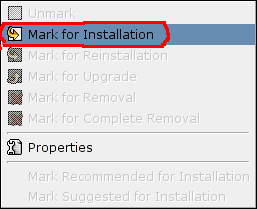
Figure 5. Mark package for installation.
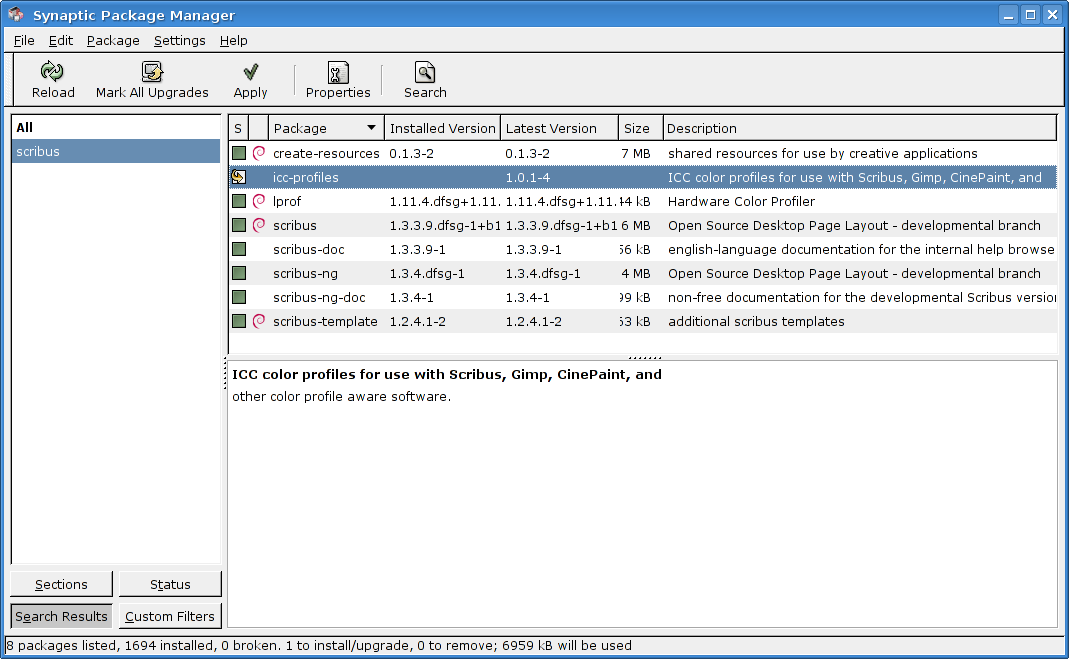
Figure 6. Package is marked for installation.
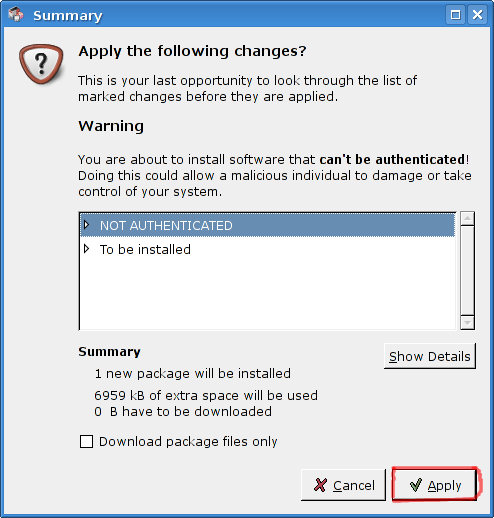
Figure 7. Apply changes summary.
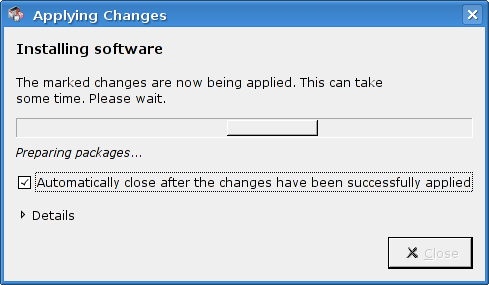
Figure 8. Package being downloaded.
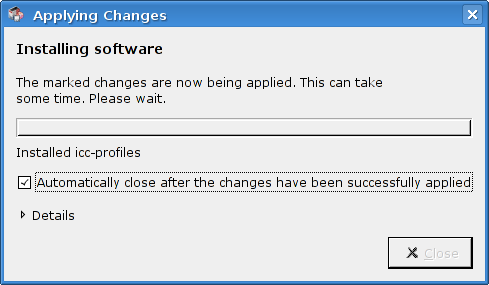
Figure 9. Package being installed.
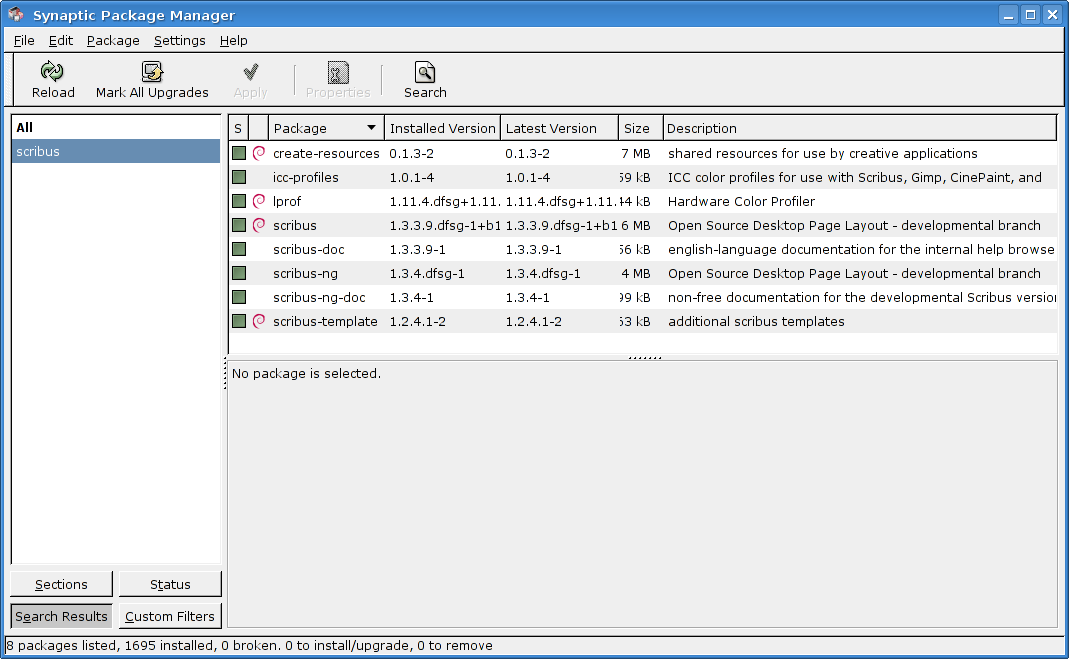
Figure 10. Main window after package installation.
2c. Using Adept package manager to install a Scribus package
For an alternative method using the "Adept" package manager found in Kubuntu see Getting Scribus on Ubuntu/Kubuntu up and running.
Building from source
See Building Scribus from source on Debian/Ubuntu for more details.
About the Scribus Archive
There are following Scribus related packages in Debian and Ubuntu:
Scribus applications and documentation
Additional data, color profiles, templates, and auxiliary applications:
Instructions on rebuilding the source packages are also applicable to other Debian derivatives and custom distributions not covered here. Oleksandr Moskalenko maintains a Scribus Team's Debian/Ubuntu repository (Scribus Archive) that contains the newest "scribus", "scribus-doc", "scribus-ng", and "scribus-ng-doc" packages. Note that the only way to run latest Scribus versions on Debian/Stable and Ubuntu is to use Scribus Archive. Unfortunately, Ubuntu has had a number of Qt related problems, so in some cases we recommend using Debian to run Scribus.
About this document
This how-to has been originally created for Scribus Wiki page by the following Scribus Wiki users: malex, mhanski, Zero0w, JureCuhalev, Cbradney, and Joolsr. This page is licensed under CC BY-SA.
Keywords: Debian, Ubuntu, .deb, packages, repository, archive, step-by-step guide, 42.