Scribus hands on
| Installation • Usage • PDF issues • Imposition • Other |
| This article is outdated. Please update the information to reflect the current status or knowledge. We will deprecate/delete in the future. |
 |
This article is a candidate for deletion because it is either grossly inaccurate, misleading, or completely outdated. If you believe that this article still has value or would like to correct it please label it correctly. |
"""Work in progress: this document is still only a draft!"""
This document will tell you, how to do your first steps with Scribus without teaching you, how to use Scribus or how to do DTP.
It is not a brilliant idea to approach Scribus this way (but so many people want to live dangerously): you should really read one of the several tutorials before starting to work with Scribus:
- Get Started with Scribus
- Working with Scribus: How to begin
- Getting Started With Scribus 2008 by Murray Strome and Hananel
Having read our book (very soon available) will certainly enhance your karma!
You have been warned: Reading this document will help you putting a document together, but it won't really help you to do a good job.
Last check before we start: what version are you using? Well, if you're beginning with Scribus, you really should be using 1.3.3.12.
Creating a new document
When creating a new document, you get a dialog where you can set the size of the pages (most of the time A4 or Letter) and its orientation (portrait or landscape), the default measurement unit for the document (normally cm, inch or pt), the margin around the content, and the number of pages you want to create.
You can still change those values after having created the document:
- You can modifiy the size of the page, its orientation and the margins in the "Format/Page" menu. Each page may have different settings.
- You can change the unit in the status bar.
- You can add pages with "Insert/Page" and manage them through "??/???"
The Scribus Workspace
You have for ways to interact with Scribus:
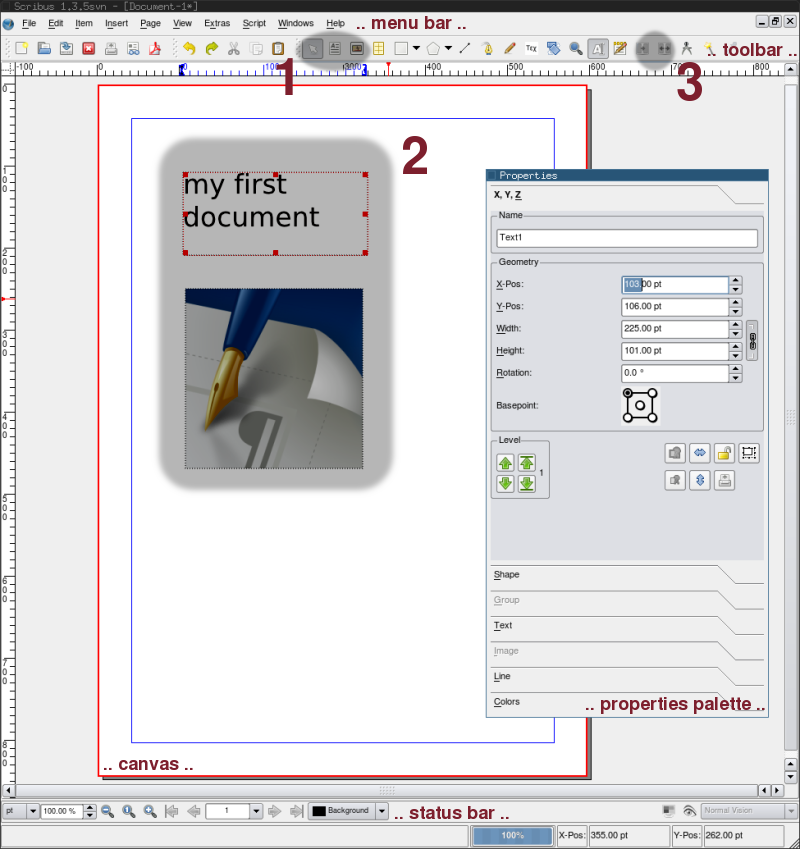
- All actions can be performed using the Menus at the top
- The Toolbar below the Menus gives you a faster access to some key functions
- Right-clicking on the objects on the Canvas will give you access to those functions which are most relevant to that contest.
- The Properties Palette is your cockpit when managing the content. Different type of content may have different Tabs active.
- The Status bar will give you feedback over your actions and lets you set some general settings.
Adding content
The focus point (1) shows the toolbar buttons for moving frames, for creating text frames and for creating image frames:
- After having created a Text Frame, you can:
- Double click on it and start writing
- Right clik on it and "Edit Text" in a separate window (it's faster)
- Right click on it and "Get Text" from an external file (txt, odt, ...; it's the best way to put long text into Scribus)
- Use the "Text" tab in the Properties Palette and the "Style" Manager (in the "Edit" menu) to layout the text.
- After having created an Image Frame, use the context menu to "Get the Image" from an external file (jpg, png, tif, psd, pdf).
- Use the "Image" tab in the Properties Palette to how the picture will be showed (crop, fit to frame)
- If you copy an image frame and you paste it into a text frame, you will get an inline image, which moves with your text (you should avoid that).
- In the Shape tab you can define the form of your frame and how other frames flow around the current frame.
- If you have a vector image:
- PDF can be imported into an image frame, and won't be rasterized on export (if you choose to not rasterize them; 1.3.5svn only).
- Use the "File > Import > Vector File" to include EPS or SVG files as vectors.
The focus point (2) shows you a typical result.
The two buttons in the focus point (3) will let you concatenate text frames to flow the text between columns and pages
Page numbers are added on the master page ("Edit / Master Page") through the "Insert / Character / Page Number" menu entry (in older version of Scribus you may have to add as many "page number" characters as the total number of pages has: 1 for 9, 2 for 99, 3 for 999)
Working with the Frames
- Through the Properties palette
- The order of the frames is set through the levels in the X,Y,Z tab
- You can move the frame with the mouse or through the X,Y,Z tab (you can lock their content or their position)
- The Line tab manages the border of the frames.
- You can align the frames using the guides ("Format/Guides" and "View/Guides") or the "Window/Distribute and Align" tool.
Producing the document
- printing (if it fails go through exporting to pdf)
- exporting to pdf
- collecting the document
What will be difficult to do
- Lists: they have to be "manually" created (How to create lists in_Scribus).
- mathematical formulas: you can import them as eps vector graphics.
- imposition (a booklet): you will have to use external tools (Howto: imposition).
- tables: there is only a very basic support (Building Tables).
What you won't be able to do
- footnotes
- index
- edit pdfs
