Help:Manual Layers
Working with Layers
You may know the concept of layers from drawing or image editing software. Layers can be used for many different purposes, for example for separating printable and non-printable items like grids, to create multiple-language versions of a document in a single file or simply to ease editing certain objects without affecting others.
By default, a new document has only one layer, with the default name "Background". Newly added objects will each be at their own Level on this layer, so you may have many levels on one layer. For many documents, only one layer will be necessary, but sometimes it may be desirable to work with more than one layer.
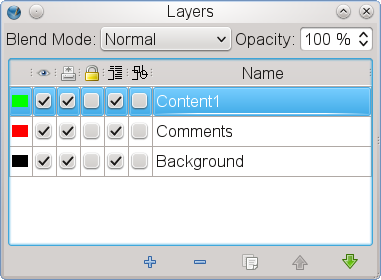
To add a new layer, open the Layers dialog under Windows > Layers or press F6:
 |
At first glance, the dialog looks simple, but it's very powerful. At the top you can set a blend mode and layer opacity. These will be discussed elsewhere.
At the bottom of the dialog we have the basic layer management tools available, from left to right:
- Adding a new layer
- Removing a selected layer
- Duplicating a selected layer, including its content
- Moving a selected layer one level up
- Moving a selected layer one level down
The major part of the dialog is occupied by the layer list, including various layer options. These are, from left to right:
- Color of the layer indicator: Each layer has a unique color that helps identifying objects on that layer. You can enable the color indicators for objects via View > Show Layer Indicators. To change this color, simply click on the color for the respective layer in the dialog. This will bring up a color selector, where you can either choose another color or create a new one.
- Layer visibility: Here you can set a layer to visible or invisible. Visibility has no impact on printing, so be careful when you use this feature, as it can easily happen that invisible content will appear in your print or an exported PDF, simply because you forgot to disable printing as well.
- Layer printability: This option corresponds to the previous, and you're advised to be equally cautious, since a visible layer may be set to not to print or export to PDF.
- Layer locking: This option lets you lock all objects on layer, i.e. prevent them from being edited.
- Text flow for layer objects: If enabled, this option will force text in frames on lower layers to flow around objects on the selected layer.
- Outline mode for layer objects: This option comes in handily if you want to speed up the performance of Scribus, as all objects on a layer are only displayed in a "wireframe" mode. This is especially useful when a layer contains complex vector graphics.
- Layer name: Every layer has a unique name, which is shown here. To change the name of a layer, double-click into the "Name" field and insert a new one.
Switching between layers
There are two options to switch between layers. The first is to select a layer in the layer dialog, but it is a bit tedious to open a separate dialog each time you want to do nothing more than continue your work on another layer. Fortunately, the Status Bar at the bottom of the Scribus windows has a layer selector. It lists all layers in a document by name and also displays a layer's color.
Moving objects between layers
If you want to move an object from one layer to another, you can use "Send to Layer" from the Context Menu or the same command from the Item menu in the menu bar. The command is also available in the Context Menu of objects in the Document Outline.
Hints for working with layers
- Layers always exist for the whole document, not per page.
- To select all items on a layer, use Edit > Advanced Select All from the Menu Bar.
- If you’re deleting a layer with objects on it, you will be asked if the objects on it should be removed as well. If you negate, all objects on the deleted layer will be moved to the background layer.
- Scribus document layers must not be confused with layers in PSD files. Both are completely independent.
- Scribus supports layers in Adobe Illustrator (AI) files, but only if an AI file is being opened (File > Open). If you import a layered AI file (File > Import > Get Vector File), all AI layers will be merged into one.
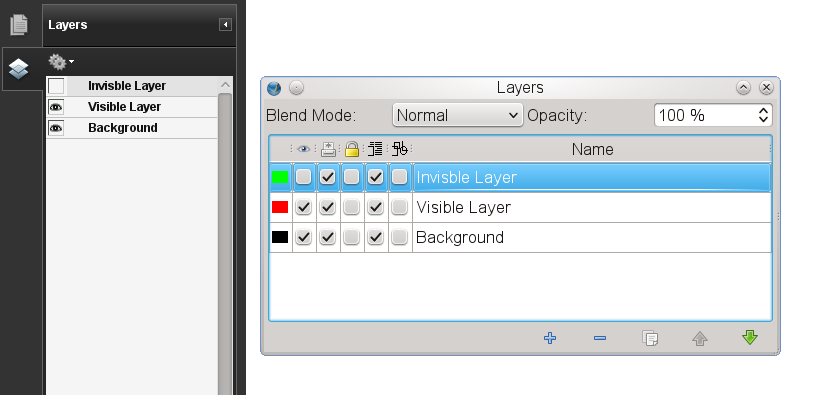
- Layers are also supported in PDF version 1.5 and later, but so far, only Adobe Reader 7 and later versions can display layered PDFs correctly. Scribus can export PDF 1.5 files with layers, but you have to check the option "Include Layers" in the "General" tab of the PDF export dialog. Adobe Reader will then read the layer content correctly:
 |
| Layers and their settings in Adobe Reader (right) and Scribus (left) |
| This material may be distributed only subject to the terms and conditions set forth in the Open Publication License, v1.0 or later. Distribution of the work or derivative of the work in any standard (paper) book form is prohibited unless prior permission is obtained from the copyright holder. A copy of the license is included in the section entitled "Text of the Open Publication License." |