Footnotes: Difference between revisions
mNo edit summary |
|||
| (4 intermediate revisions by one other user not shown) | |||
| Line 1: | Line 1: | ||
'''Other languages:''' [[Notas_al_pie|Español (es)]] | |||
This page is an attempt to describe the creation of footnotes in 1.5.0svn. It mainly represents a series of observations on creating and editing footnotes. | This page is an attempt to describe the creation of footnotes in 1.5.0svn. It mainly represents a series of observations on creating and editing footnotes. | ||
| Line 41: | Line 43: | ||
: [[File:Footnotes6.png]] | : [[File:Footnotes6.png]] | ||
Here we have managed to increase the height of the frame by editing the '''Top Distance''' in ''Properties > Text > Columns & Text Distances''. As can be seen, this allows for | Here we have managed to increase the height of the frame by editing the '''Top Distance''' in ''Properties > Text > Columns & Text Distances''. As can be seen, this allows for creating a little breathing space between the main text and the footnotes. The '''Left Distance''' was also edited, but no change happens with width. | ||
====Unwelding and Variants==== | ====Unwelding and Variants==== | ||
It turns out that what I said about moving footnote frames isn't quite true. Before we get to unwelding, let's talk about what happens with ''Item > Welding > Edit weld item''. | It turns out that what I said about moving footnote frames isn't quite true. Before we get to unwelding, let's talk about what happens with ''Item > Welding > Edit weld item''. | ||
| Line 69: | Line 71: | ||
In the bottom section of the dialog, notice the settings for ''Auto Height'' and ''Auto Width''. Here, finally, is where we can find a way to be able to edit these dimensions by unselecting these items. | In the bottom section of the dialog, notice the settings for ''Auto Height'' and ''Auto Width''. Here, finally, is where we can find a way to be able to edit these dimensions by unselecting these items. | ||
|} | |} | ||
Latest revision as of 12:40, 9 September 2013
Other languages: Español (es)
This page is an attempt to describe the creation of footnotes in 1.5.0svn. It mainly represents a series of observations on creating and editing footnotes.
Use Edit Contents Mode
This isn't just a recommendation, it's currently the only way to create footnotes. You will not find any method in Story Editor.
Elements of Footnote Creation
- Edit > Styles – I am mentioning this first, since even though it's not central or absolutely required for creating footnotes, probably with few exceptions you will want to create a paragraph or character style for your footnotes, even if it's just a variant of your main text style.
- Edit > Marks – this brings up the Marks Manager dialog. Until you actually have some footnotes (one kind of Mark), you won't see anything to do here.
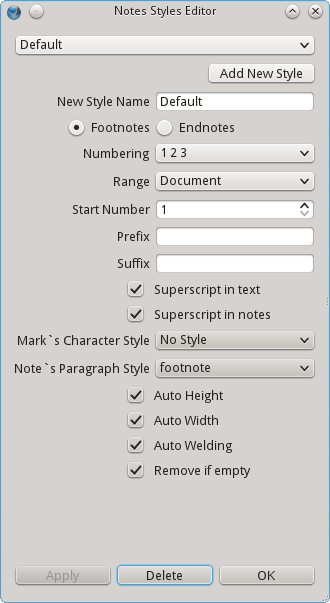
- Edit > Notes Styles – here is where you will be applying your paragraph and character styles to create Notes Styles.
- Item > Welding – for the moment, don't worry about what welding has to do with Scribus or footnotes. We'll get there soon enough.
- Insert > Marks – this as you might expect is where the action is in actually inserting a footnote mark somewhere in the text. You might just start at this point, by beginning to create footnotes, but it's still going to be important sooner or later to understand those other aspects of footnotes.
Insert > Marks
Welding
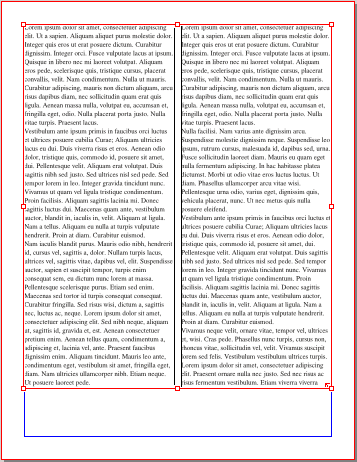
Don't worry, no concern about getting out your smoked glass helmet. Something you can see in the screenshots of the footnote frames above is the small yellow rectangle at the joint of our original text frame and this new footnote frame. This indicates the two frames are welded, and as you might expect you can't pull them apart. If you move one, the other moves right along with it.
This might seem like grouping, but it has some different characteristics. You can resize the main text frame, either by using the mouse or the settings in Properties > XYZ, but if you narrow it, the footnote frame also narrows. If you shorten it, the footnote frame stays right against the bottom of the shortened frame.
On the other hand, you can move the footnote frame, either with the mouse or with X-Pos and Y-Pos spinboxes, but you cannot directly edit the height or width of this welded footnote frame.
Here we have managed to increase the height of the frame by editing the Top Distance in Properties > Text > Columns & Text Distances. As can be seen, this allows for creating a little breathing space between the main text and the footnotes. The Left Distance was also edited, but no change happens with width.
Unwelding and Variants
It turns out that what I said about moving footnote frames isn't quite true. Before we get to unwelding, let's talk about what happens with Item > Welding > Edit weld item.
- Move weld Point – although it's clear that you can click on and then move the weld point on the page, the utility of this unclear, and it's use may be more appropriate for other kinds of marks. The relationship between the main frame and the footnote frame seems to remain the same.
- Move Object – here the utility becomes more obvious, where now we can use the mouse to physically separate the main text and footnote frames. We see that our yellow weld rectangle is still present.
- Here we see another way to create breathing space between the text lines. You can only make this separation using the mouse on the canvas. It won't work by adjusting the spinbox settings, and here still you cannot adjust height or width of the footnote frame. Once you End Editing, the space remains constant except if you adjust the height of the main text frame, in which case the two frames come together again.
A note of caution: Close the Edit weld item dialog before doing other operations. For example, I found that trying to Insert a new page into the document caused Scribus to crash when I hadn't closed Edit weld item.
Now for some unwelding. Click Item > Welding > Unweld items.
This looks similar to what we just did, but now see that the yellow rectangle has disappeared. Furthermore, we can now move either the main or footnote frame independently. Since there is (apparently) no method to re-weld, you might use this option thoughtfully. You may notice that with footnote frames the Lock Size button is selected in Properties > XYZ. Even if you unselect this, you will still be unable to edit the size of the footnote frame independently. Also note that even with an unwelded frame, as you add more footnotes, the frame does then enlarge to accommodate them.


