Trabajar con marcos de imagen: Difference between revisions
| Line 13: | Line 13: | ||
Al apretar el botón derecho del ratón aparece en Menú contextual, que contiene varias operaciones frecuentes con marcos. Una de ellas es la posibilidad de convertir un marco de imagen en otro tipo de marco. | Al apretar el botón derecho del ratón aparece en Menú contextual, que contiene varias operaciones frecuentes con marcos. Una de ellas es la posibilidad de convertir un marco de imagen en otro tipo de marco. | ||
== | ==Tamaño y posición== | ||
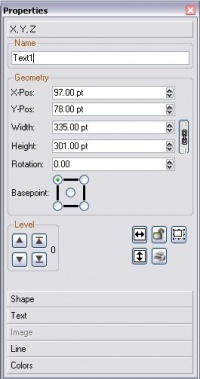
En este momento te darás cuenta de que la ventana Propiedades es fundamental al trabajar con Scribus. Si no está ya visible, ábrala mediante el menú '''Ventanas > Propiedades'''. La pestaña XYZ de la ventana Propiedades muestra información muy precisa sobre la posición en los ejes X e Y de la esquina superior izquierda, la anchura y altura del marco y la rotación del mismo. Fíjese en que la información sólo se muestra respecto a un marco seleccionado (mostrado con un borde rojo). Los marcos se seleccionan de manera automático cuando son creados. Para deseleccionar un marco pulse sobre la página por fuera de los bordes del marco; si quiere volver a seleccionarlo pulse dentro del mismo. Es necesario seleccionar el marco para modificarlo o reposicionarlo. | |||
==Loading an Image into the Frame== | ==Loading an Image into the Frame== | ||
Revision as of 23:31, 7 June 2008
| Installation • Usage • PDF issues • Imposition • Other |
Este artículo pretende ser un recopilación de operaciones relacionadas con los marcos de imagen. Buena parte del uso de Scribus es intuitivo, pero puedes descubrir funciones que desconoces o formas más directas de hacer las cosas.
| All Working with pages:
Working with text frames |
Creación
Formas de crear un marco de imagen:
- Pulsando sobre el icono Insertar marco de imagen en la barra de herramientas
- Seleccionando Insertar > Marco de imagen en el menú
- Teclado: I, o Alt+N, I.
Esto permitirá que sitúes y des tamaño a un marco de imagen con el ratón: pulsa y mantén apretado el botón del ratón, luego arrástralo en diagonal sobre la página. El click inicial determina una esquina del marco, y al soltar se fija la esquina opuesta. Los habitual es comenzar con la esquina superior izquierda, pero puedes empezar desde cualquier esquina hacia la opuesta.
Menú contextual
Al apretar el botón derecho del ratón aparece en Menú contextual, que contiene varias operaciones frecuentes con marcos. Una de ellas es la posibilidad de convertir un marco de imagen en otro tipo de marco.
Tamaño y posición
En este momento te darás cuenta de que la ventana Propiedades es fundamental al trabajar con Scribus. Si no está ya visible, ábrala mediante el menú Ventanas > Propiedades. La pestaña XYZ de la ventana Propiedades muestra información muy precisa sobre la posición en los ejes X e Y de la esquina superior izquierda, la anchura y altura del marco y la rotación del mismo. Fíjese en que la información sólo se muestra respecto a un marco seleccionado (mostrado con un borde rojo). Los marcos se seleccionan de manera automático cuando son creados. Para deseleccionar un marco pulse sobre la página por fuera de los bordes del marco; si quiere volver a seleccionarlo pulse dentro del mismo. Es necesario seleccionar el marco para modificarlo o reposicionarlo.
Loading an Image into the Frame
| When you first create an Image Frame, it will be blank except for an X drawn from opposite corners, denoting the fact that there is no image.
Acceptable image formats for importing are TIFF, JPEG, PNG, GIF, XPM, and EPS. You may also import a PDF, although at this time only the first page will be loaded into the frame (but see below to work around this problem). See the Scribus Manual, Help > Scribus Manual > Documentation > Importing (keyboard: F1 then Documentation > Importing) for advice about use of formats. Load an image from the Context Menu (right-click in frame) > Get Image (keyboard: Ctrl+D), from the menu File > Import > Get Image (or its keyboard equivalents). By default, the image will be loaded at its native size, with the upper left corner of the frame the upper left corner of the image. It is conceivable that you may be able to simply resize the frame, but most likely you will need to adjust scaling of the image. If you know the final size you want the frame to be, follow the directions in the next section, then go to Properties: Image Tab. |
What about SVGs?
SVGs are an open source vector graphics format, and in many ways can be an ideal graphics format for DTP. SVGs do not use a frame, but can be imported directly into Scribus using the menu: If you do this, you will want to make the size much bigger (higher DPI) than the default to reduce pixelization in your final Scribus product. |
| Importing multiple pages of a PDF
This is possible presently only with external software, such as Adobe Acrobat. There is also an opensource and free program called pdftk which can break up your multi-page PDF into single-page PDFs. Moreover, KPDFtool offers an easy to use GUI for simple PDF operations, such as extracting single pages from multipage PDFs. Finally, keep in mind that Scribus can create multiple single-page PDFs -- look for this option when you export to PDF. |
Properties: XYZ Tab - Resizing, Repositioning
| With the mouse: | With the Properties window: |
|---|---|
|
There are three ways to change the individual settings --
Also note that for 2 and 3, holding down Ctrl, Shift, or Ctrl+Shift (works with up and down arrow keys also) will alter which decimal place is affected. In addition, when using the Properties window width and height are by default linked, but you need only click the chain icon to the right to unlink them. |
Some Additional Help
- From the Menu, Page > Snap to Grid will cause your frame to "stick" to the grid lines on the page. View > Show Grid toggles the grid on and off. (The grid does not print or become part of a PDF.) If you want to adjust the line spacing of the grid, go to File > Preferences > Guides.
- From the Menu, Page > Snap to Guides will cause your frame to "stick" to guide lines on the page. View > Show Guides toggles them on and off. (Like the grid, guides do not print or become part of a PDF.) If you want to edit or add guides, go to Page > Manage Guides or File > Preferences > Guides .
Properties: Image Tab
If your frame is already the correct size, click Scale to Frame Size. Subsequent adjustments in frame size will adjust scaling to maintain scaling to the frame size. Clicking back to Free Scaling will allow you to crop edges, reposition, or change scaling.
Scaling, Repositioning -- the Image
See Resizing, Repositioning above for instructions on moving and resizing the frame -- Properties: XYZ Tab.
| With the mouse on the frame: | With the Properties window: |
|---|---|
|
Just as in the XYZ tab, there are three ways to change the individual settings --
And again note that for 2 and 3, holding down Ctrl, Shift, or Ctrl+Shift (works with up and down arrow keys also) will alter which decimal place is affected. In addition, when using the Properties, X-Scale, Y-Scale, and X-DPI, Y-DPI are by default linked, but you need only click the chain icon to the right to unlink them. |
X-Pos, Y-Pos: These refer to the offset of the image inside the frame. Negative values will expose the background color of the frame.
X-Scale, Y-Scale, Actual X-DPI, Actual Y-DPI: Default linked, click the chain to unlink. Obviously, scaling and DPI are inversely related, but for high-quality printed output, knowing the end-product DPI is essential to avoid poor quality results. If your end-product will be a PDF for the web or for a presentation, a lower DPI may suffice. See this page at the Scribus website for more details.
Some Additional Info:
The Context Menu (right-click in frame) > Info will give some basic information about your image -- file source, original and final scaling. The menu item Extras > Manage Pictures may also be of help.
Rotation
With the mouse:
Click the Rotate Item icon on the toolbar (keyboard: R), then click inside the frame and drag-rotate to desired angle.
With the Properties window: XYZ Tab
Just like resizing and repositioning, you have the same three ways to change the rotation digitally. There is also an icon just below (looks something like one of a pair of dice) to alter the point around which rotation takes place -- center or one of the four corners.
Copying Frames and Similar Operations
There are several different ways to copy or move frames.
- You should be familiar with Copy and Paste (keyboard: Ctrl+C, Ctrl+V) and Cut and Paste (keyboard: Ctrl+X, Ctrl+V) -- also accessible from Edit on the menu, and from the Context Menu (right-click in frame). To paste to another page, move to that page, click on it, then paste -- the frame will have the same coordinates as on the original page.
- There is also Duplicate (keyboard: Ctrl+Alt+Shift+D) Item > Duplicate. This makes a copy which is slightly offset from the original, and on a layer above it.
- There is Multiple Duplicate, Item > Multiple Duplicate, which brings up a requestor to automatically create as many copies as you wish, with a sequential adjustable offset. You can also use this for a single duplication when you want to set the offset. Note that once you set the offset here, Item > Duplicate will use this same offset.
- Finally, there is the Scrapbook, Item > Send to Scrapbook or from Context Menu (right-click in frame). This will make a named copy of the selected frame and its contents to the Scrapbook. To retrieve a saved item from Scrapbook, select from the menu Windows > Scrapbook, to bring up a requestor to paste an item to a page. Also note that you can save your entire Scrapbook to a file, which can then be loaded and used in another document.
Experimentation will show you that frames can even be outside the document boundaries and still be copied, duplicated and manipulated in various ways. They will even be saved with the document in these locations. If you try to generate a PDF, you will receive error messages about objects not being on the page; if ignored, the PDF will not have these objects. Furthermore, especially in a large multipage document, you may lose track of these off-document objects.
Levels & Layers
Frames in general, not just image frames, represent a two-dimensional space that you manipulate and move around your workspace, much like a small note you can attach and detach. Like small physical notes, they are laid down, one by one, on the page, new ones over the previous ones. The small box labeled Level in the XYZ tab of Properties allows you to move the selected frame up or down levels; the arrows with bars will move all the way to the top or bottom. Since the background of your frame may be opaque or transparent, the level the frame is at will affect how much of the frame can be visible in relationship to other overlapping or underlying frames.
Layers
|
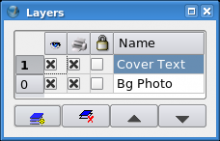
When you start a document in Scribus, you are by default working on the Background Layer. This is your active working space, which in turn can have multiple Levels with which you can work. By clicking the menu Windows > Layers (keyboard: F6) you can create new Layers to work on. Each Layer can have multiple Levels, all of which you can edit. As you see in this Layers Tool, an entire Layer can be visible or invisible, may or may not print, and may be locked to prevent accidental editing. You can only work on one Layer at a time -- either highlight it in the Layers Tool, or select with the requester at the bottom of the main window. For further information on the whys and hows of Layers, check the tutorial: Get Started With Scribus:5. |
XYZ Tab: The Rest
The remaining buttons in the XYZ tab do the following:
- Flip the selected frame horizontally or vertically
- Lock a frame in place. Everything about your frame is locked -- size, position, contents. Copying and pasting a locked frame may produce unexpected results.
- Lock the size of the frame only. Note that the editing tabs disappear from the corners and sides.
- Enable/disable printing of the frame. Why? You may want to have a frame on the page that's a message to yourself or someone else, yet not be part of the printed finished work. Or the frame may just be a space-saver for some other purpose.
Properties: Shape Tab
| Click the Shape tab in Properties. Near the top is a button with a square in the center. If you click that button, you may quickly switch to one of a group of set shapes from your original rectangle. In addition, if you click Edit Shape..., you now have full vector-editing control of your shape.
Another angle on shapes and image frames: You may also use the Polygon tool on the toolbar (use will be described in detail in another section) to create a regular polygon, which may then be converted using the Context Menu (right-click in the polygon) to Convert To > Image Frame. Round Corners Causes an adjustable degree of rounding of the Image Frame corners. Also note the effect of negative values. |
Text Flows Around Frame
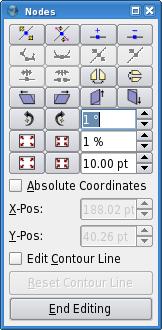
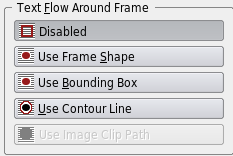
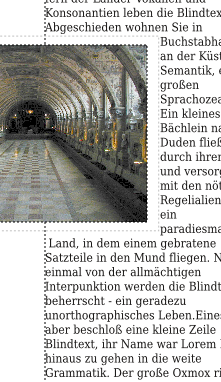
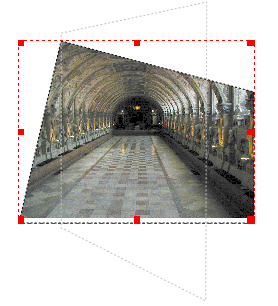
| Use this to determine what happens with text underneath the selected frame. Remember Levels & Layers? When you create an image frame, the Bounding Box (of the image) and the Contour Line are the same size and position. But click on Edit Shape... and you can change this Contour Line's size, position, and shape as desired -- check the Edit Contour Line box in the Edit Shape requester. The appearance in v1.3.4: |
Here is an example: |
| Below we see that the shape of the image, the Bounding Box (dotted red line), and Contour Line (faint grey dotted line) can occupy separate spaces. The Bounding Box will always have a rectangular shape. |
Properties: Line Tab
The Line of an Image Frame refers to the border of the frame. The first thing to be aware of is that the default setting for Line Color is None, so regardless of the settings in the Line Tab, nothing will show until the Line Color is set.
Otherwise, the various settings for Line are straightforward. If a setting is greyed-out, it does not apply to frames.
Properties: Color Tab
As noted above, the Line Color refers to the border of the frame, with the default being None.
Fill Color means background color of the frame. None for a Fill Color means that the background is transparent.
Shade refers to saturation of the color, so that 0% should represent a neutral grey scale color. Opacity refers to the relative opacity/transparency, with 100% being totally opaque, 0% totally transparent. It is worth noting at this point that some PDF versions and some PDF viewers do not support transparency.
Overprinting versions 1.3.4 and above
Knockout versus Overprinting are described here.
Please note that you are not limited to colors you see displayed in the Color Tab, nor are you compelled to have all these choices. See the Menu item Edit > Colors to add, edit, or remove colors. Removing colors can simplify the use of Scribus, and does reduce saved file size.
(c) Gregory Pittman, 2006, 2007 The content of this page is licensed under the Free Documentation License.
