How to create a partially-rounded-off shape
| Installation • Usage • PDF issues • Imposition • Other |
Button … Menu → Choice … Keyboard
Introduction
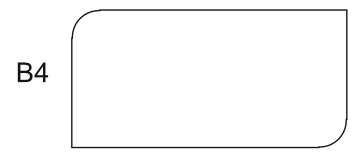
While the "Round Corners" tool in ![]() Properties ⟩⟩ Shape is very useful, sometimes you only want to round some of the corners of a rectangle rather than all of them - see the image above for an example.
Properties ⟩⟩ Shape is very useful, sometimes you only want to round some of the corners of a rectangle rather than all of them - see the image above for an example.
You could use a rounding tool as explained here Rounding Complex Shapes but there are simpler alternative techniques that you might like to try.
Both of these techniques put rounding on rectangles but they can be used for other shapes too.
Technique A - Overlaying
With this technique you can 'overlay' shapes to create new ones. This is a simpler technique than the later one.
Step A1
- Create the rectangle you want to 'round off'. (If you're following this I've made a 200x100pt rectangle.)
- Use
 Properties ⟩⟩ Shape "Round Corners" to make all of the corners of the rectangle the required radius. (I've used 20pt.)
Step A2
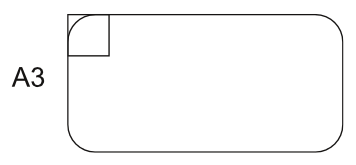
- Create a rectangle with a width and height larger than the radius of the corners you've just created with "Round Corners". (I've used 30x30pt.)
- Duplicate the rectangle until you have the same amount as the rounded corners you want to remove. (In my case I've duplicated once to give me two squares.)
Step A3
- Open the
 Align and Distribute dialog and select the original shape and one of your smaller ones.
 - Use the appropriate buttons to put your smaller shape "over" the larger one. (In my case I've aligned it top-left.)
Step A4
- Drag-select the two aligned shapes and choose menu Item → Path Tools → Path Operations…
You shouldn't need to make any changes to this dialog as it defaults to the settings you need, i.e. "Unites the shapes".
- Press the OK button.
Now repeat "Step A3" and "Step A4" for the newly-changed shape and the other smaller shape, aligning them how you want. (I've aligned them bottom-right.)
You should now have a shape with only two rounded corners. Fairly simple I think you'll agree, but there's another way that you can do this that gives you more possibilities.
Technique B - Cutting
This is a more powerful technique that takes a little more work but can be very effective, especially if you want fancy corners (explained later).
Step B1
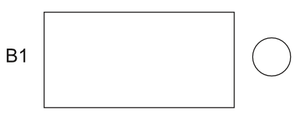
- Create the rectangle on which you want to round some corners. (Again I've made a 200x100pt rectangle.)
- Create a circle that has a height and width double that of the radius which you want to give to each corner. (I've used 40pt to give a 20pt radius.)
Step B2
- Double click the circle to bring up the
 Node Editor dialog.
 - Press the "Open a Polygon or Cuts a Bezier Curve" button - it should be third down on the left.
- Click on the top blue node of the circle.
- Press the "Open a Polygon or Cuts a Bezier Curve" button again.
- Click on the left-hand blue node of the circle.
The top-left arc of the circle has now been detached from the rest of it.
- Press End Editing to dismiss the "Node Editor".
You've now got two arcs. One small which you need, and one large which you don't, so you can delete the larger one.
Step B3
- Duplicate the arc so you've got the same amount as the number of rounded corners you want. (In my case I've duplicated once to give me two arcs.)
- Open the
 Align and Distribute dialog and select the rectangle and one of your arcs.
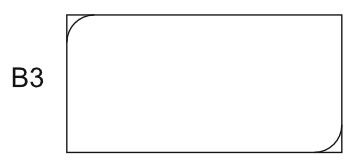
 - Use the appropriate buttons to put your arc 'over' one corner of the rectangle. (In my case I've aligned it top-left.)
- Select the other arc, shift-select the rectangle, and align it at the other corner.
- Select only the second arc and, in
 Properties ⟩⟩ X,Y,Z, flip it horizontally and then vertically. (You can also use rotations or whatever you need depending on your requirements.)
Step B4
- Select the top-left arc and use Shift+left-arrow to nudge it very slightly to the left.
- Then use Shift+up-arrow to nudge it very slightly up.
If you don't do the above the arc won't intersect the rectangle and you won't be able to do the next operation.
- Select the top-left arc and shift-select the rectangle.
- Choose menu Item → Path Tools → Cut Polygon
The corner of the rectangle has now been "cut off" and you're left with a new shape which you can discard, or save it to your scrapbook if you think it might come in useful later.
Now repeat "Step B4" for the bottom-right arc shifting the arc slightly down and to the right instead of left and up as done before.
You should now have a rectangle rounded-off at two corners.
Conclusion
You've now seen two different ways of manipulating shapes for corners but they've been very simple. Why not try some experiments and see what you can produce?
For example, in image "BX", I used the in-built heart shape - at 45 degree angles - to cut the corners off a rectangle and it gave me some nice little shapes that look good for basic picture holders (well, I think so at least).


