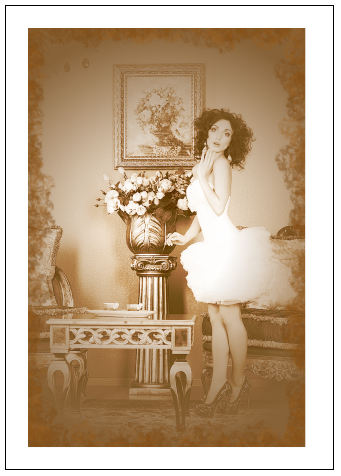
How to fake a vintage photo
| Installation • Usage • PDF issues • Imposition • Other |
Button … Menu → Choice … Keyboard
Introduction
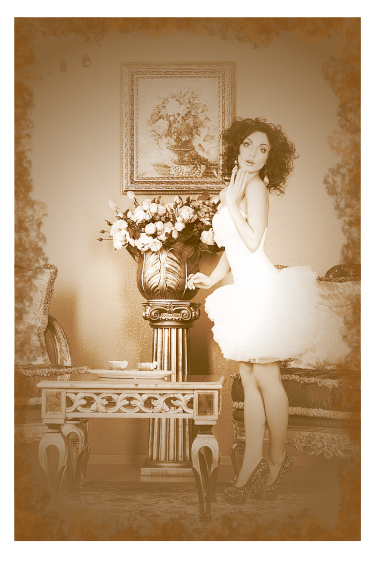
Sometimes you need a vintage photo but you just don't have a vintage camera - or a vintage photographer! - to hand.
This tutorial will show you how to make just about any photo look like it was taken in the olden days.
Both Scribus and GIMP are used in this tutorial but you can skip the GIMP section if you don't feel comfortable using it. You don't lose a lot by skipping it but it's worth giving it a go.
Initial Image
First you'll need an image to "oldify". You can download the one used in this tutorial here. (The 847 x 1280 - Medium - version looks good.)
If you're choosing your own image try to pick one that is in-keeping with the age when photos you're trying to re-create were made. So, for example, don't choose a photo where someone is wearing a digital watch, or an image of a car or an aeroplane. Choose something that would look right at the time.
GIMP Work
What you're going to do now is create an image that will be a "frame" around the finished photo.
- Open GIMP.
- Create a New Image that is the same size as your original image with a Transparent Background.
Now you need to set-up a paintbrush to create some "fingerprints" and "water stains".
The Initial Paintbrush
- Open the
 Brushes dialog and choose the "Oils 01" brush which comes with GIMP as standard. (The brush name might be suffixed with "(66 x 74)" or something similar.)
 - Under the list of brushes set the "Spacing" to 50. (This tells GIMP to move 50% of the size of the brush when drawing lines with it, which you'll do later.)
- Open the
 Toolbox and select the "Paintbrush" tool.
 - In the
 Tool Options dialog - usually right under the "Toolbox" - set the "Opacity" to 60%. (What you will draw with the brush will be semi-transparent and let what's underneath show through a bit.)
 - Set the "Size" to be 120. (You'll be reducing this later.)
- Set the "Dynamics" to "Jittered Smudge". (This tells GIMP to randomly change the angle of the brush you're drawing with which is important to get a good random effect without drawing everything manually.)
- Check/tick "Apply Jitter" and set the "Amount" to 1. (This tells GIMP to add an extra bit of scattering to what you're drawing, for a better effect.)
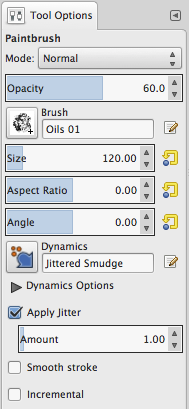
If your ![]() Tool Options look like figure 1 then you've done everything right and you've created the first of three brushes you'll be using. Now you need to create the first of three colours.
Tool Options look like figure 1 then you've done everything right and you've created the first of three brushes you'll be using. Now you need to create the first of three colours.
- In the
 Toolbox click the "Foreground Colour". (It's the box on the left of the two "merged" boxes below the tools.)
 - In the "HTML notation" field enter "ba6d1a" (without the quotes) and press OK. (The HTML notation value is just the RGB colour you're using written in hexadecimal, the same way that HTML/CSS uses colours in web pages.)
You're now ready to paint.
Painting the Marks
- Choose menu Select → All . (This creates a rectangular selection around all of your image.)
- Choose menu Edit → Stroke Selection… . (This function draws round the selection you've just created.)
- Select "Stroke with a paint tool" and make sure that the "Paintbrush" tool is selected.
- Press the Stroke button to draw around the selection with the brush you created.
You should have seen that GIMP drew some feint brown smudges around the edge of your image. If it didn't you'll need to check your settings above, undo the last action, and try again.
Now you need to make some slightly different marks.
- Make sure that "Paintbrush" is still the selected tool in the
 Toolbox.
 - In Tool Options change the "Opacity" to 50%. (You're starting to layer the marks around the frame.)
- Also change the size of the brush to 100.
- In the
 Toolbox click the "Foreground Colour" again.
 - Enter "9a5a16" as the "HTML notation" and press OK.
- Choose menu Edit → Stroke Selection… and press Stroke again to draw around the selection a second time with the slightly smaller/darker brush you've just set-up.
You're almost finished with the GIMP work; just one more bit of drawing to do.
- Make sure that "Paintbrush" is still the selected tool in the
 Toolbox.
 - In Tool Options change the "Opacity" to 40%.
- Also change the size of the brush to 80.
- In the
 Toolbox click the "Foreground Colour" again.
 - Enter "7d4912" as the "HTML notation" and press OK.
- Choose menu Edit → Stroke Selection… and press Stroke again.
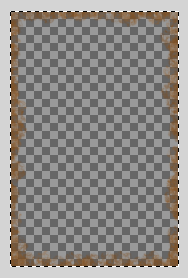
If you've now got an image that looks like figure 2 then you've created a nice little frame to go over your finished photo.
- Choose menu File → Export As… and export your image as a PNG. (You need to use PNG as you want the transparency to be kept.)
The Scribus Work
You've now reached the "main attraction" of the tutorial.
- Open Scribus.
- Create a New Document. (A4 works well but Letter might be okay too.) Use a Portrait orientation if your original image is a portrait image, otherwise use Landscape.
- Choose menu View → Fit to Height to get all of the page on screen.
Now you need some colours.
Colours
What you're trying to create is what's generally called a "sepia image". (What you'll be making is not really a sepia image, it's just a reasonable attempt at a facsimile of one.) You will need two colours:
- "Sepia" at R=135, G=99, B=56.
- "Dark Sepia" at R=84, G=63, B=33.
If you don't know how to create colours in Scribus then you need to read this article first.
Once your colours have been created you can start creating layers and frames.
Layers
You're going to create four frames and in this case it's best of you create a layer for each.
- Choose menu Windows → Layers to open the
 Layers palette.
You've already got a background layer so you need to create three more:
- one for the "overlay" which will highlight the background,
- one for the "halo" which will surround your photo,
- and one for the "fingerprints" image you created earlier, which is a finishing touch.
- Press the + button to create a new layer.
- Double-click the name "New Layer 1" and change the name to "Overlay" (without the quotes).
- Press the + button again and rename "New Layer 2" as "Halo".
- Press the + button again and rename "New Layer 3" as "Frame".
- Click on the "Background" layer so you can start adding your frames from the bottom up.
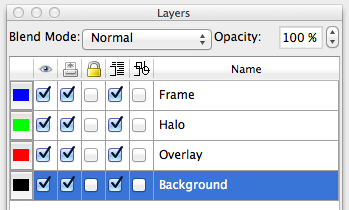
Your layer palette should look like figure 3.
Background
- Choose menu Insert → Insert Image Frame and draw the frame to whatever size you want.
- Right-click the image frame and choose Get Image… from the menu.
- Choose the original image and OK to put the image in the frame.
If you chose a large image then it's probably way too big for the frame so you need to resize it.
- Right-click the image frame and choose Resize Image to Frame from the menu.
- Right-click the image frame and choose Resize Frame to Image to get the frame sized properly.
Now you need to add some effects to the background image.
- Right-click the image frame and choose Image Effects… to open the
 Image Effects editor.
First you need to darken the image a bit. (This makes a better contrast with the overlay you'll be creating later.)
- Add the "Brightness" effect and set the brightness to -40 (minus 40). See Figure 4.
Next you need to remove all of the colour from the image. (Old-fashioned images were not coloured.)
- Add the "Greyscale" effect. See Figure 5.
Now you need to make some colour changes. This is the first tricky bit of the tutorial.
- Add the "Duotone" effect.
- Set "Colour 1" to "White".
- Set "Colour 2" to "Dark Sepia".
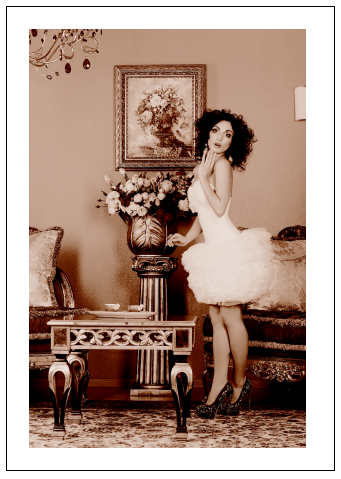
You should have a reasonable enough first go at a "sepia image" - like figure 6 - but you can do much better.
You will now make subtle changes to the colour curves of the image. Don't worry about what colour curves are at the moment. You can always read about them on the web later.
- Press the Curve Editor icon
 for "Colour 1".
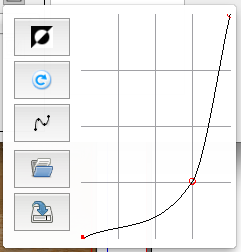
 - Drag the centre of the curve to position 3,1 on the grid as shown in figure 8.
- Press the Curve Editor icon for "Colour 1" to dismiss it.
- Press the Curve Editor icon
 for "Colour 2".
 - Drag the centre of the curve to just under and to the left of position 3,2 on the grid, and the centre of the top-half of the curve to just above and to the right of position 3,3 as shown in figure 9.
- Press the Curve Editor icon for "Colour 2" to dismiss it.
- OK the
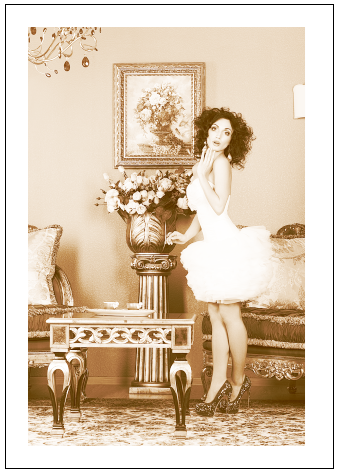
 Image Effects editor to see your altered background which should look like figure 7 and the larger image below.
It's not looking too bad so far but it can be improved.
Overlay
Now you'll work on an overlay that will enhance the background image.
- Go to the
 Layers palette and click on the "Overlay" layer.
 - Choose menu Insert → Insert Image Frame and draw the frame as you did for the background image.
- Right-click, choosing Get Image… and selecting the original image again.
- Resize the frame and image so that they're both exactly the same size as the background image.
What you can see should look like the original but your earlier work hasn't gone missing, it's just underneath the image you're working on now. It's time to add more effects.
- Right-click the image frame and choose Image Effects… to open the
 Image Effects editor.
 - Add the "Duotone" effect.
- Set "Colour 1" to "Sepia".
- Set "Colour 2" to "White".
You don't need to alter the colour curves for this effect so you should have something like figure 10 so far.
- Add the "Sharpen" effect.
- Set the "Radius" to 2.0.
- Set the "Value" to 5.0.
This helps to bring the whites "out" of the photo and your image should now be like that of figure 11.
- In
 Layers, with the "Overlay" layer still selected choose "Screen" from the list of "Blend Modes" at the top of the dialog.
This has had the effect of blending the foreground with the background while making the background lighter. Your photo should now look like that below.
This looks even better than it did before but it can be improved even more.
Halo
Now you'll give the image a "halo" that will draw the viewers eyes towards the centre while obscuring the edges a bit more. Lots of old photos look like this because of the cameras, materials and processes that were used at the time.
- While still on the "Overlay" layer, select the image frame.
- Choose menu Item → Multiple Duplicate… .
- Accept the defaults and OK the dialog.
- Right-click the duplicate image frame you've just made and choose Send to Layer → Halo .
You may notice that the image has gone back to how it looked before you changed the "Blend Mode" of the "Overlay" layer. That's okay because you're now seeing the image on the "Halo" layer and that layer has a "Blend Mode" of "Normal". This doesn't matter because you'll be removing the image from the "Halo" layer.
- Go to the
 Layers palette and click on the "Halo" layer.
 - Right-click the image frame and choose Convert To → Polygon .
Your image now looks like it did before because the image on the "Halo" layer has gone.
Now you've got your frame you need to put a gradient fill in it.
- With the polygon selected, go to
 Properties ⟩⟩ Colours.
 - Press the "Fill" icon and choose "Radial Gradient" from the list below the icon.
Your polygon has probably gone black but that's okay.
- Click on the left-most gradient stop under the black gradient rectangle so that it's coloured red.
- In the list of colours under the gradient rectangle choose "Sepia".
- Further down the Colours tab you'll find the "Transparency Settings", set the "Opacity" to 0%.
Some of your image has come back and there should be a black "smudged" ring around it like in figure 12.
- Click on the right-most gradient stop under the black gradient rectangle so that it's coloured red.
- In the "Colours" list under the gradient rectangle select "Sepia".
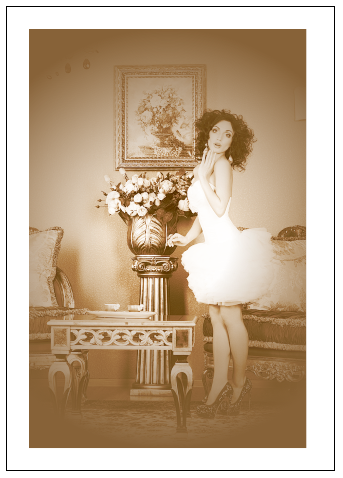
If your gradient rectangle looks like figure 14 then it's probably correct. The ring around the image should now have gone a brown shade as in figure 13. This is okay but the photo looks a bit dark so you'll fix that.
- Drag the left-most gradient tab to the 30% position.
Your photo should look like that below. It's looking much better but there's still one thing to do.
Fingerprints
Do you remember some GIMP work you did a while ago? Well it's time to put that work into use.
- Go to the
 Layers palette and click on the "Frame" layer.
- Choose menu Insert → Insert Image Frame and draw the frame as you did for the background/overlay image.
- Right-click the image frame and choose Get Image… from the menu.
- Choose the image you created in GIMP and OK to put the image in the frame.
- If necessary, right-click the image frame and choose Resize Image to Frame from the menu.
- If necessary, right-click the image frame and choose Resize Frame to Image to get the frame sized properly.
Once your frame and image are the same size as the background image you're done.
Conclusion
You've now seen how you can convert an image into something that looks like a vintage photograph.
Feel free to change the colours, colour curves, or anything else you want to experiment with to see what other effects you can achieve. With some experimentation you can probably come up with something even better.
Some old photographs are lighter than that you've just created while some are darker. Some also have thicker halos around the subjects. Have a play about with all of the settings to make different types of old photos.
