Začínáme se Scribusem:4
Začínáme se Scribusem 2006
| ||||||||
Kapitola 4
|
- Co vše lze se Scribusem dělat
- Instalace
- Prázdná místa
- Obálka
- Working With Layers On A Page
- Design Multiple Pages
- Create Final Page Layouts
- Design With Graphics And
Freedom - Set Fire With SVG Graphics
- Publishing Demands Freedom.PDF.
- Travel At The Speed Of Scribus
- Contributors
- GNU Free Documentation Licence
Obálka
Pokud vidíte na nově vytvořené prázdné straně spoustu vodících čar, odškrtněte Náhled → Zobrazit mřížku (View → Show Grid). Okraje stránky jsou vyznačovány modrými čarami. Základní myšlenka Scribusu je jednoduchá: chcete-li na stránku vložit fotografii, musíte nejprve vytvořit obrázkový rámec a poté fotografii do tohoto rámce importoovat. V případě textu je to podobné: nejprve vytvořit textový rámec a potom vložit nebo vepsat nový text. Brzy uvidíte, že má tento přístup několik významných výhod.
Jak vložit obrázek
Panel nástrojů (anglicky) obsahuje všechny nástroje, které Scribus nabízí. Není úplně nutné pamatovat si všechny ikonky – Scribus vám nabídne popisek při najetí kurzoru myši. Klikněte na třetí ikonu Vložit obrázkový rámec ![]() (Insert Image Frame), klávesová zkratka: I. Toto vám umožní vložit obrázkový rámec na stránku. Tímto způsobem umístíte na stránku obrázek obálky. Táhněte tedy myší z levého horního rohu do pravého dolního rohu (nebo z kteréhokoliv jiného do protějšího). Není třeba trefovat se přesně na rohy. Na konci tohoto kroku máte obrázkový rámec v podobě
(Insert Image Frame), klávesová zkratka: I. Toto vám umožní vložit obrázkový rámec na stránku. Tímto způsobem umístíte na stránku obrázek obálky. Táhněte tedy myší z levého horního rohu do pravého dolního rohu (nebo z kteréhokoliv jiného do protějšího). Není třeba trefovat se přesně na rohy. Na konci tohoto kroku máte obrázkový rámec v podobě
velkého obdélníku s dvěma černými diagonálními čárami v podobě velkého X. Toto je tradiční způsob, jak odlišovat obrázkové a textové rámce. Toto velké X se v tisku nikdy neobjeví.
Duše Scribusu
Vyberte z menu Nástroje → Vlastnosti (Tools → Properties), klávesová zkratka: F2. Otevře se dialogové okno, které je srdcem a duší Scribusu. Všechny objekty, které přidáte na stránku – obrázkové a textové rámce, tvary, linky apod. – jsou ovládány z tohoto okna. Ujištěte se, že je právě vytvořený obrázkový rámec vybraný (je zvýrazněný). Obvykle se tento výběr zvýrazňuje červenými (nebo jinými) čtverečky v rozích objektu. Pokud není, klikněte v panelu nástrojů na první ikonu ![]() (Vybrat objekt, Select Item) a klikněte do rámce. Dialogové okno Vlastnosti okamžitě zobrazí všechny detaily objektu. Chcete-li libovolný objekt upravovat či vymazat, musí být vybraný.
(Vybrat objekt, Select Item) a klikněte do rámce. Dialogové okno Vlastnosti okamžitě zobrazí všechny detaily objektu. Chcete-li libovolný objekt upravovat či vymazat, musí být vybraný.
Nahraďte tyto obrázky českými.
Pole Jméno (Name) vám umožňuje přiřadit objektu jméno, které si snáze coby autor zapamatujete – např. ObrazekNaObalce. Pokud pole Jméno nevidíte, stačí kliknout na horní záložku s názvem X, Y, Z. Nyní umístíte horní levý roh obrázkového rámce přesně do horního levého rohu své stránky. Pole X-Poz (X-Pos) a Y-Poz (Y-Pos) vyplňte hodnotami 0, pole Šířka (Width) a Výška (Height) potom hodnotami 210 mm a 280 mm (což jsou výška a šířka vaší stránky). Nyní máte rámec přesně umístěný na stránce. Tento způsob pozicování je mnohem rychlejší pro takovéto přesné umisťování.
Vložit obrázek
Klepnutím pomocí nástroje ![]() (Vybrat objekt, Select Item) na vytvořený obrazový rámec se ujistěte, že jej lze vybrat (vybraný objekt je ten, jehož rám je zvýrazněn červenou (výchozí nastavení) barvou a je opatřen klasickými čtverečky stejné barvy (sloužícími pro změnu velikosti) v každém rohu a v každé polovině strany rámu. Poté klepněte na zvolený rám pravým tlačítkem myši pro vyvolání kontextového menu. Vyberte položku Vložit obrázek... (Ctrl+D Get Image). V objevivším se souborovém dialogu vyberte soubor 'TitleFX.jpg' a potvrďte výber tlačítkem Otevřít. Nyní je obrazový rám vyplněn zvoleným obrázkem TitleFX.jpg.
(Vybrat objekt, Select Item) na vytvořený obrazový rámec se ujistěte, že jej lze vybrat (vybraný objekt je ten, jehož rám je zvýrazněn červenou (výchozí nastavení) barvou a je opatřen klasickými čtverečky stejné barvy (sloužícími pro změnu velikosti) v každém rohu a v každé polovině strany rámu. Poté klepněte na zvolený rám pravým tlačítkem myši pro vyvolání kontextového menu. Vyberte položku Vložit obrázek... (Ctrl+D Get Image). V objevivším se souborovém dialogu vyberte soubor 'TitleFX.jpg' a potvrďte výber tlačítkem Otevřít. Nyní je obrazový rám vyplněn zvoleným obrázkem TitleFX.jpg.
Umístění obrázku
Určitě jste si všimli jak je nyný obrázek vložen - je v rámu zarovnán svým levým horním obrajem. Je možné samozřejmě upravit velikost a tvar rámu, ale lze samozřejmě i upavit umístění a velikost obsahu. Obsah obrazového rámu posuneme pomocí nástroje ![]() Upravit obsah rámce (Edit Contents of Frame) z nástrojové lišty a následnou manipulací pomocí myši. Pokud nevyhovuje obrázek svou velikostí, upravte ji v paletě Vlastnosti na záložce Obrázek
Upravit obsah rámce (Edit Contents of Frame) z nástrojové lišty a následnou manipulací pomocí myši. Pokud nevyhovuje obrázek svou velikostí, upravte ji v paletě Vlastnosti na záložce Obrázek
. Všimněte si prosím drobnosti v ovládánní - pokud máte pro modifikaci umístění obrázku v rámu zvolen nástroj [[Image:Button-Edit-Content.png] a klepnete kamkoli do prázdného prostoru (mimo stránku a rámec), pak je automaticky přepnuto na nástroj ![]() . Nyní tedy vyberte obrazový rám a zaměřme se na paletu Vlastnosti, přesněji na záložku Obrázek. Zde v políčcích X-poz a Y-poz lze opět manipulovat s umístěním obrázku, ale hlavně pak v položkách následujích lze ovlivnit velikost, a to buď vyjádřením procentuálním, nebo pomocí tiskové vlastnosti DPI (počet tiskových bodů na jeden palec) v obou osách. My v našem projektu zadáme do políčka X-poz hodnotu -90, čímž posuneme obsah doleva.
. Nyní tedy vyberte obrazový rám a zaměřme se na paletu Vlastnosti, přesněji na záložku Obrázek. Zde v políčcích X-poz a Y-poz lze opět manipulovat s umístěním obrázku, ale hlavně pak v položkách následujích lze ovlivnit velikost, a to buď vyjádřením procentuálním, nebo pomocí tiskové vlastnosti DPI (počet tiskových bodů na jeden palec) v obou osách. My v našem projektu zadáme do políčka X-poz hodnotu -90, čímž posuneme obsah doleva.
Color Karma
At the bottom of the Properties Tool (Image tab), you may have noticed a section called 'Input Profiles.' This will only show if the LittleCMS on your PC is correctly installed and configured. The color of your images may look markedly different on your screen, and even more when you print them. This little area minimizes such color mismatch. From the pop-up for 'Input Profile', choose a color profile that closely matches your monitor. Scribus immediately re-renders the image on the screen to display colors according to that profile.
The actual installation of LittleCMS and how to use it under Scribus is actually quite simple, but beyond the scope of this tutorial. Here are some good tips:
- Download a set of free profiles from the Adobe site, so you can send images between Mac, Windows, and Linux.
- Create a custom color profile of your own monitor and use that instead of any other.
Save
You may want to save your file before proceeding. So head over to File>Save and type the name 'Fyug.sla' for your file. Save it in the FYug folder. You can also just click on the floppy icon in the taskbar, right underneath the menus, to save your file.![]()
Masthead Band
The cover page of any magazine has its name emblazoned across the top. This is called the Masthead. Ours is titled “FreedomYug.” We'll start by creating a semi-transparent band for the Masthead. Go to Settings > Preferences > Display (in 1.3.x File > Preferences > PDF Export). Make sure this checked: “Use PDF1.4 Transparency Features” (In 1.3.x make sure the PDF 1.4 is chosen under Compatibility). Click OK. Your document now supports transparent objects.
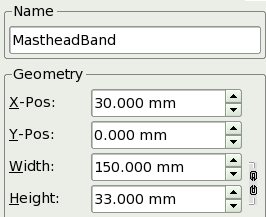
Click the fifth tool ![]() in the Toolbar. Should you hover your mouse over this, the roll-over text would display “Draw Various Shapes” or something similar. Select the rectangle shape from the drop-down menu. Click anywhere near the top-centre of the page and draw a rectangle. Make sure the rectangle is selected, and immediately go to the Properties Tool, click on the X,Y,Z tab, and enter the following values: X-Pos: 30mm. Y-Pos: 0mm. Width: 150mm. Height: 33mm. Give it a name, such as 'MastheadBand' in the Name field.
in the Toolbar. Should you hover your mouse over this, the roll-over text would display “Draw Various Shapes” or something similar. Select the rectangle shape from the drop-down menu. Click anywhere near the top-centre of the page and draw a rectangle. Make sure the rectangle is selected, and immediately go to the Properties Tool, click on the X,Y,Z tab, and enter the following values: X-Pos: 30mm. Y-Pos: 0mm. Width: 150mm. Height: 33mm. Give it a name, such as 'MastheadBand' in the Name field.
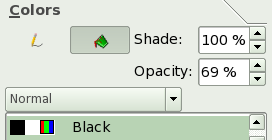
Then click on the Colors tab in Properties. Click the Pencil tool ![]() to select the stroke or outline border. Click on 'None' in the colors list. Then, click the bucket icon to select the fill color. Click on 'Black' from the list of colors, and in the opacity field, enter 69% (if you do not see an Opacity field, you have not selected PDF 1.4 transparency features -- see first paragraph above in this section). You will see the band has turned semi-transparent, and partly shows the image through itself, in darkened colors. Experiment with Opacity and other colors to your taste.
to select the stroke or outline border. Click on 'None' in the colors list. Then, click the bucket icon to select the fill color. Click on 'Black' from the list of colors, and in the opacity field, enter 69% (if you do not see an Opacity field, you have not selected PDF 1.4 transparency features -- see first paragraph above in this section). You will see the band has turned semi-transparent, and partly shows the image through itself, in darkened colors. Experiment with Opacity and other colors to your taste.
Add More Bands
Draw another rectangle towards the centre of the image. In the Properties Tool (X,Y,Z), give X-Pos: 93mm. Y-Pos: 160mm. Width: 115.35mm. Height: 13.75mm. Again in Colors, set the stroke to 'None', and the fill with 'Black' at an opacity of 69%. Call this the 'HeadlineBand'. A third rectangle, named 'SubHeadBand' can be drawn slightly underneath this, at X-Pos: 100mm. y-Pos: 180mm. Width: 109.7mm. Height: 18.35mm. The fourth and final rectangle, this time a little square box, will have the following Properties: X-Pos: 20.5mm. Y-Pos: 245mm. Width and Height will both be 9mm.
| Here is a shortcut you might try for a repetitive job like this. Instead of making each rectangle from scratch, then changing all of these parameters, after you make the first one and adjust its colors, just copy it: Item > Duplicate. Then all you have to adjust is its name, position, and size. |
Create Colors
| Hold on! Don't fill this with the same 69% Black. Let's give it a fresh lime green color. Go to Edit > Colors... in the menu. A dialog box listing existing colors displays on your screen. Click on 'New' and give your new color swatch a name, 'Lime Green' (if you already have a LimeGreen, call it LimeGreen2 or something else). In the second dialog-box that opens up, choose 'CMYK' as the Color Model. This closely follows the inks of Cyan, Magenta, Yellow, and Black, used in your desktop printer and in printing plants, that mix inks to create new colors. With the sliders at the bottom, give C:69%, M: 10%, Y:100%, and K: 0%.
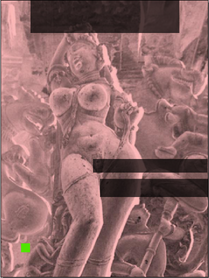
Click OK in this dialog box, and then click OK again in the Colors dialog box, where you'll notice your new color added. Go back to your page, click on the small square you just created, and in the Colors tab of Properties Tool, give it a stroke of None, and a fill of LimeGreen, at 100% opacity. You cover should look like the screenshot here, with all the bands for text. |

|
Locked Bands
One last thing. Select each semi-transparant band individually, and in the Properties palette, in the X,Y,Z tab, click on the icon of the padlock ![]() at the bottom. This ensures you accidentally do not move or resize each locked object.
at the bottom. This ensures you accidentally do not move or resize each locked object.
Similarly, lock the CoverPicture Frame as well, and the green square, using this padlock. Also, uncheck 'Text Flows Around Frame' in the Shape tab of the Properties Tool for each of these rectangles. This allows text to overlap the rectangles.


