Praca ze stronami wzorcowymi: Difference between revisions
| Line 33: | Line 33: | ||
* Usuwanie strony wzorcowej | * Usuwanie strony wzorcowej | ||
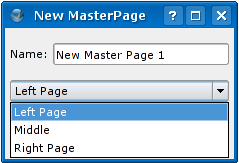
Po kliknięciu na przycisk '''Dodaj nową stronę wzorcową''' pojawi się okienko, w którym będziesz mógł podać nazwę strony (Obrazek 3). | |||
Rada: wybierz nazwę, która będzie odpowiadała przeznaczeniu strony wzorcowej, tak abyć nawet po dłuższym czasie wiedział, do czego ona służy. | |||
[[Image:Master pages new master page.png|frame|left|Picture 3]] | [[Image:Master pages new master page.png|frame|left|Picture 3]] | ||
Revision as of 23:55, 28 November 2006
- Linkownia
- Zrobione w Scribusie
- Gazety i czasopisma
- Polska lokalizacja Scribusa
- Darmowe polskie fonty
- Słowniczek pojęć z DTP
- Pierwsze kroki ze Scribusem
- Praca z ramkami tekstowymi
- Praca z ramkami graficznymi
- Praca ze stronami wzorcowymi
- Praca w Edytorze artykułów
- Tekst na krzywej
- Scribus w Ubuntu Linux
- Klik i Scribus działa
- Instalacja za pomocą Cmake
- Tworzenie spisu treści
- Formularze PDF
- Kolory dodatkowe
- Obrazek ze ścieżką odcięcia
- Instalacja profili ICC
- Dodawanie fontów
- Import grafik EPS
- Zawieszone spójniki
- Twój pierwszy artykuł
- Tworzenie hiperłączy
- Zarządzanie kolorami
- Skąd pobrać Scribusa?
- Podgląd wydruku nie działa
- Scribus dla MacOSX?
- Dodawanie fontów
- Scribus po polsku
- Type 1 i ligatury
- Automatyczne numery stron
- Interlinia w Scribusie
- Pierwsze kroki z DTP
- Skalowanie obrazka w ramce
- Export do PDF/X-3
- Ligatury i cyfry nautyczne?
- Pomoc w rozwoju Scribusa
- Przykładowe dokumenty
- Zgłaszanie błędów
- Słowniki dzielenia na sylaby
Tłumaczenie w toku!
Po co są strony wzorcowe
W momencie zaczniesz planować użycie wielu powtarzających się obiektów (nagłówki, loga, tło, numery stron itd.) w tych samych miejscach na stronach dokumentu, zrobisz najlepiej stosując strony wzorcowe. Oszczędzisz sobie w ten sposób wiele czasu i niepotrzebnego mozołu. Obiektów znajdujących się na stronach wzorcowych nie da się zmienić w normalnym trybie edycji strony. Ograniczenie to pozwala uniknąć przypadkowego przesunięcia lub usunięcia obiektu na stronach wzorcowych. Strona wzorcowa jest zawsze związana z dokumentem – nie można jej zapisać w oddzielnym pliku. Możesz jednak utworzyć plik zawierający często używane strony wzorcowe i korzystać z niego jako źródła importu stron wzorcowych do innych dokumentów Scribusa.
Jak utworzyć strony wzorcowe
Plan A:
|
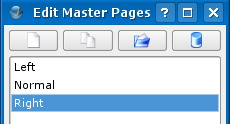
Utwórz nowy dokument. Wybierz z głównego menu Edycja > Strony wzorcowe... (Obrazek 1), aby wystartować okienko dialogowe o nazwie Edytuj strony wzorcowe (Obrazek 2). Strona wzorcowa o nazwie Normalna jest zawsze dostępna i nie można jej usunąć – przycisk usuwania zostanie wyłączony po wybraniu tej strony (Obrazek 2). Stronę wzorcową Normalna można co prawda edytować, lepiej jednak zostawić ją pustą, aby można było dodawać puste strony. Po najechaniu myszą na przyciski pojawią się pomocne podpowiedzi (Obrazek 2). Zaczynając od lewej strony:
Po kliknięciu na przycisk Dodaj nową stronę wzorcową pojawi się okienko, w którym będziesz mógł podać nazwę strony (Obrazek 3). Rada: wybierz nazwę, która będzie odpowiadała przeznaczeniu strony wzorcowej, tak abyć nawet po dłuższym czasie wiedział, do czego ona służy. After you click OK you will see the window Edit Master Pages with your new Master Page highlighted. When you have a list of Master Pages you can then click from one to the next to edit each one as desired (Picture 4). When you close the Edit Master Pages window, you return to the normal editing mode in Scribus. If you find that you need a Master Page similar to an existing one, click on Duplicate the selected master page rather than starting a new Master Page from scratch -- this can be a great time-saver. You can also copy a Master Page from another document by clicking on Import master pages from another document button, which opens the Import Master Page window (Picture 5).
|
Plan B:
|
You can also create new Master Pages from the page you are editing in normal editing mode. From the menu bar select Page > Convert to Master Page... (Picture 6). This opens a window entitled Convert Page to Master in which you may give this new Master Page a name (similar to Picture 3 above). Afterward, you may then go back to Edit > Master Pages... where you will find your new Master Page in the Edit Master Pages window (Picture 4 above). |
Podwójne strony, składanka potrójna i poczwórna
|
So how can we use these concepts with Double Sided, 3-fold and 4-fold document layouts? Actually, you will find that these are situations where using Master Pages is especially useful and time-saving. When you create a new document, select your desired layout (Picture 7). After this, create your Master Pages as explained above for Plan A or Plan B. To the right we see why the name chosen for a Master Page is especially important and helpful.
|
Stosowanie stron wzorcowych
Do pustych stron dokumentu:
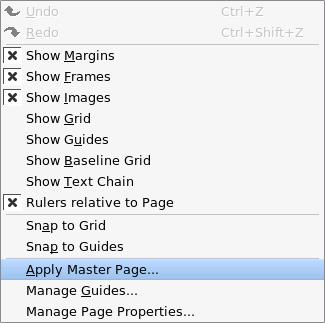
Selecting either Page > Apply Master Page... (Picture 6) or Apply Master Page... from the context menu (right-click on the page - Picture 11) opens up the Apply Master Page window. From this you may choose to apply the Master page to the:
- Current page
- Even pages
- Odd pages
- All pages
- and you may apply to a range of pages
Select the desired Master Page from the drop-down list labeled Master Page.
Perhaps not surprisingly, the option Even pages can only be selected when the document has more than one page. Also, applying to a range of pages only applies when you have selected All pages.
Wstawianie nowych stron:
|
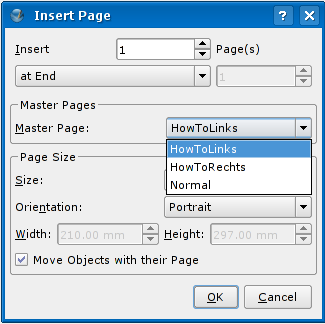
When you insert a new page (menu bar Page > Insert), you open up a window from which you can choose to add one or more pages, choose the place of insertion, and in addition decide whether these new pages will contain Master Page elements (Picture 13). Note that the Master Pages area expands according to your layout, so that in Picture 14 we see the appearance of an Insert Page window for a 4-fold layout. Wskazówka: Page numbering is best accomplished with Story Editor. While you are in Edit Master Page mode, create a text frame with the appropriate location for your page numbering. From the Story Editor menu, select Insert > Character > Page Number (keyboard: Ctrl+Shift+Alt+P). This appears as # in the Story Editor window, but this is not Shift+3. For proper spacing, make at least 2 of these special characters when page numbering will be as high as 2 digits (10-99), at least 3 when page numbers need to be 100-999.
|


