Help:Manual Importvectors: Difference between revisions
(Created page with "vvv") |
No edit summary |
||
| (One intermediate revision by the same user not shown) | |||
| Line 1: | Line 1: | ||
[[Category:Help_Manual]] | |||
[[Help:TOC|Table of Contents]] | |||
<h2>Importing Vector Drawings</h2> <h3>Supported formats</h3> <p>Here's a short description of the vector formats currently supported by Scribus:</p> <ul> <li><b>AI (Adobe Illustrator)</b>: The native format of Illustrator, or, more precisely, formats. Older versions of AI are basically EPS files that contain some additional features only used by Illustrator. As of Illustrator 9, AI is based on PDF, and, like its predecessor, adds some Illustrator-only information. AI import is still experimental but works very well in most cases. One of the major advantages of the AI import filter (and the EPS filter as well) is that Scribus will load spot colors in AI and EPS files correctly. If PDF-based AI files are opened directly (via <i>File > Open</i>), Scribus will also import AI/PDF layers.</li> <li><b>EPS (Encapsulated PostScript)</b>: Probably the most wide-spread graphics format in pre-press and a subset of the PostScript standard. See the section about [[Help:Manual_Importeps|EPS import]] for more information.</li> <li><b>PS (PostScript)</b>: A page description language created by Adobe Systems and the foundation of almost all modern print workflows. The PDF format is also derived from PostScript. Since PostScript files can contain more than one page, import may not deliver the expected result.</li> <li><b>FIG (Xfig)</b>: This is the native format of the UNIX drawing veteran Xfig. While rarely used by designers, it's ubiquitous in scientific environments like universities for technical drawings or diagrams. The format is well-documented, and import into Scribus works flawlessly.</li> <li><b>Scalable Vector Graphics (SVG)</b>: An open and widely used standard for two-dimensional vector graphics. See the section about <a href="scribus-svg.html">SVG import</a> for more information.</li> <li><b>SXD (OpenOffice.org Draw 1) and ODG (OpenDocument Graphics)</b>: These are the vector file formats used by OpenOffice.org and other Open Source Office Suites. Since "Office Drawing" is quite different from working with a typical vector drawing program, the formats use a lot of features, like automatic connectors, that aren't well-suited for a print workflow. As a result, import will only work with limited success. See [[Help:Manual_Importodt|Scribus and OpenOffice.org/OpenDocument]] for possible workarounds.</li> <li><b>WMF (Windows Metafile)</b>: A vector format used by many Office Suites and also the Windows clipboard. While WMF files are usually rejected by creative professionals, most collections of "Office Clipart" use this format. The WMF filter has been added to enable users to import these simple vector drawings.</li> <li><b>PICT (Macintosh Picture)</b>: The graphics file format used by Mac OS, similar to WMF on Windows. It can contain bitmap or vector data.</li> <li><b>CVG (Calamus Vector Graphic)</b>: A simple vector format used by the DTP veteran Calamus. It only supports grayscale colors.</li> <li><b>SHAPE (Dia Shapes) and SML (Kivio Shape)</b>: Basic vector shapes used by the diagram programs Dia and Kivio. Grayscale/RGB only.</li> </ul> <h3>How it works</h3> <p>Importing vector drawings into Scribus is rather different if compared to most other DTP programs, and it's also an exception to the "frame paradigm" used for almost everything else in Scribus.</p> <p>When you import a vector drawing via <i>File > Import > Get Vector File</i>, the vector data of the original file will be converted into native Scribus vector objects. The major advantage of this approach is that imported vector graphics remain fully editable in Scribus, which is useful even if you don't intend to use Scribus as a vector editor. For example, the conformance to published specifications like EPS or SVG can vary enormously between programs or different versions of the same program. Importing files as native vector objects allows for easy and quick corrections like closing paths etc. It also enables Scribus to easily change or modify the colors of imported vector graphics (see below).</p> <p>The Scribus approach to vector import comes at a cost, though, and you need to consider carefully whether you are willing to pay this price or rather export your drawing as a bitmap image and import it into an [[Help:Manual_Imageframe|image frame]]. First, as you will notice when you try to load a complex vector file, importing can take very long, as Scribus may have to create hundreds or even thousands of Scribus vector objects. Moreover, the creation of that amount of objects also results in an Undo/Redo event for each object. You can speed up import a little bit by disabling Undo/Redo before you import a complex drawing. Likewise, scaling or moving a complex drawing means changing the properties of all objects within this drawing, and if you don't have enough memory on your computer, Scribus may even crash.</p> <p>A similar problem may be the number of colors in your [[Help:Manual_Editcolors|color list]]. Since Scribus imports the colors of all objects in a drawing (see below), you may end up with a seemingly endless list of colors. Again, you need to decide whether you need the advantages of this approach.</p> <p>Finally, every drawing that consists of more than one vector object (i.e., almost every drawing) is imported as a <i>group</i> of objects, and text flow around groups doesn't work. This means you have to draw a separate [[Help:Manual_Shapes|shape]] around the drawing to let text flow around it.</p> <h3>Editing imported vector drawings</h3> <p>Working with the built-in vector tools is described in [[Help:Manual_Editshapes|Editing Shapes]]. But as you will notice after importing a vector drawing, the tools are not availabe immediately, the reason being the import of a drawing as a <i>group</i> of vector objects. Thus, you need to <i>ungroup</i> the graphic first. This can be achieved via the "Ungroup" command in the "Item" menu, the Context Menu of the drawing or by using the shortcut Ctrl+Shift+G:</p> <br> <table width="100%"> <tr> <td align="center">[[File:Help_vectimp1.png]]</td> </tr> </table> <br> <p>The more complex an imported drawing, the more likely the necessity to apply "Ungroup" several times, as the drawing will probably consist of many sub-groups.</p> <p>The drawback of this approach is that it decomposes the whole drawing, even if you only want to edit a small part of it. If you later want to move or resize the whole graphic, you have to regroup all parts again. Fortunately, Scribus comes with a powerful tool that comes to the rescue in this situation, namely the Document Outline (<i>Windows > Outline</i>). This dialog lists all elements in a Scribus document, sorted per page. Here you can select single parts of the imported group, and if you're lucky, the creator of the drawing assigned meaningful names to the respective elements, although not all programs and file formats provide this feature. Scribus will jump to each selected element and indicate the selection by showing the frame border of the item in red:</p> <table width="100%"> <tr> <td align="center">[[File:Help_vectimp2.png| alt="Using the Document Outline to select items in grouped objects"]]</td> </tr> </table> <br> <p>You can now use the Context Menu in the Document Outline to detach the selected item from the rest of the group by using the "Ungroup" command. As described above, you may have to use the command several times, depending on how deeply nested the groups in the drawing are. At the end of the process, you can see the item as a separate entry in the Document Outline:</p> <br> <table width="100%"> <tr> <td align="center">[[File:Help_vectimp4.png|alt= "The item “path13122” has been detached from the group “svg1061”, an imported SVG file."]]</td> </tr> <tr> <td> <div align="center"><i>The item "path13122" has been detached from the group "svg1061", an imported SVG file."</i></div> </td> </tr> </table> <h3>Solid colors in imported vector drawings</h3> <p>A consequence of the way Scribus imports vector files is that all colors in a drawing will be added the list of available colors. Depending on the complexity of a drawing and the number of imported files, the list can become quite long, and depending on the source format and the used color spaces, the color names may not be very meaningful:</p> <table width="100%"> <tr> <td align="center">[[File:Help_vectimp3.png|alt= "Imported colors from a vector drawing (SVG)"]]</td> </tr> </table> <br> <p>This may initially be confusing to some users, but there are ways to make life easier for you. First of all, Scribus does not duplicate colors, i.e., if an imported drawing uses a color whose color values match those of an already existing color, the imported color will be "mapped" to the list of colors. This works even with spot colors. Second, Scribus supports <a href="color1.html">named colors</a>, so if a vector program and the file format can save color names, those will be imported:</p> <br> <table width="100%"> <tr> <td align="center">[[File:Help_vectimp5.png|alt= "Xfig uses a name for every color, and Scribus will import the named colors."]]</td> </tr> <tr> <td> <div align="center"><i>Xfig uses a name for every color, and Scribus will import the named colors.</i></div> </td> </tr> </table> <br> <p>If you delete an imported drawing, its colors won't disappear from the color list automatically, as it's difficult to determine whether they have been "mapped" or are being used by other objects. This is not a problem, because after deleting the drawing, you can open the color manager (<i>Edit > Colors</i>) and click "Remove Unused", which will remove all colors that aren't used by any item in your document.</p> <p>An example for the usefulness of the color import is the "Replace Colors" feature. Imagine you are working with a vector logo that is supposed to appear in different colors in different documents. By using "Replace Colors", you can work with one single source file. Import the logo into your document and replace one or more logo colors just as your specific document requires. And speaking of logos: These are often required to use a spot color. If you created or edited the logo in a program that doesn't support spot colors, you can load the graphic into Scribus and use "Replace Colors" to replace a CMYK or RGB color with a spot color:</p> <br> <table width="100%"> <tr> <td align="center">[[File:Help_new5.png|alt="Replacing colors"]]</td> </tr> </table> | |||
{{OPL}} | |||
Latest revision as of 18:35, 29 March 2012
Importing Vector Drawings
Supported formats
Here's a short description of the vector formats currently supported by Scribus:
- AI (Adobe Illustrator): The native format of Illustrator, or, more precisely, formats. Older versions of AI are basically EPS files that contain some additional features only used by Illustrator. As of Illustrator 9, AI is based on PDF, and, like its predecessor, adds some Illustrator-only information. AI import is still experimental but works very well in most cases. One of the major advantages of the AI import filter (and the EPS filter as well) is that Scribus will load spot colors in AI and EPS files correctly. If PDF-based AI files are opened directly (via File > Open), Scribus will also import AI/PDF layers.
- EPS (Encapsulated PostScript): Probably the most wide-spread graphics format in pre-press and a subset of the PostScript standard. See the section about EPS import for more information.
- PS (PostScript): A page description language created by Adobe Systems and the foundation of almost all modern print workflows. The PDF format is also derived from PostScript. Since PostScript files can contain more than one page, import may not deliver the expected result.
- FIG (Xfig): This is the native format of the UNIX drawing veteran Xfig. While rarely used by designers, it's ubiquitous in scientific environments like universities for technical drawings or diagrams. The format is well-documented, and import into Scribus works flawlessly.
- Scalable Vector Graphics (SVG): An open and widely used standard for two-dimensional vector graphics. See the section about <a href="scribus-svg.html">SVG import</a> for more information.
- SXD (OpenOffice.org Draw 1) and ODG (OpenDocument Graphics): These are the vector file formats used by OpenOffice.org and other Open Source Office Suites. Since "Office Drawing" is quite different from working with a typical vector drawing program, the formats use a lot of features, like automatic connectors, that aren't well-suited for a print workflow. As a result, import will only work with limited success. See Scribus and OpenOffice.org/OpenDocument for possible workarounds.
- WMF (Windows Metafile): A vector format used by many Office Suites and also the Windows clipboard. While WMF files are usually rejected by creative professionals, most collections of "Office Clipart" use this format. The WMF filter has been added to enable users to import these simple vector drawings.
- PICT (Macintosh Picture): The graphics file format used by Mac OS, similar to WMF on Windows. It can contain bitmap or vector data.
- CVG (Calamus Vector Graphic): A simple vector format used by the DTP veteran Calamus. It only supports grayscale colors.
- SHAPE (Dia Shapes) and SML (Kivio Shape): Basic vector shapes used by the diagram programs Dia and Kivio. Grayscale/RGB only.
How it works
Importing vector drawings into Scribus is rather different if compared to most other DTP programs, and it's also an exception to the "frame paradigm" used for almost everything else in Scribus.
When you import a vector drawing via File > Import > Get Vector File, the vector data of the original file will be converted into native Scribus vector objects. The major advantage of this approach is that imported vector graphics remain fully editable in Scribus, which is useful even if you don't intend to use Scribus as a vector editor. For example, the conformance to published specifications like EPS or SVG can vary enormously between programs or different versions of the same program. Importing files as native vector objects allows for easy and quick corrections like closing paths etc. It also enables Scribus to easily change or modify the colors of imported vector graphics (see below).
The Scribus approach to vector import comes at a cost, though, and you need to consider carefully whether you are willing to pay this price or rather export your drawing as a bitmap image and import it into an image frame. First, as you will notice when you try to load a complex vector file, importing can take very long, as Scribus may have to create hundreds or even thousands of Scribus vector objects. Moreover, the creation of that amount of objects also results in an Undo/Redo event for each object. You can speed up import a little bit by disabling Undo/Redo before you import a complex drawing. Likewise, scaling or moving a complex drawing means changing the properties of all objects within this drawing, and if you don't have enough memory on your computer, Scribus may even crash.
A similar problem may be the number of colors in your color list. Since Scribus imports the colors of all objects in a drawing (see below), you may end up with a seemingly endless list of colors. Again, you need to decide whether you need the advantages of this approach.
Finally, every drawing that consists of more than one vector object (i.e., almost every drawing) is imported as a group of objects, and text flow around groups doesn't work. This means you have to draw a separate shape around the drawing to let text flow around it.
Editing imported vector drawings
Working with the built-in vector tools is described in Editing Shapes. But as you will notice after importing a vector drawing, the tools are not availabe immediately, the reason being the import of a drawing as a group of vector objects. Thus, you need to ungroup the graphic first. This can be achieved via the "Ungroup" command in the "Item" menu, the Context Menu of the drawing or by using the shortcut Ctrl+Shift+G:
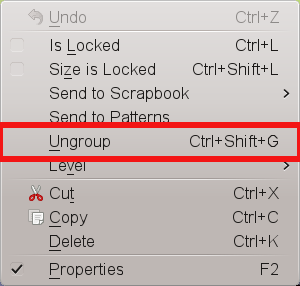 |
The more complex an imported drawing, the more likely the necessity to apply "Ungroup" several times, as the drawing will probably consist of many sub-groups.
The drawback of this approach is that it decomposes the whole drawing, even if you only want to edit a small part of it. If you later want to move or resize the whole graphic, you have to regroup all parts again. Fortunately, Scribus comes with a powerful tool that comes to the rescue in this situation, namely the Document Outline (Windows > Outline). This dialog lists all elements in a Scribus document, sorted per page. Here you can select single parts of the imported group, and if you're lucky, the creator of the drawing assigned meaningful names to the respective elements, although not all programs and file formats provide this feature. Scribus will jump to each selected element and indicate the selection by showing the frame border of the item in red:
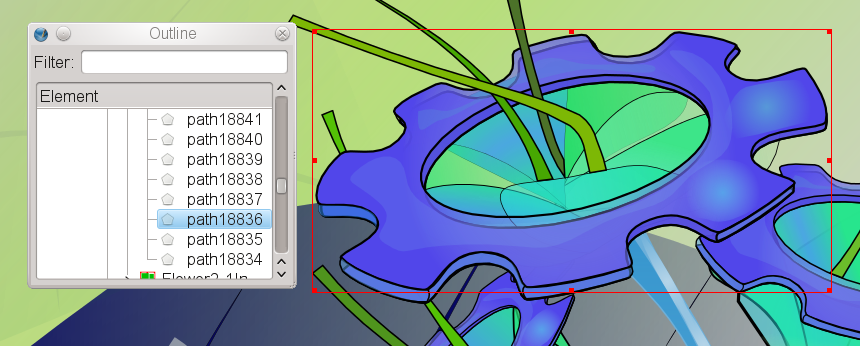 |
You can now use the Context Menu in the Document Outline to detach the selected item from the rest of the group by using the "Ungroup" command. As described above, you may have to use the command several times, depending on how deeply nested the groups in the drawing are. At the end of the process, you can see the item as a separate entry in the Document Outline:
 |
| The item "path13122" has been detached from the group "svg1061", an imported SVG file." |
Solid colors in imported vector drawings
A consequence of the way Scribus imports vector files is that all colors in a drawing will be added the list of available colors. Depending on the complexity of a drawing and the number of imported files, the list can become quite long, and depending on the source format and the used color spaces, the color names may not be very meaningful:
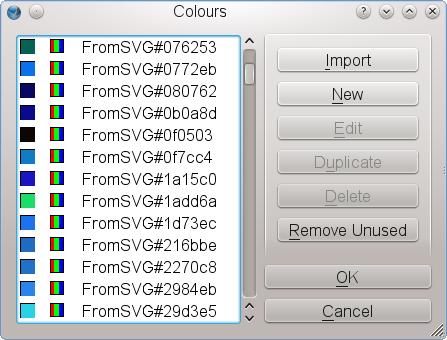 |
This may initially be confusing to some users, but there are ways to make life easier for you. First of all, Scribus does not duplicate colors, i.e., if an imported drawing uses a color whose color values match those of an already existing color, the imported color will be "mapped" to the list of colors. This works even with spot colors. Second, Scribus supports <a href="color1.html">named colors</a>, so if a vector program and the file format can save color names, those will be imported:
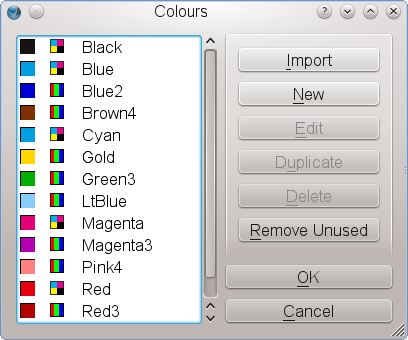 |
| Xfig uses a name for every color, and Scribus will import the named colors. |
If you delete an imported drawing, its colors won't disappear from the color list automatically, as it's difficult to determine whether they have been "mapped" or are being used by other objects. This is not a problem, because after deleting the drawing, you can open the color manager (Edit > Colors) and click "Remove Unused", which will remove all colors that aren't used by any item in your document.
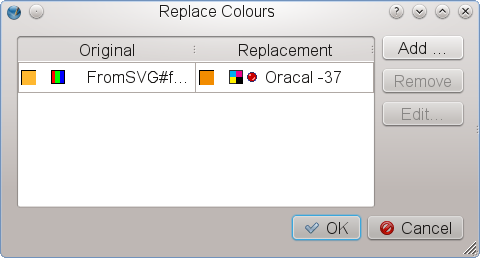
An example for the usefulness of the color import is the "Replace Colors" feature. Imagine you are working with a vector logo that is supposed to appear in different colors in different documents. By using "Replace Colors", you can work with one single source file. Import the logo into your document and replace one or more logo colors just as your specific document requires. And speaking of logos: These are often required to use a spot color. If you created or edited the logo in a program that doesn't support spot colors, you can load the graphic into Scribus and use "Replace Colors" to replace a CMYK or RGB color with a spot color:
 |
| This material may be distributed only subject to the terms and conditions set forth in the Open Publication License, v1.0 or later. Distribution of the work or derivative of the work in any standard (paper) book form is prohibited unless prior permission is obtained from the copyright holder. A copy of the license is included in the section entitled "Text of the Open Publication License." |