Get Started With Scribus:9
Get Started With Scribus 2006
| ||||||||
Chapter 9
|
- What Can You Do With Scribus
- Scribus And Its Sisters
- Empty, White Spaces
- Cover Page
- Working With Layers On A Page
- Design Multiple Pages
- Create Final Page Layouts
- Design With Graphics And
Freedom - Set Fire With SVG Graphics
- Publishing Demands Freedom.PDF.
- Travel At The Speed Of Scribus
- Contributors
- GNU Free Documentation Licence
Set Fire With SVG Graphics
Graphics R US
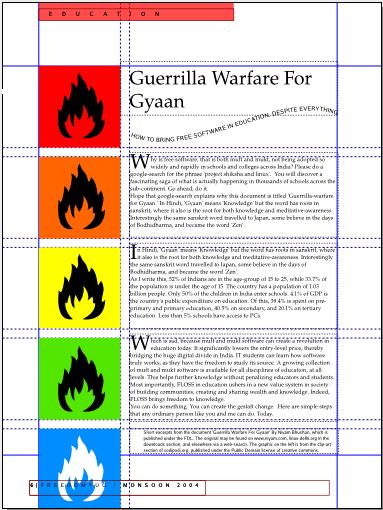
The flame logo is a special type of graphic, called a 'Scalable Vector Graphics' or SVG for short. It can be enlarged to any size without loss of quality, and even the shape of the flame can be edited in Scribus. Yes, even the colors are imported from the image into the Colors palette of Scribus, and colors from within Scribus can be applied to the image, as has been done here to multiple copies of this graphic. Note how the text is set on a curve created within Scribus, and the automatic drop-caps to the text column.
IgniteStart with a new Template, call it 'GyaanL'. Copy and paste the red band, text, and page folio and page number from another left-page template. Change the text to 'Education' in all-caps. In Page > Manage Guides, add two vertical guides at 65mm and 70mm. Lock them, and close the templates palette. Add another page using this template, in the Page palette. Or you could use Page > Insert... menu. From Flame to FlameYou don't need a Picture frame to place an SVG, you can do it directly. Go to File > Import... > Import Svg-Image. Navigate to the 'Images' folder of FYug, and select the 'Highly-Inflammable.svg' image to import. A huge graphic fills the page. Just select it, and in Properties, give it the height and width of 45 mm. Position this graphic to the top-left margin of the page. Check Edit > Colors... and you will find the orange color in the image has been marked and imported into the Colors palette. ColorizeSelect both the frame and the orange box, go to Item > Group. Then copy and paste it right underneath the first one. In the Properties palette, type '+5mm' at the end of the Y position, to automatically move it down by 5 mm. Thus, copy and paste until you have five copies of the graphic on the page, with a 5mm gap between each one vertically. Select each graphic, ungroup it, select the background color, and change the color of each in the Properties palette. |

|
Dragged Guides
From the horizontal rulers just below the taskbar and above the page, click and drag a horizontal guide to the bottom of each box. Toggle 'View Guides' so in the View menu, so you can see the guide. Finally, draw text frames to the height of each graphic in the column on the right, and type in the text. Define a Paragraph style that has a drop-cap of two lines, and apply that style to each text frame.
Page Number on Top
Did you note the problem of the last graphic overlapping the page number and the page folio text? Go back to the Templates palette, copy the page folio text frame that contains the page number. Close the Templates palette, go back to your page, and just paste it on top. The page number comes in automatically to this text. Draw a white box above the original page folio. Place the flame graphic above this, and finally paste the new folio text frame above this. You can use the up and down arrows in the Properties palette to change the stacking order of overlapping objects. Do ensure that the page folio you paste, is into the top-most layer of your page. Counter-check in the Layers palette.
Text on Path
The text on the curve is pretty easy. Write the text in a text frame. Draw a curve using the 'Insert lines' tool. Use the tool that has a pencil with a line shaped like an 'S' around it. To draw the curve, just click once at the starting point of the curve, and drag briefly to the top-right. Then release the button, click at the end position of the curve, and drag briefly to the bottom-left. Once you are satisfied with the curve shape, just right-click the mouse and your curve is done. Select both the text frame and the curve, and select Item > Attach Text to Path. The text will follow the curve. You can play with alignment and other settings in the Properties palette. Rotate the whole curve slightly for a better fit.